YouTube Video Editing Essentials
Introduction to Video Editing
Your Editing Workspace
Opening video editing software for the first time can feel like stepping into a cockpit. There are panels, buttons, and timelines everywhere. But most editors, from free apps to professional suites, share a similar layout. Let's break down the three key areas you'll work with.
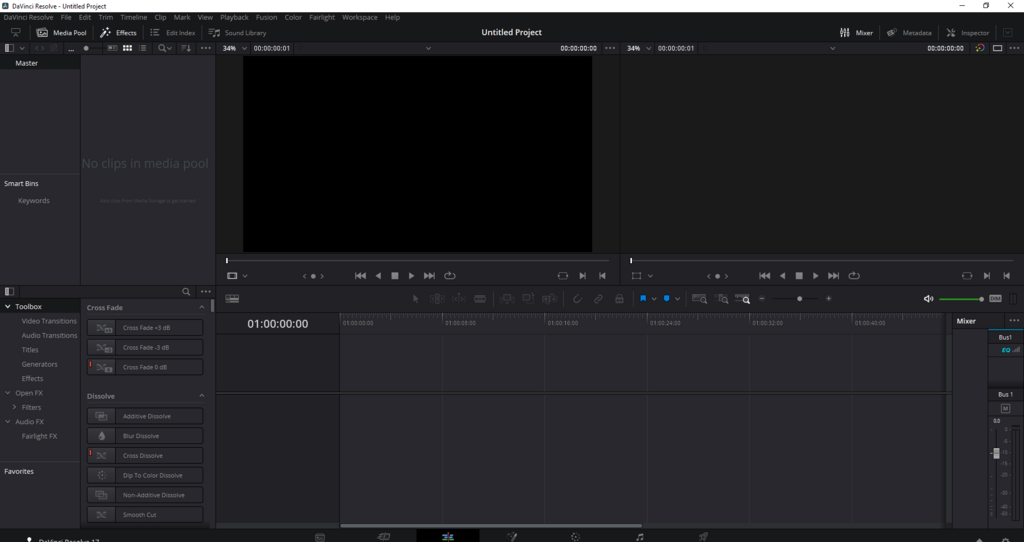
First is the Project Panel or Media Bin. This is your digital filing cabinet. It's where you'll import and organize all the building blocks of your video: video clips, audio files, images, and graphics.
Next, you'll see a Preview Monitor (sometimes called the Viewer). This is your screen. It lets you watch your raw footage before you use it and view your edited sequence as you build it.
Finally, and most importantly, is the Timeline. This is the heart of your workspace. It's a visual representation of your video from start to finish. Here, you'll arrange clips in sequence, trim them to the perfect length, and layer in audio and titles.
Think of it this way: The Project Panel holds your ingredients, the Timeline is where you assemble the recipe, and the Preview Monitor shows you what you're cooking.
Import and Organize
Before you can start editing, you need to bring your footage into the software. This process is called importing. You'll typically find an "Import" button under the "File" menu, or you can often just drag and drop files from your computer directly into the Project Panel.
Once your files are imported, don't just leave them in a messy pile. Good organization is a habit that will save you countless headaches. Most software allows you to create folders, usually called "bins," inside your Project Panel. Create bins for different types of media, like "Video," "Audio," "Music," and "Graphics." It makes finding what you need quick and easy, especially as your projects grow larger.
Learn to use the timeline where you can arrange and edit your clips.
Formats and Resolutions
Not all video files are created equal. You'll encounter different formats and resolutions, and it's helpful to know the basics.
A video format is like a container for your video and audio data. Common formats include .MP4, .MOV, and .AVI. For sharing online, .MP4 is the universal standard. It offers good quality with a relatively small file size, making it perfect for platforms like YouTube and Instagram.
Resolution refers to the number of pixels that make up the image, determining its clarity and sharpness. It's expressed as width by height. For example, 1920x1080, also known as Full HD, is a very common resolution. 4K, or 3840x2160, offers four times the detail of HD.
| Resolution Name | Pixel Dimensions | Common Use |
|---|---|---|
| Standard Definition (SD) | 720x480 | Older TVs |
| High Definition (HD) | 1280x720 | Basic HD video |
| Full High Definition (Full HD) | 1920x1080 | YouTube, Blu-ray |
| Ultra High Definition (4K UHD) | 3840x2160 | Modern TVs, streaming |
When you start a new project, your software will ask you to set a resolution. It's best to match this to the resolution of your source footage to maintain the highest quality.
What is the primary function of the Timeline in video editing software?
Which video format is described as the universal standard for online sharing because it offers good quality with a relatively small file size?
With these fundamentals, you're ready to start arranging your clips and telling your story.