Web3.js vs Ethers.js Deep Dive
Introduction to Ethereum Development
Building on Ethereum
You've likely heard of Ethereum as a cryptocurrency, but it's much more than digital money. Think of it as a global, shared computer that anyone can use. Instead of running on a single server owned by a company, it runs on thousands of computers worldwide. This structure makes it decentralized and transparent.
Applications built on this shared computer are called decentralized apps, or dApps. They aren't controlled by any single entity. This opens up new possibilities for everything from finance to gaming, all running on a transparent and censorship-resistant network.
Talking to the Blockchain
So, how does a regular web application, like a website you open in your browser, communicate with the Ethereum network? It can't do it directly. Your app needs a special tool to act as a bridge, translating your requests into a language the blockchain understands.
This is where JavaScript libraries come in. For Ethereum development, the two most popular libraries are Web3.js and Ethers.js. They are like translators that allow your front-end application to connect to an Ethereum node, read data from the blockchain, and ask users to approve transactions.
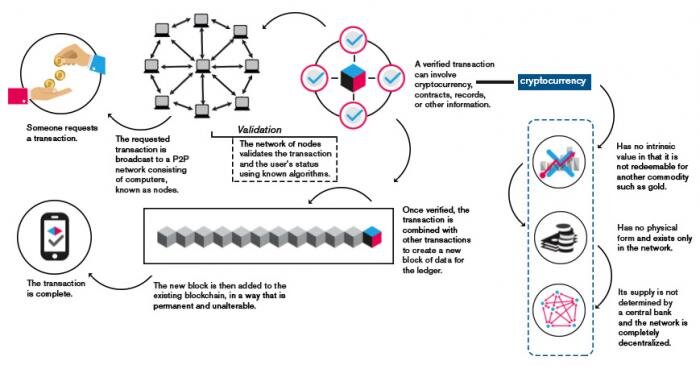
Both libraries serve the same core purpose, but they have different designs. We'll focus on the fundamental tasks you can accomplish with them, which are the building blocks for any dApp.
Core Functions
Regardless of which library you choose, you'll perform three main types of tasks: connecting to the blockchain, reading its state, and writing new transactions.
First, you need to establish a connection. Your application doesn't connect to the entire network at once. Instead, it connects to a single computer, called a node, that is part of the network. You can run your own node, but most developers use a service like Infura or Alchemy that provides a reliable connection point.
// Using Ethers.js to connect to the Ethereum network
// We import the library first
import { ethers } from "ethers";

// Then, we create a 'provider' to connect to a node.
// This example uses a public, read-only connection.
const provider = new ethers.JsonRpcProvider("https://mainnet.infura.io/v3/YOUR_INFURA_ID");

console.log("Connected to Ethereum!");
Once connected, you can read data. This is a free operation that doesn't cost any gas (the fee for transactions on Ethereum). You can check the balance of an account, read data from a smart contract, or look up the latest block number. It’s like looking up information in a public database.
// Using our provider to get the ETH balance of an address
async function getBalance() {
  const address = "0x742d35Cc6634C0532925a3b844Bc454e4438f44e";
  const balance = await provider.getBalance(address);

  // The balance is returned in Wei (the smallest unit of ETH),
  // so we format it to be readable in ETH.
  const formattedBalance = ethers.formatEther(balance);
  console.log(`Balance: ${formattedBalance} ETH`);
}

getBalance();
The final step is writing to the blockchain. This is called sending a transaction. Any action that changes the state of the network, like sending ETH to another account or executing a function in a smart contract, requires a transaction. These actions must be signed by a user with their private key (usually through a wallet like MetaMask) and require a gas fee.
In short, libraries like Web3.js and Ethers.js help your app do three things: connect to a node, read blockchain data, and send transactions to update the blockchain.
These are the fundamental interactions every dApp needs to perform. With just these three capabilities, you can build applications that allow users to interact with the decentralized web. Now, let's test your understanding of these concepts.
What is the primary concept of Ethereum, as described in the text?
What is the main purpose of JavaScript libraries like Ethers.js and Web3.js in Ethereum development?