Video Shooting Essentials
Camera Basics
The Camera's Core Parts
A video camera might seem complicated, but it breaks down into a few key parts that work together to capture an image. Think of it like a high-tech eye.
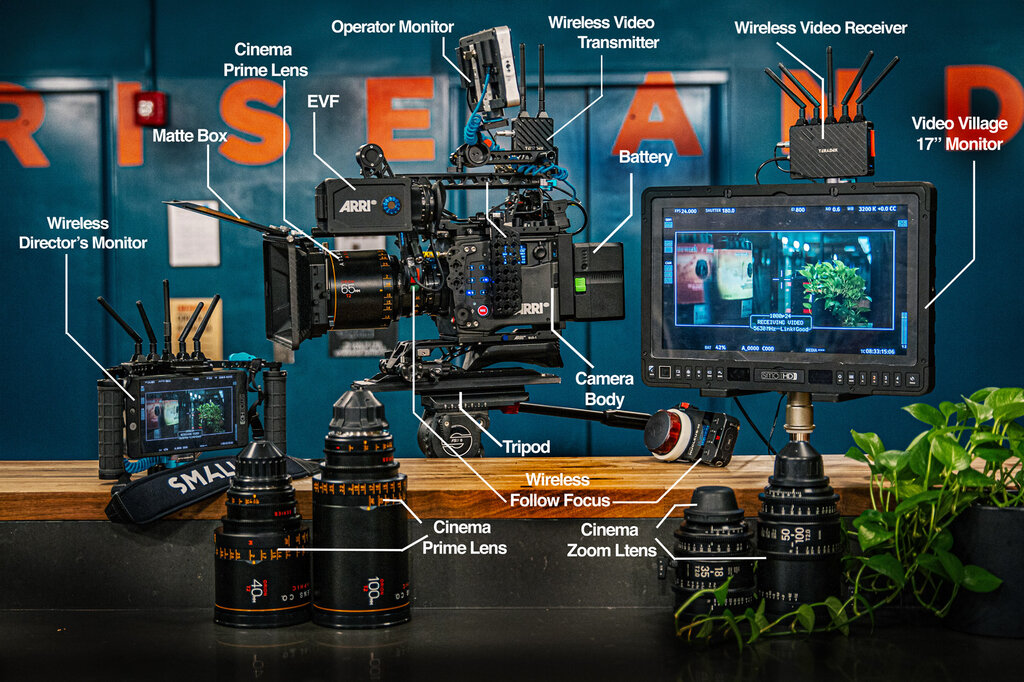
The Lens is the camera's actual eye. It's a series of curved glass pieces that gather light from a scene and focus it precisely onto the sensor. Different lenses can give you wide, sweeping views or zoom in on distant details.
The Image Sensor is the digital equivalent of film. It's a small, light-sensitive chip that converts the light focused by the lens into an electronic signal. This signal becomes your video file. The quality of the sensor plays a big role in how clean and detailed your final image looks.
The Body houses all the electronics, including the sensor, processor, and memory card slot. It's also covered in buttons, dials, and menus that let you take control. These controls are your direct link to adjusting how the camera captures the image.
Finally, the Viewfinder and Monitor are your windows into what the camera sees. The viewfinder is the small eyepiece you look through, while the monitor is the larger screen on the side or back. Both show you a live feed from the sensor, helping you frame your shot perfectly.
Controlling Light
Getting a good video is all about controlling light. A picture that’s too bright is "overexposed," and one that’s too dark is "underexposed." You balance the light using three core settings: aperture, shutter speed, and ISO. They're often called the "exposure triangle" because changing one affects the others.
Mastering aperture, shutter speed, and ISO is the key to moving beyond automatic settings and taking creative control of your camera.
Let's break them down.
Aperture
noun
The adjustable opening inside the lens that controls the amount of light reaching the sensor.
Aperture works just like the pupil of your eye. In a dark room, your pupil widens to let in more light. In bright sun, it shrinks. The aperture does the same thing with a set of overlapping blades inside the lens.
Aperture is measured in "f-stops," like , , or . Here's the tricky part: a smaller f-stop number means a wider opening, which lets in more light. A larger f-stop number means a smaller opening, letting in less light.
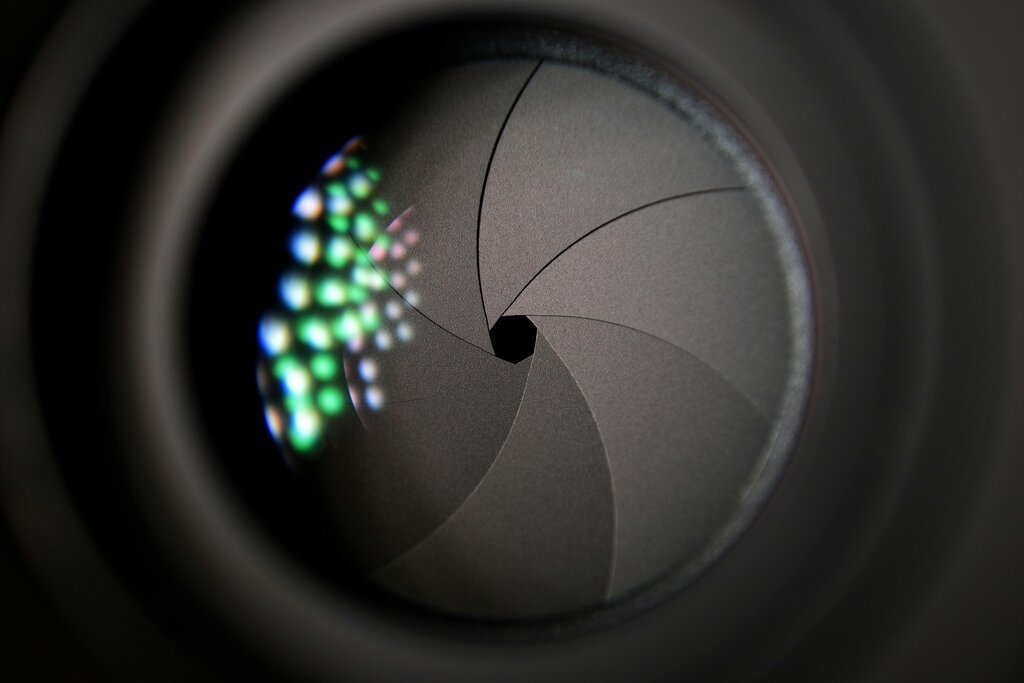
Beyond brightness, aperture also controls depth of field. This is how much of your scene is in sharp focus. A wide aperture (small f-stop, like ) creates a shallow depth of field, where your subject is sharp but the background is blurry. A narrow aperture (large f-stop, like ) creates a deep depth of field, keeping everything from the foreground to the background in focus.
Shutter Speed determines how long the sensor is exposed to light. It's measured in fractions of a second, like or . A slower shutter speed () leaves the sensor exposed for longer, capturing more light and creating motion blur. This can make movement look smooth and cinematic. A faster shutter speed () freezes the sensor for a split second, letting in less light but capturing crisp, sharp images of fast action.
For standard video, a good rule of thumb is to set your shutter speed to double your frame rate. If you're shooting at 24 frames per second, a shutter speed of $1/48$ (or the closest setting, $1/50$) will produce natural-looking motion blur.
ISO digitally brightens your image. Think of it as an artificial light boost. A low ISO (like 100 or 200) is used in bright conditions and produces a very clean, high-quality image. As the scene gets darker, you can increase the ISO (to 800, 1600, or higher) to make the image brighter.
The trade-off is that high ISO settings introduce digital "noise" or "grain," which can make your video look grainy or speckled. The goal is always to use the lowest ISO possible for the lighting you have.
Getting the Colors Right
Have you ever taken a photo indoors and noticed it has a weird yellow or orange tint? That's a white balance issue. Different light sources have different color temperatures. Sunlight is cool and bluish, while a standard light bulb is warm and yellowish.
Your brain automatically adjusts for these color shifts, but a camera needs to be told what "white" should look like in a given scene. This process is called white balance. Most cameras have presets for different lighting conditions like "Daylight," "Cloudy," or "Tungsten" (for indoor bulbs). You can also set a custom white balance by pointing your camera at something that is pure white, which tells it how to calibrate the colors for that specific environment.
Getting your white balance right ensures that colors look natural and accurate, just as you see them with your own eyes.
Let's review what you've learned about camera basics.
Which part of the camera is the digital equivalent of film, responsible for converting light into an electronic signal?
You want to film a portrait where the person is in sharp focus but the background is blurry. Which aperture setting would best achieve this effect?
Understanding these core components and settings is the first major step toward shooting great video. It gives you the foundation to make deliberate, creative choices instead of just pointing and shooting.