Solidworks Fundamentals to Intermediate Proficiency
User Interface
The SolidWorks Workspace
Opening SolidWorks for the first time is like stepping into a digital workshop. At first, all the tools and panels can seem overwhelming, but they're organized logically to help you build your designs. Let's break down the main areas you'll be working with.
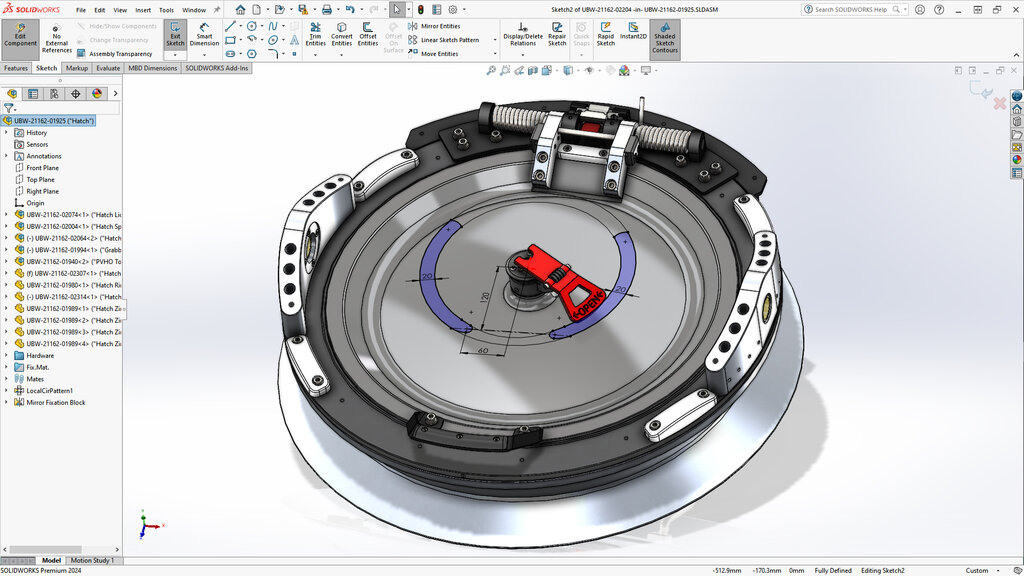
The largest part of your screen is the Graphics Area. This is your workbench, where you'll see your 3D models come to life. To the left is the FeatureManager Design Tree, which is like a recipe for your part. It lists every sketch, extrusion, and feature you create, in the order you create them.
At the top, you'll find the Menu Bar and the CommandManager. Think of these as your tool chests. The Menu Bar contains all possible commands, while the CommandManager organizes the most common tools into convenient tabs.
Your Toolkit
The CommandManager is where you'll spend most of your time. It uses tabs to group tools by function. When you're drawing a 2D profile, you'll use the 'Sketch' tab. When you're turning that sketch into a 3D shape, you'll switch to the 'Features' tab. This keeps your workspace tidy and shows you only the tools you need for the current task.
For less common commands, you can always go to the Menu Bar at the very top (File, Edit, View, etc.). It’s a complete directory of everything SolidWorks can do. Another powerful shortcut is right-clicking. Depending on what you click on—a face, an edge, or an item in the FeatureManager—a context-sensitive menu will pop up with relevant tools.
Right-clicking is your best friend in SolidWorks. It often provides the exact tool you need, right where you need it.
Navigating Your Model
Viewing your model from different angles is essential. SolidWorks uses your mouse to make this feel natural. You can zoom in to see details, pan to move the model around, and rotate to see it from every side. Mastering these three actions is the first step to working efficiently.
| Action | How to Do It |
|---|---|
| Zoom | Scroll the middle mouse wheel forward or backward. |
| Pan | Hold down the Ctrl key and the middle mouse button, then move the mouse. |
| Rotate | Hold down the middle mouse button, then move the mouse. |
For standard views like Top, Front, or Isometric, you can use the View Orientation window. Pressing the spacebar is a quick way to bring this up. It gives you a cube of selectable faces, allowing you to snap your model to a precise orientation instantly.
Make It Your Own
Just like arranging a physical workbench, you can customize the SolidWorks interface to fit your workflow. If you find yourself constantly using a specific tool, you can add it to a toolbar or the CommandManager. Don't use certain tools? You can hide them to reduce clutter.
To start customizing, right-click on the CommandManager and select 'Customize'. From here, you can drag and drop commands onto toolbars, add or remove tabs, and even create your own custom toolbars. A well-organized workspace means less time searching for tools and more time designing.
Now that you're familiar with the layout, let's test your knowledge.
What is the primary area of the SolidWorks interface where your 3D model is displayed and manipulated?
Which component of the interface lists every feature, sketch, and operation you create in chronological order?
With a good grasp of the interface, you're ready to start creating your first models.