Scratch Programming for 7th Graders
Introduction to Scratch
Welcome to Scratch
Scratch is a creative programming environment where you can build your own interactive stories, games, and animations. Instead of typing complex code, you snap together colorful blocks, much like building with LEGOs. This visual approach makes it easy to get started and see your ideas come to life quickly.
To create programs in Scratch, you simply drag and drop colored puzzle-piece blocks of code written in simple language, snap them together, then change the variables:
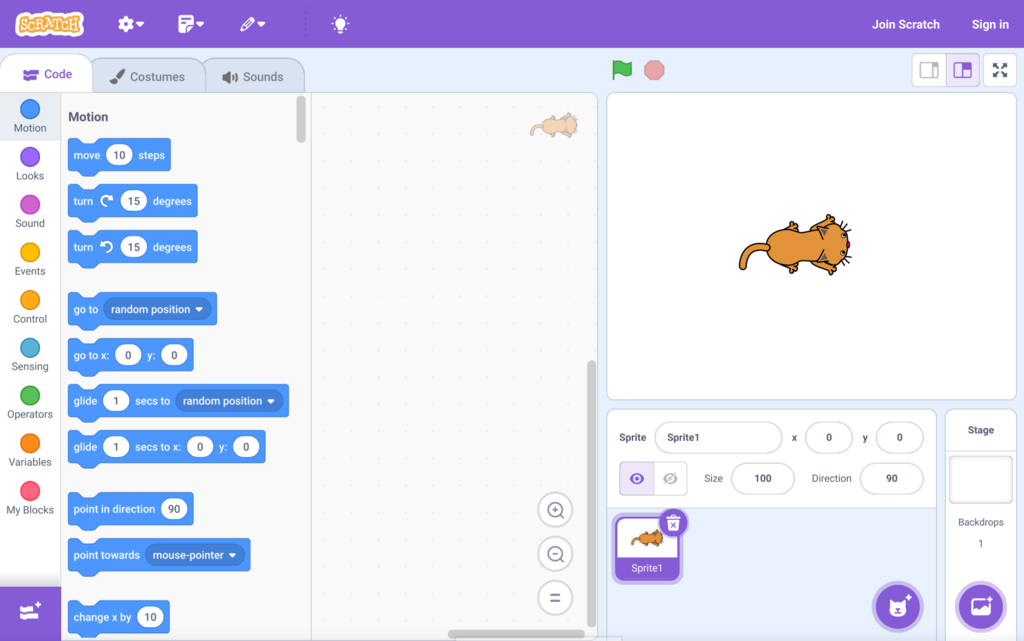
When you first open a new project, you'll see the main Scratch interface. It’s your digital playground, and every part has a purpose.
Exploring the Interface
The Scratch interface is organized into a few key areas. Understanding what each one does is the first step to building your projects.
To the right, you'll find the Stage. This is where your creation comes alive. It's the performance area for your characters, called Sprites. By default, your first sprite is the Scratch Cat.
Below the Stage is the Sprite Pane. Here, you can add new sprites, choose backdrops for your stage, and adjust properties like a sprite's size and direction.
On the far left is the Block Palette. This is your toolbox. It holds all the code blocks, neatly organized into categories by color and function.
The large empty space in the middle is your Scripting Area. You'll drag blocks from the palette and snap them together here to build scripts. A script is simply a set of instructions that tells a sprite what to do.
Understanding the Blocks
The blocks in the palette are color-coded to help you find what you need. Each category has a specific purpose. You don't need to memorize them all at once, but it's helpful to know what the main categories do.
| Category | Color | Purpose |
|---|---|---|
| Motion | Blue | Moves sprites around the stage. |
| Looks | Purple | Changes a sprite's appearance, costume, or makes it talk. |
| Sound | Magenta | Adds sounds and music. |
| Events | Yellow | Starts scripts, often based on an action like clicking the green flag. |
| Control | Orange | Manages the flow of your script with loops and conditions. |
| Sensing | Light Blue | Detects things like mouse position or keyboard presses. |
| Operators | Green | Performs math, logic, and works with text. |
| Variables | Dark Orange | Stores information like a score or a name. |
The shape of the blocks matters, too. Blocks with a bump on top, like the yellow "Events" blocks, are designed to start a script. Blocks with a notch on top and a bump on the bottom are stackable commands. They snap together in order to be executed.
Your First Project
Let's create a very simple project to see how it all works. We'll make the Scratch Cat say "Hello, World!" when we click the green flag.
- Find the Event Block: Go to the yellow Events category in the Block Palette. Find the block that says
when green flag clickedand drag it into the Scripting Area. - Find the Looks Block: Now, go to the purple Looks category. Find the
say Hello! for 2 secondsblock and drag it over to your Scripting Area. As you bring it close to the first block, you'll see a gray shadow appear. This means they are ready to connect. - Snap Them Together: Release the mouse button. The two blocks should snap together, forming a short script.
That's it! You've just written a program.
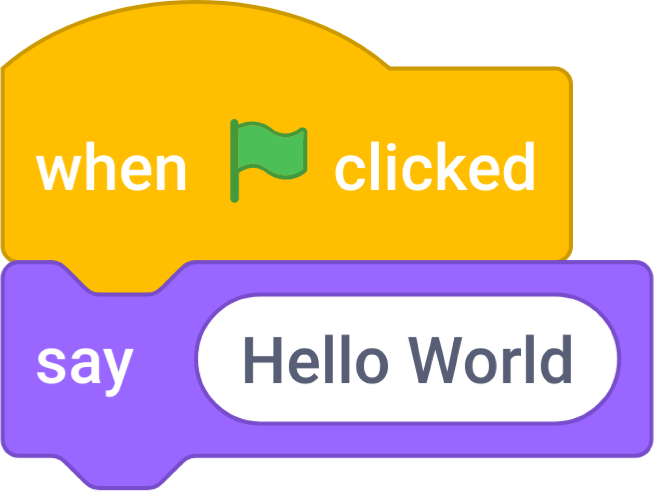
To run your project, click the green flag icon located just above the Stage. You should see the Scratch Cat display a speech bubble that says "Hello!". To stop the project, click the red stop sign next to the flag.
Finally, to save your work, give your project a name in the text box at the top of the screen and click the "File" menu, then select "Save now."
Congratulations on building your first Scratch project! You've learned how to navigate the interface, understand the basic block types, and bring a sprite to life with a simple script.