Practical Docker Mastery and Container Orchestration
Docker Architecture Deep-Dive
The Docker Engine's Architecture
At its core, Docker operates on a client-server model. You interact with the Docker client, which is the command-line interface (CLI) you've been using. This client doesn't actually build images or run containers itself. Instead, it sends instructions to a background service called the Docker daemon, or dockerd.
The daemon is the workhorse. It listens for API requests from the client and manages all the Docker objects: images, containers, networks, and volumes. When you type docker run, the client sends a request to the daemon's REST API. The daemon then checks if it has the requested image locally. If not, it pulls the image from a configured Docker registry, like Docker Hub. Finally, it creates and runs a new container from that image.
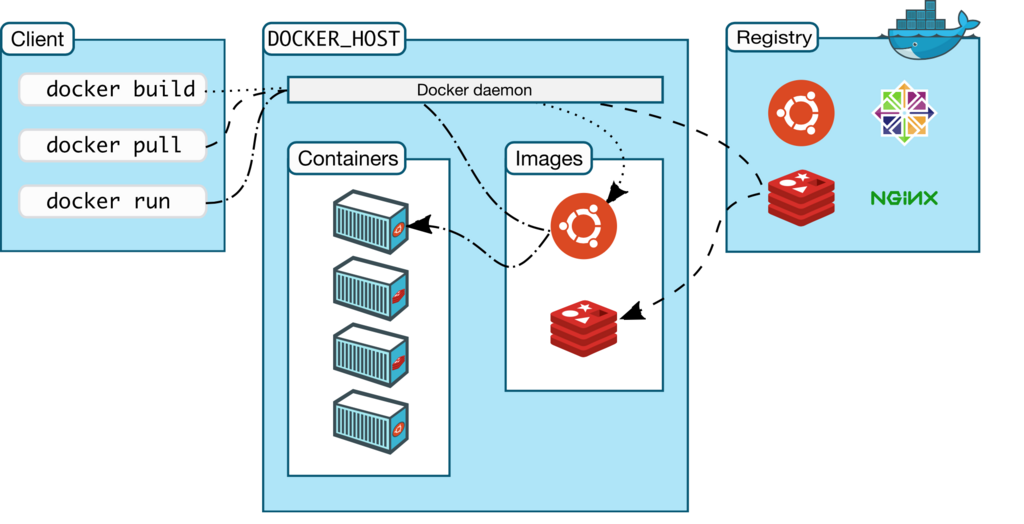
This separation is powerful. It means your Docker client can be on your local machine, while the daemon runs on a remote server, a virtual machine, or in the cloud. All communication happens securely over the network via the API.
How Isolation Actually Works
Containers feel like lightweight virtual machines, but they aren't. They are simply isolated processes running on the host machine's kernel. This isolation is achieved using two powerful features built directly into the Linux kernel: namespaces and control groups (cgroups).
Namespaces are what provide the isolation for a container's view of the system. Each container gets its own set of namespaces, completely separate from the host and other containers. This means a process inside a container can have a Process ID (PID) of 1, its own private network interface, and its own filesystem mounts, without conflicting with anything outside of it.
Common namespaces used by Docker include:
pid: Process ID isolation.net: Manages network interfaces.mnt: Manages filesystem mount points.ipc: Manages access to IPC resources.uts: Isolates kernel and version identifiers.user: Isolates user and group IDs.
While namespaces handle isolation, control groups, or cgroups, manage resource allocation. A cgroup limits how much of a system resource, like CPU or memory, a process (or a group of processes) can use. When you run a container, Docker creates a cgroup for it, ensuring it can't consume all the host's resources and impact other containers or the host itself.
Lightweight Images Explained
The other piece of the puzzle is how Docker images are so small and efficient. This is thanks to a technology called a Union File System, like OverlayFS.
A Docker image isn't one big monolithic file. It's a collection of read-only layers stacked on top of each other. Each layer represents a set of filesystem changes. For example, a base Ubuntu image might have several layers. When you create your own image using a Dockerfile, each instruction (like RUN, COPY, ADD) creates a new layer on top of the previous one.
When you run a container, Docker takes all the read-only layers from the image and adds a single, thin, writable layer on top. This is the container layer. If you modify a file inside the container, Docker uses a copy-on-write (CoW) strategy. It copies the file from the underlying read-only layer up to the writable container layer and then applies your changes. The original file in the image remains untouched.
This is incredibly efficient. Multiple containers can share the same underlying image layers, saving immense disk space. The only data that is unique to each container is what's in its thin writable layer.
Bringing It All Together
Let's trace the lifecycle of a docker run command to see how these components interact at a high level:
- Client to Daemon: You execute
docker run -it ubuntu bash. The Docker client parses this command and sends a structured API request to the Docker daemon. - Image Check: The daemon receives the request. It checks its local storage for an image named
ubuntuwith thelatesttag. - Registry Pull: If the image isn't found, the daemon contacts a configured registry (Docker Hub by default). It authenticates, finds the
ubuntuimage, and pulls its layers down to the host machine. - Container Creation: The daemon creates the container. It sets up the required namespaces (PID, network, etc.) and cgroups to isolate the process and limit its resources.
- Filesystem Mount: It stacks the read-only layers of the
ubuntuimage and creates a new writable layer on top for the container. - Network Configuration: The daemon connects the container's network namespace to a network (like the default bridge network), assigning it an IP address.
- Process Execution: Finally, the daemon executes the specified command (
bash) as PID 1 inside the container's new namespaces.
From that point on, the bash process runs, fully isolated, believing it's on its own fresh Ubuntu machine, unaware of the host OS or other containers around it.
Understanding this architecture is key to troubleshooting effectively. When a container can't connect to the network, you know to investigate the net namespace and Docker's network configuration. If an application is slow, you can check the cgroup limits. This knowledge transforms you from a user who runs commands to an administrator who can manage and debug containerized environments.