Photoshop Essentials for Image Editing
Photoshop Interface
Getting Around Photoshop
Opening Photoshop for the first time can feel like stepping into a cockpit. There are buttons, menus, and panels everywhere. But once you know what the main controls do, it all starts to make sense. Think of it as an artist's digital studio. Everything you need is organized and within reach.
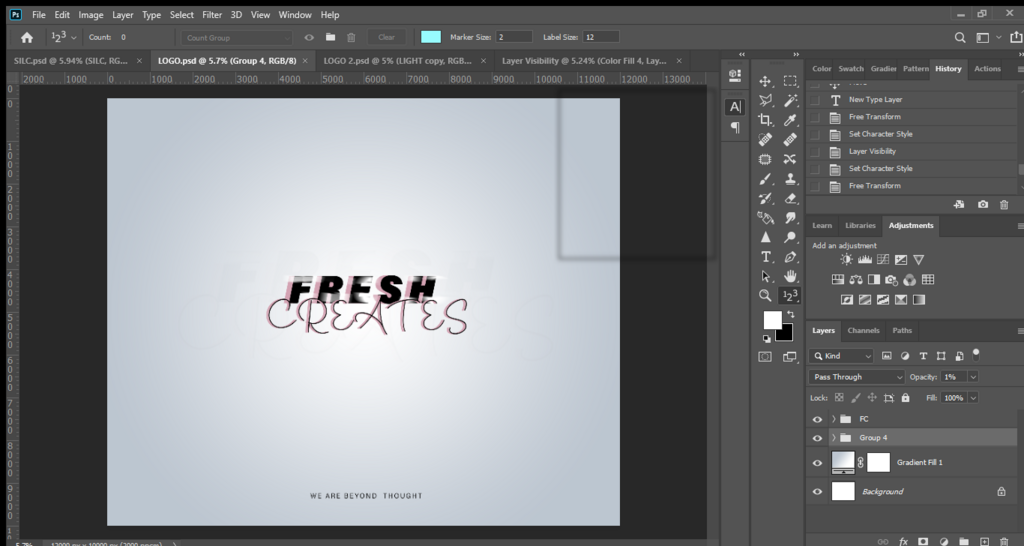
The Photoshop interface has four main parts you'll use constantly.
-
Document Window: This is the large area in the center where your image appears. It's your canvas. All your editing happens right here.
-
Tools Panel: Usually docked on the left side, this is your toolbox. It holds all the tools for drawing, painting, selecting, and editing your image. You'll see icons for brushes, erasers, and text tools, among others.
-
Menu Bar: At the very top of the screen (or the application window on Windows), you'll find familiar menus like
File,Edit, andImage. This is where you'll find commands for opening files, saving your work, and making broad adjustments. -
Options Bar: Located just below the Menu Bar, this bar is dynamic. It changes to show the specific settings for the tool you've currently selected from the Tools Panel. If you select the Brush Tool, the Options Bar will show settings for brush size and hardness. If you select the Text Tool, it will show font and color options.
The Options Bar is your best friend. Always glance at it after picking a new tool to see what you can adjust.
Your First Steps
Let's get an image into the workspace. The most direct way is through the Menu Bar. Go to File > Open... and then navigate to the image file on your computer. Select it and click Open. Your image will now appear in the Document Window.
Once you've made some changes, you'll want to save your work. You have two main options under the File menu:
- Save: This updates the current file with your changes. If you're working on a
.psdfile, it saves all your editable Photoshop data. - Save As...: This lets you save a new copy of the file. You can give it a new name or, importantly, save it in a different format. To share your image online, you'll want to use
Save As...to create a JPEG or PNG version.
Make It Your Own
Photoshop's workspace is not set in stone. You can move panels around to create a layout that works best for you. The panels on the right, like Layers and Color, can be dragged by their top tabs to new locations. You can dock them to the sides of the screen, group them together, or let them float freely.
If you ever lose a panel or want to open a new one, just go to the Window menu in the Menu Bar. Every available panel is listed there. Clicking a panel's name will toggle its visibility.
For example, if you accidentally close your Tools Panel, you can bring it back by going to
Window > Tools.
Photoshop also has pre-built layouts called workspaces. You can find them under Window > Workspace. There are default workspaces tailored for different tasks like Photography, Painting, and Graphic and Web. Experiment with these to see which one you like. You can even save your own custom layout as a new workspace.
In the Photoshop interface, what is the large central area where your image appears and you perform edits?
You've just selected the Brush Tool. Where would you look to adjust its size and hardness?