Photoshop Essentials
Photoshop Interface
Finding Your Way Around
Opening Photoshop for the first time can feel like stepping into the cockpit of an airplane. There are buttons, menus, and panels everywhere. But once you know what the main controls do, it becomes much less intimidating. Let's break down the main parts of the workspace.
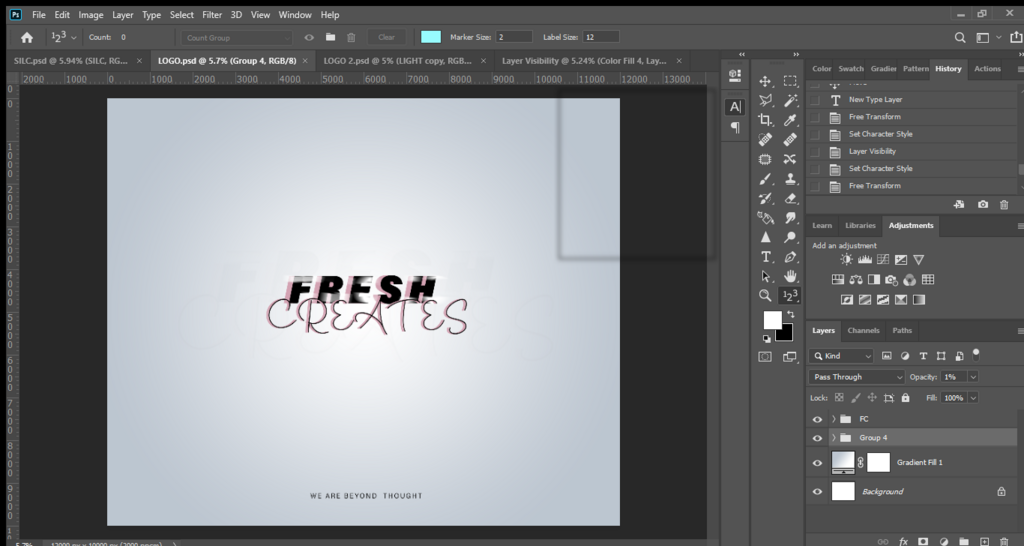
The main area in the center is the Document Window. This is where your image or design lives. It's your canvas.
At the very top of the screen, you'll find the Menu Bar (File, Edit, Image, etc.). This works like the menu in any other software, containing commands and options for your entire project.
Just below the Menu Bar is the Options Bar. This one is clever. Its contents change depending on which tool you have selected. If you pick the Brush tool, you'll see options for brush size and hardness. If you select the Type tool, you'll see font and text alignment options.
On the left side is the Tools Panel. This is your toolbox, holding everything from selection tools and brushes to the eraser and color picker. You'll likely use this panel more than any other.
Essential Panels
On the right side of the screen are several collapsible windows called panels. These give you fine-tuned control over your work. While there are many, let's focus on three crucial ones you'll use constantly.
You can customize your workspace by clicking and dragging panels. Don't like where the Layers panel is? Move it! You can stack them, dock them side-by-side, or pull them out to float freely. Once you have a setup you like, go to Window > Workspace > New Workspace to save it.
First is the Layers Panel. Think of layers as transparent sheets stacked on top of each other. You can draw on one layer without affecting the others. This is one of Photoshop's most powerful features. It lets you edit different parts of your image independently, keeping your work flexible and non-destructive.
Layers are one of those fundamental concepts in Photoshop that you'll need to get your head around.
Next is the Adjustments Panel. This panel allows you to apply color and tonal adjustments to your image without permanently changing the original pixels. Want to make your photo brighter or change its color balance? You'll do it here. Each adjustment creates its own special layer in the Layers panel, so you can always go back and tweak it later.
Finally, there's the History Panel. This panel is your safety net. It records every step you take, from painting a brush stroke to resizing the canvas. If you make a mistake, you can simply click on a previous state in the History panel to undo it. It’s like a time machine for your edits.
Which part of the Photoshop workspace changes its contents to show settings for the currently selected tool?
The concept of editing different parts of an image on separate, transparent sheets that can be stacked is handled by which panel?
Getting comfortable with these core elements will make every future task in Photoshop much easier.