Microsoft Excel Essentials
Excel Basics
Getting Around Excel
When you first open Excel, you're looking at a workbook. Think of it as a digital notebook. This notebook is made up of individual pages called worksheets, or just sheets. You can see tabs for these sheets at the bottom-left, usually starting with 'Sheet1'.
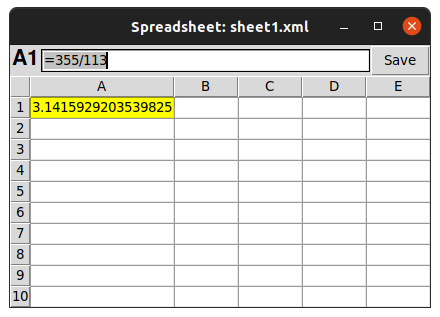
The main area is a grid of columns and rows. Columns are labeled with letters (A, B, C...) across the top, and rows are labeled with numbers (1, 2, 3...) down the side. The box where a column and row intersect is called a cell. Each cell has a unique address, or reference, based on its column and row. For example, the cell in the top-left corner is A1.
Above the grid is the formula bar. This bar shows you the actual content of the selected cell, whether it's text, a number, or a formula. This is also a handy place to edit a cell's contents.
At the very top, you'll find the ribbon. It’s organized into tabs like 'Home', 'Insert', and 'Page Layout'. Each tab contains groups of related tools and commands you'll use to work with your data.
Entering and Editing Data
Putting data into a worksheet is straightforward. Just click on a cell to select it and start typing. When you're done, press Enter to move to the cell below, or Tab to move to the cell to the right. You can enter text, numbers, dates, or times.
Made a mistake? No problem. To change what's in a cell, you have a couple of options. You can click the cell once and retype everything. Or, for smaller changes, you can either double-click the cell to edit it directly, or click it once and make your edits in the formula bar.
A quick tip: Use the arrow keys on your keyboard to easily move from one cell to another without using the mouse.
Making Your Data Readable
Raw data can be hard to look at. Basic formatting helps organize your worksheet and make it easier to understand. The most common formatting tools are in the 'Home' tab of the ribbon.
You can change the font, make text bold or italic, or change its color. You can also change the background color of a cell, which is useful for highlighting important information or creating headers for your data.
| Formatting Tool | What It Does |
|---|---|
Bold (Ctrl+B) | Makes text stand out. Ideal for headers. |
Italic (Ctrl+I) | Emphasizes text, often used for notes. |
| Fill Color | Changes the background color of a cell. |
| Font Color | Changes the color of the text itself. |
Don't forget about alignment. By default, Excel aligns text to the left and numbers to the right. You can change this to center your text or align it differently within the cell to improve the layout of your sheet.
Worksheets and Workbooks
A single Excel file is called a workbook. It can hold many worksheets, which lets you keep related information together in one file. For example, you might have a workbook for your monthly budget, with a separate worksheet for each month.
Managing these sheets is easy. Look for the tabs at the bottom of the screen. You can add a new sheet by clicking the plus (+) icon. To rename a sheet, just double-click its tab, type a new name, and press Enter. This is much better than leaving them as 'Sheet1', 'Sheet2', etc.
You can also change the order of your worksheets by clicking and dragging the tabs. If a worksheet is no longer needed, right-click its tab and select 'Delete'.
When you're finished working, you need to save your workbook. Go to the 'File' tab and choose 'Save' or 'Save As'. It's a good habit to save your work frequently so you don't lose any progress.
Understanding Cell References
The power of Excel comes from how its cells can work together. This is done using cell references. As we covered, a cell's reference is its column letter and row number, like A1, B2, or C15.
You'll use these references when you start writing formulas. For example, instead of writing a formula that says 'add 5 and 10', you'd write a formula that says 'add the value in cell A1 and the value in cell B1'. This way, if the numbers in A1 or B1 change, the result of your formula updates automatically.
There are two main types of cell references: relative and absolute.
Relative Reference
adjective
A cell reference that changes when a formula is copied to another cell. For example, A1.
Relative references are the default in Excel. They are incredibly useful for applying the same calculation across many rows or columns.
For example, if you have a formula in cell C1 that says =A1+B1 and you copy it down to cell C2, the formula will automatically adjust to become =A2+B2. This saves you from having to rewrite the formula for every single row.
Absolute Reference
adjective
A cell reference that remains fixed when a formula is copied. It's marked with a dollar sign ($), like $A$1.
You use an absolute reference when you have a constant value that you want to use in multiple calculations. For instance, imagine a tax rate is stored in cell H1, and you need to use that rate to calculate tax for a list of items. By using $H$1 in your formula, you ensure that every calculation correctly points back to the tax rate, even when you copy the formula down the column.
You can also have mixed references like A$1 or $A1, which lock either the row or the column, but not both. We'll explore these more advanced uses later.
With these fundamentals, you are ready to start organizing and working with data in Excel. The next step is to learn how to use formulas to perform calculations.