Mastering Your DSLR with Creative Precision
Mastering Manual Exposure
Beyond the Light Meter
You know how to point your camera and find the settings. Now it's time to take full control. Manual mode isn't just about getting the 'correct' exposure; it's about choosing the right exposure for your creative vision. This means understanding the trade-offs between the three pillars of exposure: aperture, shutter speed, and ISO.
Think of them as ingredients in a recipe. You can combine them in different ways to get the same overall brightness, but the final 'flavor' of the image will be completely different. Let's break down how each element shapes your photo beyond simply making it brighter or darker.
Each setting controls exposure differently: Aperture: controls the area over which light can enter your camera Shutter speed: controls the duration of the exposure ISO speed: controls the sensitivity of your camera’s sensor to a given amount of light
Aperture and Depth
Aperture is the opening inside your lens that lets light pass through to the sensor. You control its size using f-stops, which might seem counterintuitive at first. A small f-stop number, like , corresponds to a large opening, letting in lots of light. A large f-stop number, like , means a tiny opening, letting in very little light.
But aperture’s creative impact goes far beyond brightness. It directly controls the depth of field (DoF), which is the portion of your image that appears acceptably sharp.
-
Large Aperture (small f-stop): This creates a shallow depth of field. Only a narrow slice of your scene will be in focus. This is perfect for portraits, where you want your subject to pop against a beautifully blurred background (an effect called bokeh).
-
Small Aperture (large f-stop): This creates a deep depth of field. A much larger portion of the scene, from the foreground to the background, will be sharp. This is ideal for landscapes, where you want every detail, from the flowers at your feet to the distant mountains, to be in focus.
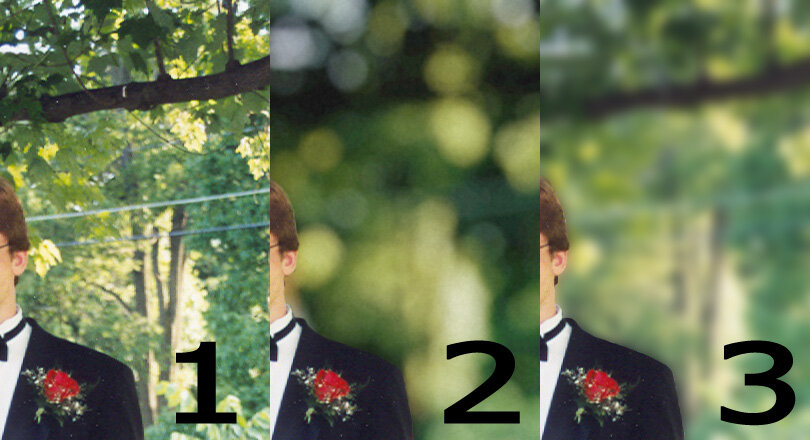
Choosing your aperture is your first major creative decision. Are you trying to isolate a subject, or capture a sweeping, detailed scene?
Shutter Speed and Motion
While aperture is a measure of space, shutter speed is a measure of time. It’s how long the camera’s shutter stays open, allowing light to hit the sensor. It's measured in seconds or fractions of a second (e.g., 1/1000s, 1/60s, 2").
Shutter speed’s creative job is to control how motion is rendered. You have two main options: freeze it or blur it.
-
Fast Shutter Speed (e.g., 1/1000s or faster): This freezes motion. The shutter opens and closes in a flash, capturing a razor-sharp instant. This is essential for sports photography, capturing a bird in flight, or any fast-moving subject you want to appear perfectly still.
-
Slow Shutter Speed (e.g., 1/30s or slower): This creates motion blur. If anything moves while the shutter is open, it will appear as a streak or a blur in the final image. This can be used creatively to show the flow of a waterfall, the blur of city traffic at night, or the path of stars across the sky. Using a slow shutter speed often requires a tripod to keep the camera steady, ensuring that only the moving elements are blurred.
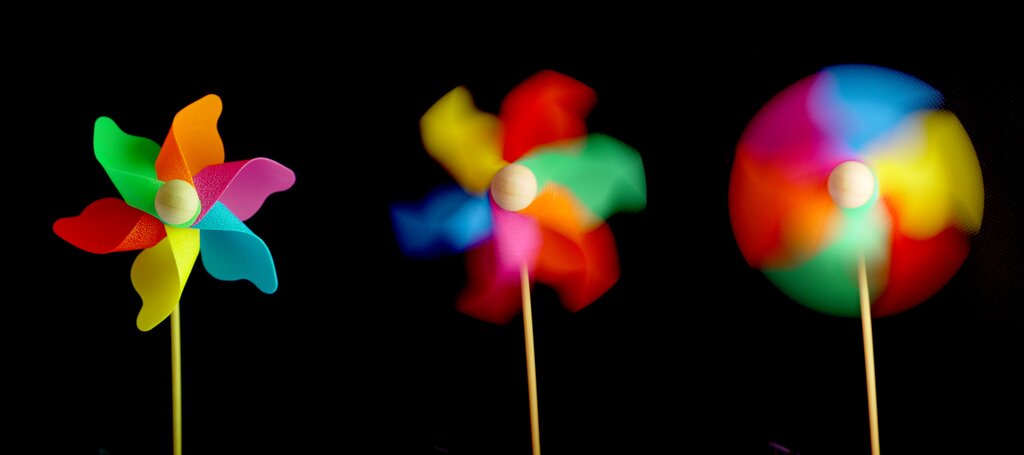
As a rule of thumb, to avoid camera shake when hand-holding your camera, your shutter speed should be at least 1 divided by your focal length. For a 50mm lens, that's at least 1/50s. For a 200mm lens, you'd want at least 1/200s.
ISO and Noise
ISO is the last piece of the puzzle. It doesn't physically change the amount of light entering the camera. Instead, it digitally amplifies the signal from the light that the sensor does receive. It's your tool for shooting in dark conditions when you can't open your aperture any wider or slow your shutter speed any further.
Your camera has a base ISO, usually around 100 or 200, where it produces the highest quality image with the best signal-to-noise ratio. As you increase the ISO (e.g., to 800, 1600, 3200), you're essentially making the sensor more sensitive to light. This lets you get a bright exposure in a dark room.
But this sensitivity comes at a cost: digital noise. Noise appears as a grainy, sometimes splotchy texture in your image, especially visible in the darker areas. It degrades the overall image quality, reducing detail and color accuracy.
Modern cameras are incredibly good at handling high ISOs, but the trade-off always exists. The goal is always to use the lowest ISO possible for your given aperture and shutter speed settings. Only increase it when you have no other choice.
Putting It All Together
The relationship between these three settings is governed by the reciprocity law. In simple terms, if you change one setting to let in less light, you must change another setting to let in an equal amount more light to maintain the same exposure.
For example, if you change your aperture from to (letting in half the light), you must either double your shutter speed (e.g., from 1/125s to 1/60s) or double your ISO (e.g., from 400 to 800) to keep the brightness the same.
This is where the creative trade-offs come in. There is no single 'correct' exposure. There are multiple combinations of settings that will give you a bright-enough picture. Your job as the photographer is to decide which combination best serves your vision.
Want a blurry background for a portrait in bright sun? You'll need a large aperture (). To avoid overexposing, you'll need a very fast shutter speed (like 1/4000s) and your base ISO (100).
Want to capture the silky motion of a waterfall? You'll need a slow shutter speed (1"). To avoid a blown-out, all-white photo, you'll need a small aperture () and your base ISO (100). You might even need a special filter to block more light.
Shooting a concert in a dark venue? You'll need a large aperture () to let in light and a reasonably fast shutter speed (1/125s) to freeze the performers. The only way to get a bright enough shot is to push your ISO up to 3200 or 6400, accepting that there will be some noise.
Mastering manual mode is about internalizing these trade-offs so you can adjust your settings instinctively to capture the world not just as it is, but as you see it.
You are photographing a friend for a portrait and want to create a beautifully blurred background to make your friend stand out. Which of the following aperture settings would be most effective at achieving this look?
To capture a fast-moving subject like a bird in flight and freeze its motion completely, you should use a ________.