Mastering the Sacred Circle
Advanced Grid Construction
The Precision Framework
Professional mandalas aren't just free-form doodles. Their mesmerizing harmony comes from an invisible skeleton: a high-density grid. You already know how to create basic concentric circles, but to achieve intricate, balanced designs, you need a more robust framework. This is where a polar grid comes in.
Polar Grid
noun
A system of concentric circles intersected by radial lines that extend from a common centre point. It allows for precise placement of elements based on distance (radius) and angle (azimuth).
Think of it like a spider's web or a navigational compass. Instead of plotting points on a square X-Y grid, you use a distance from the centre and an angle. This method is perfectly suited for circular art. The foundation of this grid is the radial division, which involves dividing your circle into perfectly equal segments using a protractor and compass.
While an 8-segment division is a good start, high-detail work demands more. The most versatile and common structures are based on 12, 16, and 32 segments. Each division offers a different feel and allows for unique patterns.
| Segments | Angle Between Lines | Notes |
|---|---|---|
| 12 | 30° | Divides the circle into sections that align with the hours on a clock. Great for floral or star patterns. |
| 16 | 22.5° | Achieved by bisecting the angles of an 8-segment grid. Offers a dense framework for detailed work. |
| 32 | 11.25° | A high-density grid for extremely intricate designs. Created by bisecting the angles of a 16-segment grid. |
The key to precision is bisecting angles. To get from 8 segments to 16, you simply find the halfway point between each of your 45° lines. That's 22.5°. Do it again, and you get 32 segments at 11.25° intervals.
Layering and Scaling
A professional mandala grid isn't a single layer. It's a network of primary and secondary guidelines. Your main radial divisions (like the 16 or 32 lines) are the primary structure. But to create interlocking patterns and complex motifs, you need secondary axes.
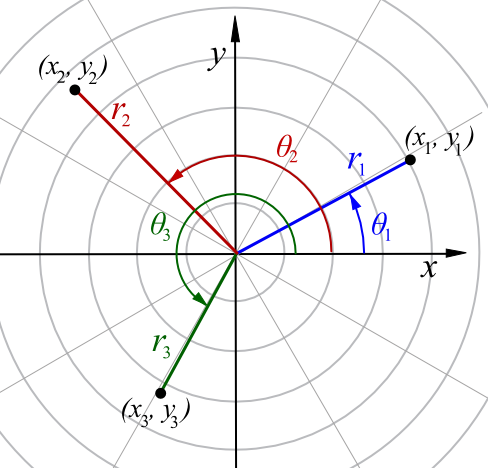
Imagine you've drawn a 16-segment grid. Now, on one of your concentric circles, mark the halfway point between two radial lines. Use your compass to draw a new circle that passes through all these halfway points. This new circle acts as a secondary guideline, offset from your main grid, allowing you to create patterns that weave in and out of the primary structure.
Another advanced technique is grid scaling. Your patterns don't have to follow the same spacing from the centre to the edge. You can use a logarithmic spiral as a guide instead of evenly spaced concentric circles. This creates a more organic, nautilus-shell effect where the pattern elements grow larger as they move outward. This is harder to construct manually but creates stunning, dynamic results.
Handling your tools correctly is crucial. When using a drawing compass, always apply gentle, even pressure. Push the needle firmly into the centre point so it doesn't slip, and lean the compass slightly in the direction of the turn to get a clean, consistent line. A slipping compass is the fastest way to ruin a grid. For your protractor, make sure the baseline is perfectly aligned with your 0°-180° axis every single time you measure an angle. Small errors compound quickly.
Ready to test your understanding of these precision techniques?
What type of grid is described as the "invisible skeleton" for a professional mandala, providing its structure and harmony?
To create an organic, nautilus-shell effect where patterns grow larger as they move outward, which guide should be used instead of evenly spaced concentric circles?
With these grid-building techniques, you have the foundation to create mandalas of incredible complexity and perfect symmetry. The grid is your map, guiding every line and shape to its correct place.