Kdenlive Video Editing Mastery
Introduction to Kdenlive
Getting Started with Kdenlive
Kdenlive is a powerful, free, and open-source video editor. It’s what editors call a “non-linear” editor, which simply means you can jump to any point in your video and make changes without affecting the rest of the footage. You can cut, splice, and rearrange clips in any order you like.
Because it's open-source, a community of developers constantly improves it, and you can use it without paying for a license. It’s a great tool for everything from simple family videos to more complex projects.
Kdenlive handles a wide range of audio and video formats, supports multi-track editing, and comes packed with dozens of effects and transitions.
Installation
Getting Kdenlive is straightforward. The official website provides the latest version for Windows, macOS, and various distributions of Linux. The recommended installation method depends on your operating system.
| Operating System | Installation Method |
|---|---|
| Windows | Download the installer from the Kdenlive website. You can choose between an installable version or a standalone one that runs without installation. |
| macOS | Download the .dmg file from the official website. |
| Linux | Use your distribution's software center to find Kdenlive. Alternatively, you can use Flatpak or AppImage for the latest version. |
Once installed, opening the application for the first time will reveal the main editing interface. It might look complex at first, but it's organized logically.
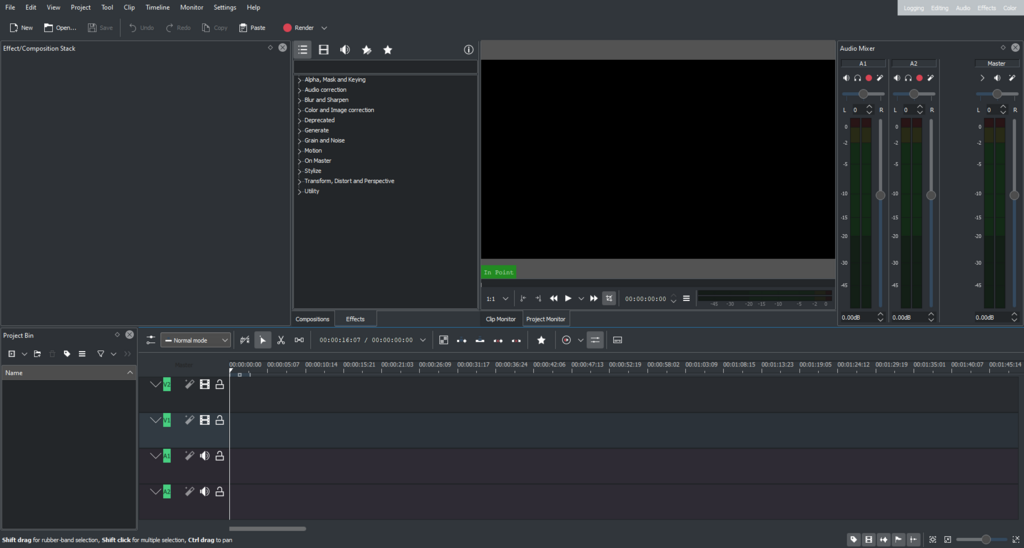
Exploring the Workspace
The Kdenlive workspace is divided into several key sections. Understanding what each one does is the first step to editing your videos.
1. Project Bin: This is where you import and organize all your media files: video clips, audio tracks, images, and titles.
2. Monitor: This section usually has two tabs. The Clip Monitor lets you preview your raw media files before adding them to your project. The Project Monitor shows you what your edited video looks like as you build it on the timeline.
3. Timeline: This is the heart of your project. You drag clips from the Project Bin onto the timeline to assemble your video. It's made up of multiple tracks for video and audio, allowing you to layer sounds, add background music, or overlay images and titles.
4. Effects/Composition Stack: Here you can find a library of video and audio effects, transitions, and composition tools. When you select a clip on the timeline, this area lets you adjust its properties, like size and position, or apply and configure effects.
This modular layout is flexible. You can resize and move these sections to create a workspace that feels comfortable for you. For now, familiarizing yourself with these core components is all you need to get started.