Introduction to Scratch Programming
Introduction to Scratch
Welcome to Scratch
Programming doesn't have to be about typing endless lines of complicated code. Imagine building a program the way you'd build with LEGO blocks. That's the idea behind Scratch, a visual programming language created at MIT. Instead of writing code, you snap together colorful blocks to create animations, games, and interactive stories.
Many of these “programming languages for kids” are block-based, or drag-and-drop, i.e. they use a series of colourful shapes that “snap” together on screen, comparable perhaps with LEGO.
This approach lets you focus on the logic and creativity of your project without worrying about syntax errors like a misplaced comma. Let's dive in and see how it works.
The Scratch Workspace
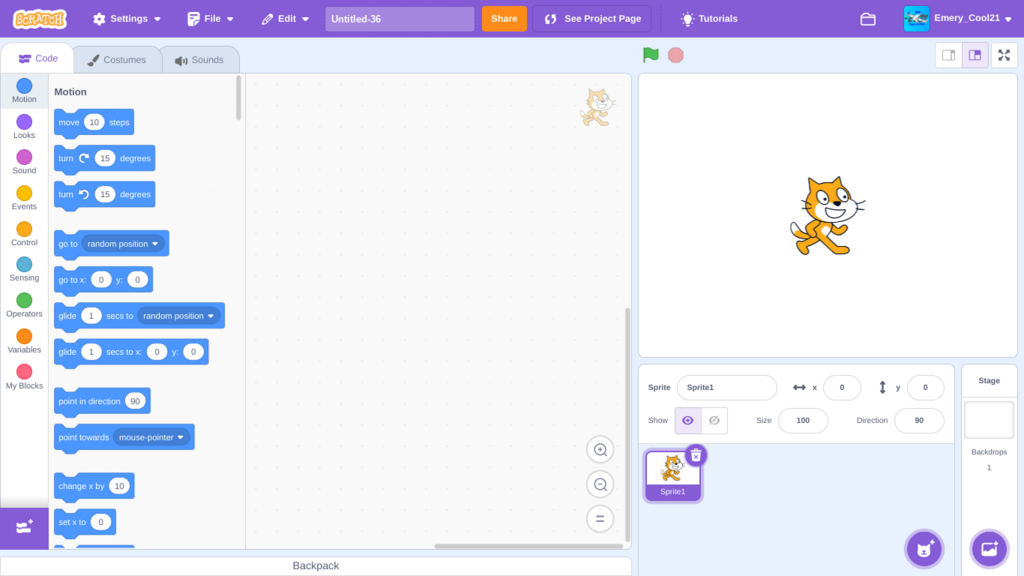
When you first open Scratch, you'll see a few key areas. Getting to know them is the first step to building amazing things.
To the right, you'll see the Stage. This is where your creations come to life. It's the performance area for your characters, which are called sprites. By default, you start with the Scratch Cat sprite.
Below the Stage is the Sprite Panel. Here, you can manage all your sprites and the Stage's background, known as a backdrop. You can add new sprites, change their properties like size and direction, or pick a different backdrop to set the scene.
On the left is the Blocks Palette. This is your toolbox. It contains all the code blocks you'll use, neatly organized into categories by color and function.
Think of it like a theater. The Stage is the performance space, the sprites are your actors, and the Blocks Palette holds all the scripts and directions you can give them.
Your First Animation
Let's make something happen. We'll start by making the cat move when we click the green flag icon above the Stage. This is how you run a project in Scratch.
First, go to the 'Events' category in the Blocks Palette (it's yellow-orange). Find the when green flag clicked block and drag it into the empty center area, which is called the Script Area. This block is a starting point; it tells your program when to run.
Next, we need to tell the cat what to do. Go to the blue 'Motion' category and grab a move 10 steps block. You'll notice it has a notch that fits perfectly under the first block. Snap it into place.
Congratulations, you've just written your first program! Click the green flag and watch the cat move.
This combination of a trigger (when green flag clicked) and an action (move 10 steps) is the fundamental building block of all Scratch projects.
The blocks are color-coded to make them easy to find. Here are the three basic categories you'll use most often at the beginning:
| Category | Color | What It Does |
|---|---|---|
| Motion | Blue | Moves sprites, turns them, and changes their position. |
| Looks | Purple | Changes a sprite's appearance, costume, or makes it talk. |
| Sound | Magenta | Adds sounds, music, and voice effects. |
Now, try experimenting. Drag a say "Hello!" for 2 seconds block from the 'Looks' category and snap it to the bottom of your script. Or, add a play sound Meow until done block from the 'Sound' category. See what happens when you combine different blocks. This is the best way to learn what's possible.
What is the main area where your Scratch creations, like animations and games, are displayed?
If you want your program to begin when you click the green flag, which category of blocks should you look in first?
You've taken your first step into the world of visual programming. By understanding the layout and snapping a few blocks together, you're on your way to creating much more complex projects.