Introduction to Drumming
Drum Kit Setup
Building Your Foundation
Unboxing a drum kit is exciting, but a good setup is what turns a pile of parts into a playable instrument. The goal is comfort and efficiency. Your kit should fit you, not the other way around. Let's start from the ground up.
First, set up your drum throne. Your throne height determines your posture and balance for everything else. Sit down and adjust the height until your thighs are angled slightly downward, with your feet resting comfortably on the floor. You shouldn't be on your tiptoes or have your knees pushed up toward your chest.
Next, bring in the bass drum. Position it so your primary foot naturally rests on the pedal. Attach the pedal, ensuring the beater strikes the center of the drumhead. Then, place the snare drum stand between your legs. The snare itself should sit just above your knees, angled slightly toward you for an easy, natural wrist angle when you play.
Finally, add the hi-hat stand. Your other foot should rest on its pedal as naturally as your primary foot rests on the bass drum pedal. This core setup of throne, snare, bass drum, and hi-hat forms your home base.
Arranging Your Kit
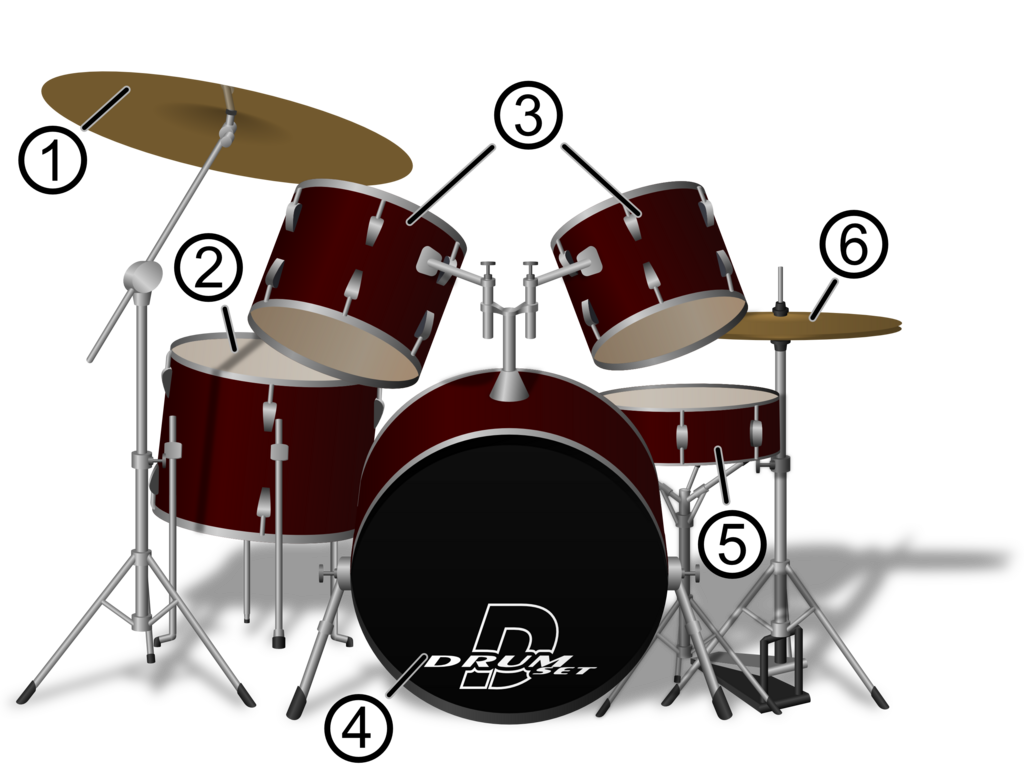
With your foundation in place, it's time to add the toms and cymbals. The guiding principle here is effortless movement. You should be able to reach every part of the kit without excessive stretching or twisting.
Mount the rack toms on the bass drum. Position them close together and at a slight angle, creating a smooth path for your sticks to travel from one to the other. Place the floor tom next to your snare-side leg, at roughly the same height as your snare drum. Sit down and practice moving your sticks from the snare to each tom. It should feel like a natural, easy arc.
Now for the cymbals. Your ride cymbal typically goes over the floor tom or between the rack tom and floor tom. Your crash cymbal usually sits on the other side, above the hi-hats. Position them at a height and angle where you can strike the edge with the shoulder of your stick and the top with the tip, all without reaching too high.
A good setup minimizes wasted motion. If it feels awkward to reach something, adjust it. Small changes in height and angle can make a huge difference in your playing.
Tuning for Tone
A well-tuned drum sings. A poorly tuned drum just makes a thud. Tuning gives your drums character and ensures they sound good together. You'll need a drum key, which should have come with your kit.
Each drum has a top (batter) head and a bottom (resonant) head, held in place by a hoop and tension rods. The key to good tuning is applying even tension across the head. Start with all the tension rods finger-tight.
Pick a tension rod and use the drum key to give it a half-turn. Then, move to the rod directly opposite it and do the same. Continue this process in a star or crisscross pattern until you've tightened all the rods. This ensures the head is stretched evenly, like a trampoline. Tap the head near each rod to hear the pitch. Adjust them until the pitch is consistent all the way around.
Your goal is to find a sweet spot where the drum has a clear, open tone without any strange, flappy sounds or lingering dissonant overtones. The top head primarily affects the feel and attack of the drum, while the bottom head affects the sustain and pitch. For now, try tuning the bottom head slightly higher in pitch than the top head for a classic, punchy sound. Experiment and listen closely. Your ears are the best guide.
Now that you know the basics of setting up and tuning, let's test your knowledge.
When setting up your drum throne, what is the ideal position for your thighs?
Which four components are considered the foundational 'home base' of a drum kit setup?
Taking the time to set up and tune your kit properly is an investment in your playing. A comfortable, great-sounding kit will inspire you to practice more and play better.