Introduction to American Sign Language
ASL Alphabet
The Manual Alphabet
In American Sign Language (ASL), how do you communicate a word that doesn't have a specific sign, like a person's name, a brand, or a technical term? You spell it out. This is called fingerspelling, and it uses a set of handshapes that represent the letters of the alphabet.
Mastering the manual alphabet is the first step to becoming fluent in ASL. It’s the bridge that connects signed and spoken languages, allowing you to spell out anything you need to say, one letter at a time.
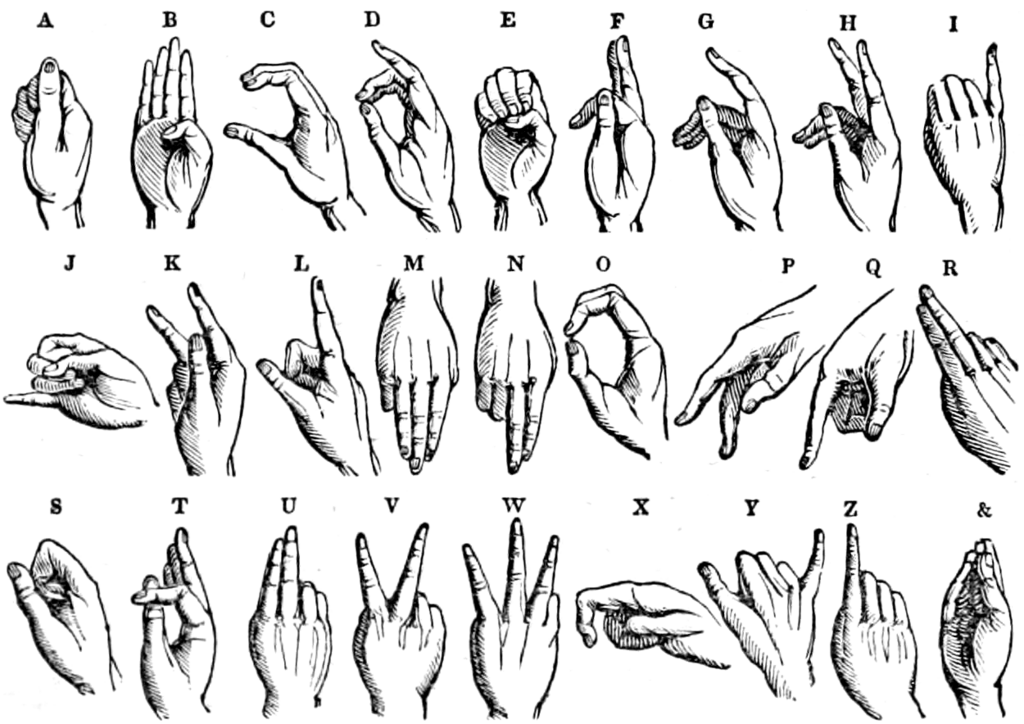
Hand Position and Orientation
Before you start forming letters, let's get your hand in the right position. You'll use your dominant hand—the one you write with—for fingerspelling. Hold it up in a comfortable position in front of your shoulder, with your palm facing forward, toward the person you're signing to. Your elbow should be relaxed and held down near your side.
Think of it as a small, invisible frame in front of your body. All your letters should be formed within this space. This keeps your signing clear, consistent, and easy for others to read.
Forming the Letters
Many ASL letters are intuitive. The letters C, L, O, V, and W, for example, look very much like their written counterparts. Others are grouped by similar handshapes, which makes them easier to learn together.
Practice in front of a mirror. This helps you see what your handshapes look like from the other person's perspective.
Let's look at a few common groups:
-
Fist Letters: A, E, M, N, S, and T are all based on a closed fist. The main difference is the thumb position. For an A, the thumb is on the side. For an S, it's crossed over the fingers. For an E, the thumb is tucked in, and the fingertips rest on the palm.
-
Pointing Letters: D and G involve pointing your index finger. For D, the index points up while the other fingers and thumb form a circle. For G, the index points sideways, parallel to the ground.
-
Letters with Movement: Only two letters in the manual alphabet require movement. For J, you trace the letter 'J' in the air with your pinky finger. For Z, you draw a 'Z' in the air with your index finger.
Putting It All Together
Once you know the individual letters, the next step is stringing them together to fingerspell words. The key is to be smooth and clear, not fast and jerky. Keep your hand in one place and flow from one letter to the next without bouncing your arm around.
A common question is how to handle double letters, like the 'L's in 'hello'. You don't sign it twice in the exact same spot. Instead, you can either make a small bounce or slide your hand slightly to the side for the second letter. This small movement signals the repetition.
As you practice, focus on rhythm. Each letter should take about the same amount of time to form. Pause briefly between words to show a space, just as you would in writing. Avoid common mistakes like having your palm face sideways or backward, as this makes your signs very difficult to read.
Let's review what you've learned about the ASL alphabet.
In American Sign Language, what is the process of spelling out words using handshapes for each letter of the alphabet called?
When fingerspelling, where should you position your dominant hand?
Fingerspelling is a skill that improves with practice. The more you use it, the more natural it will become.