Introduction to 3D Cartoon Character Design
Introduction to 3D Software
Welcome to Blender
Blender is a powerful tool for creating 3D models, animations, and more. It might look complex at first, but once you learn your way around, you'll find it's a flexible and creative space. Best of all, it's completely free and open-source.
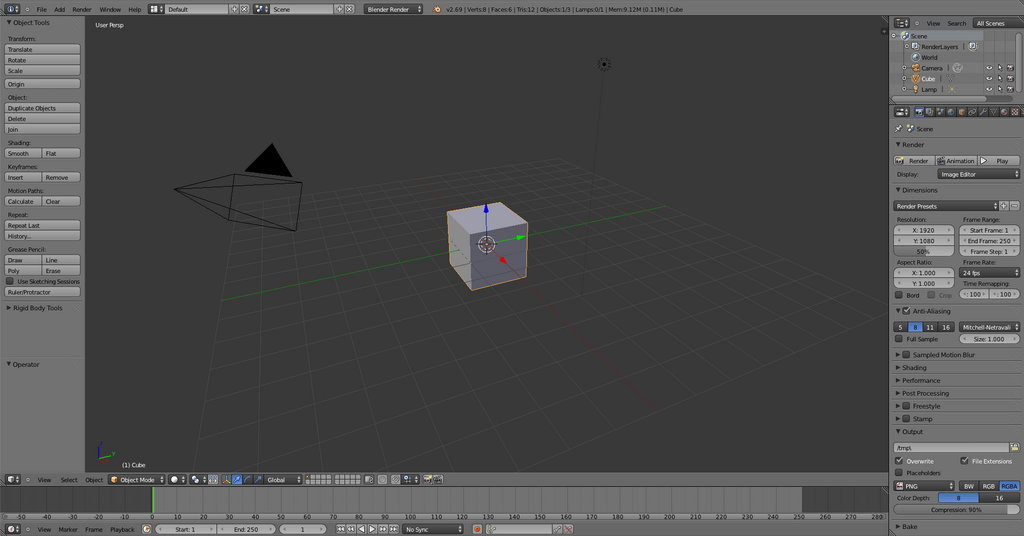
When you start a new general project, you'll be greeted by the default scene. It contains three basic objects: a cube, a light source, and a camera. This is your starting canvas.
The Blender Interface
The interface is divided into several key areas, or editors. For now, we'll focus on the main ones you'll see in the default layout.
Here's a quick breakdown:
- 3D Viewport: This is your main window into the 3D world. You'll build and view your models here.
- Outliner: Located in the top right, this panel lists every object in your scene. It's like a table of contents for your project.
- Properties Panel: Below the Outliner, this is a context-sensitive area. It shows settings for the active object, the scene, and your rendering tools.
- Timeline: At the bottom, this editor is for animation. It lets you record changes to objects over time.
Navigating Your 3D World
Getting comfortable with moving around in the 3D Viewport is the first step to mastering Blender. The main actions are orbiting, panning, and zooming. Most navigation happens using a three-button mouse.
| Action | Mouse Control |
|---|---|
| Orbit | Press and hold the middle mouse button, then drag. |
| Pan | Hold Shift + middle mouse button, then drag. |
| Zoom | Scroll the mouse wheel up or down. |
Practice these controls. Spin around the cube, slide your view from side to side, and zoom in close. The more you do it, the more natural it will feel.
Basic Object Manipulation
Now that you can move your view, let's move the objects themselves. In Blender, these basic actions are called transformations. The three fundamental transformations are moving, rotating, and scaling. To begin, select the cube by clicking on it with the left mouse button. A yellow-orange outline will show it's selected.
The core hotkeys for transformation are easy to remember: G for Grab/Move, R for Rotate, and S for Scale.
Press G and move your mouse; the cube will follow your cursor. Left-click to confirm the new position, or right-click to cancel and return it to its original spot.
The same process works for rotation (R) and scaling (S). Try rotating the cube and then scaling it up and down. You can also constrain the transformation to a specific axis by pressing the key for that axis (X, Y, or Z) right after the transformation key. For example, pressing G then X will only let you move the cube along the red X-axis.
What three objects are included in Blender's default 'General' scene?
Which editor panel provides a list of every object in your scene, much like a table of contents?
This covers the absolute basics of finding your way around Blender. In the next step, we'll start using these tools to model something new.