Google Sheets Mini-Dashboard Design
Introduction to Google Sheets
Getting Started with Google Sheets
Google Sheets is a spreadsheet application that lives in your web browser. Think of it as a powerful, digital grid of paper where you can organize information, perform calculations, and collaborate with others in real time. Unlike traditional spreadsheet software installed on one computer, your sheets are saved online in Google Drive, so you can access them from anywhere.
Finding Your Way Around
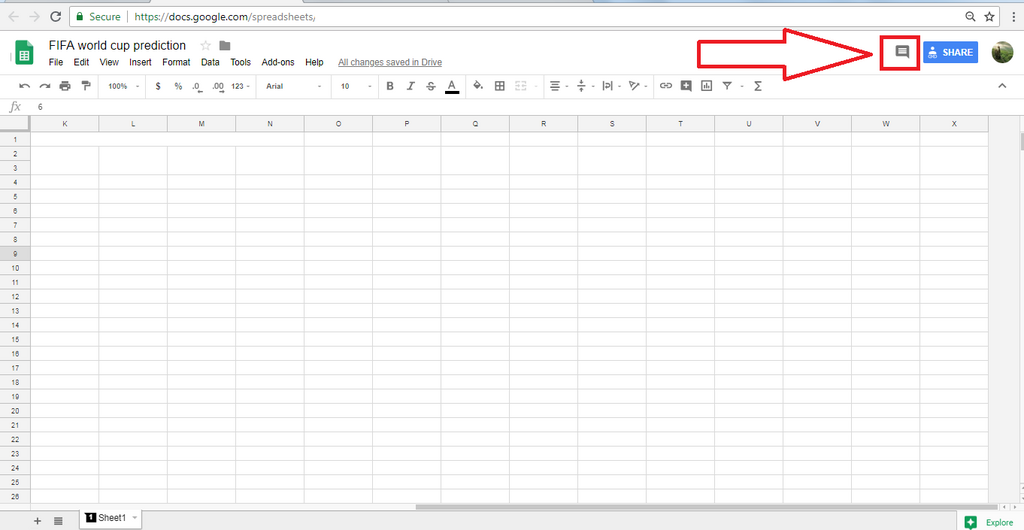
When you open a new sheet, you'll see a large grid. This grid is made of columns (labeled with letters A, B, C...) and rows (labeled with numbers 1, 2, 3...). The box where a row and column intersect is called a cell. Each cell has a unique address, like A1, B2, or C15.
Above the grid, you'll find a few key areas:
- Menu Bar: At the very top, you'll see words like File, Edit, and View. This is where you can find all of Sheets' features, from saving a copy to inserting charts.
- Toolbar: Just below the menu, this row of icons gives you quick access to common tasks like changing text to bold, adjusting alignment, or adding borders.
- Formula Bar: This long bar, marked with an fx symbol, shows the content of the selected cell. It's where you'll type and edit formulas.
Working with Your Data
Getting data into your sheet is straightforward. Just click on any cell and start typing. You can enter text, numbers, or dates. Press Enter or Tab to move to the next cell.
To select a single cell, just click it. To select a whole column or row, click on its letter or number header. You can also click and drag your mouse to select a range of cells. Once you have something selected, you can copy it (Ctrl+C or Cmd+C) and paste it (Ctrl+V or Cmd+V) somewhere else.
Pro tip: See that small blue square at the bottom-right corner of a selected cell? That's the fill handle. Click and drag it down or across to quickly copy the cell's content or extend a series (like days of the week or sequential numbers).
Formatting helps make your data easier to read. The toolbar contains everything you need for basic styling. You can change the font, make text bold or italic, change text color, and fill cells with a background color. These tools work just like they do in a word processor.
The Magic of Formulas
The real power of a spreadsheet comes from its ability to do math for you. This is done with formulas. Every formula in Google Sheets starts with an equals sign (=). This tells Sheets that you want it to calculate something, not just display the text you typed.
You can perform simple arithmetic right in a cell. For example, typing =10 * 5 will display the result, 50.
Better yet, you can refer to other cells in your formulas. If you have the number 10 in cell A1 and the number 5 in cell B1, you could type the following formula in cell C1:
Cell C1 would also display 50. The advantage is that if you change the value in A1 or B1, the result in C1 updates automatically. This makes your spreadsheet dynamic.
For more complex tasks, you can use functions. Functions are pre-built formulas that perform specific calculations. For example, instead of typing =A1+A2+A3+A4, you can use the SUM function.
The colon (:) creates a range, telling the function to include all the cells from A1 through A4. Here are a few other essential functions to know.
| Function | What It Does | Example |
|---|---|---|
SUM | Adds up a range of numbers. | =SUM(B2:B10) |
AVERAGE | Calculates the average of a range of numbers. | =AVERAGE(C2:C10) |
COUNT | Counts how many cells in a range contain numbers. | =COUNT(D2:D10) |
MAX | Finds the highest value in a range. | =MAX(E2:E10) |
MIN | Finds the lowest value in a range. | =MIN(F2:F10) |
This is just the beginning. By combining data entry, formatting, and simple formulas, you have the foundation to organize almost any kind of information.