GIMP Spritesheets and CSS Animations
Introduction to CSS Spritesheets
The All-in-One Image
Imagine you're baking cookies and need several ingredients: flour, sugar, eggs, and chocolate chips. Instead of making four separate trips to the pantry, you grab a single tray and carry everything at once. It's much faster. That's the core idea behind a CSS spritesheet.
Spritesheet
noun
A single image file that contains a collection of smaller images, arranged in a grid. These smaller images, or sprites, are displayed individually on a webpage using CSS.
In web development, every image, icon, or button graphic on a page is a separate file. When a user visits your site, their browser has to ask the server for each of these files individually. Each request takes time. If a page has dozens of small icons, like social media links or navigation buttons, these requests add up and can slow down the website.
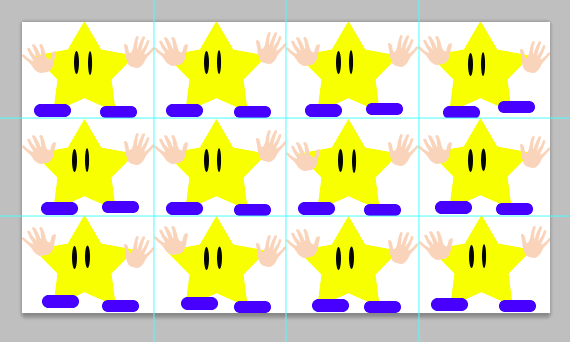
A spritesheet combines all these little images into one larger file. The browser then makes just one request to the server, downloading the entire collection at once. This significantly reduces the number of round trips between the browser and the server, making the page load noticeably faster.
How It Works
So how do you show just one small part of that big image? This is where CSS comes in. You tell the browser to display the spritesheet as a background image for an HTML element, like a <div> or a <span>. Then, you use CSS properties to define a small window, or viewport, that only shows the specific part of the spritesheet you want.
Think of it like looking through a keyhole. You can see the whole room behind the door, but the keyhole limits your view to one small section. By moving your eye, you can look at different parts of the room. With CSS, you're essentially moving this "keyhole" around the spritesheet to display different icons.
The key CSS properties for this are background-image, width, height, and background-position.
background-image: This is set to the URL of your spritesheet file.widthandheight: These define the size of your "keyhole." They should match the dimensions of the single, smaller image you want to display.background-position: This is the magic part. It tells the browser where to position the background image within the element's frame. By giving it negative X and Y coordinates, you effectively slide the large image around behind the keyhole until the correct small image is visible.
/* We have an icon that is 32x32 pixels. */
/* The icon we want is at the top-left corner of the spritesheet. */
.icon-home {
  width: 32px;
  height: 32px;
  background-image: url('spritesheet.png');
  background-position: 0 0; /* Show the top-left part */
}

/* The next icon is to the right of the first one. */
.icon-settings {
  width: 32px;
  height: 32px;
  background-image: url('spritesheet.png');
  background-position: -32px 0; /* Move the image 32px to the left */
}
In the example above, .icon-home shows the sprite located at the very top-left of spritesheet.png. For .icon-settings, we shift the background image 32 pixels to the left, which brings the second icon into view inside our 32x32 pixel window.
Key Benefits
To quickly recap, using spritesheets is a classic web performance optimization technique with clear advantages:
| Benefit | Description |
|---|---|
| Fewer HTTP Requests | The browser only needs to download one image file instead of many, reducing server load and latency. |
| Faster Load Times | Less waiting for files to download means the page renders and becomes interactive more quickly. |
| Improved Animation | All frames of an animation are pre-loaded in one file, preventing flicker or delay between frames. |
| Saves Bandwidth | Combining images can sometimes result in a smaller total file size compared to many individual, unoptimized images. |
Understanding this concept is the first step. Next, you'll learn how to actually create a spritesheet and put it to use.
What is the primary performance benefit of using a CSS spritesheet?
Which CSS property is essential for selecting which part of the spritesheet is visible?