Furniture and Product CAD Design
Advanced Surface Modeling
Beyond Basic Shapes
Creating products with ergonomic grips, flowing lines, and aerodynamic profiles requires moving beyond simple extrusions and holes. While basic tools are great for mechanical parts, they fall short when creating the organic, complex surfaces found in high-end consumer electronics, automotive bodies, or modern furniture. The key to achieving these seamless, high-quality forms lies in mastering surface modeling and understanding a concept called curvature continuity.
The Language of Smoothness
Imagine two surfaces meeting. How they meet is defined by their level of continuity. There are three fundamental levels you'll encounter in CAD.
G0 - Position Continuity: The simplest connection. The edges of two surfaces touch, but there's a sharp corner between them. Think of two wooden blocks pushed together. They meet, but there's a distinct, hard edge.
G1 - Tangent Continuity: This is a step smoother. The surfaces not only touch, but they also share the same angle at their connecting edge. A standard fillet creates G1 continuity. While there's no sharp corner, you can still see a crease where the reflection breaks. It's like a ramp smoothly meeting a flat road—the transition is functional, but not invisible.
G2 - Curvature Continuity: This is the gold standard for high-quality, aesthetic surfaces. Here, the surfaces are tangent, and the rate at which their curvature changes is also the same across the boundary. This creates a perfectly smooth transition that is invisible to the eye and to reflections. This is why a car's body panels look like a single, uninterrupted surface. Achieving is essential for creating products that feel and look seamless.
Advanced Surface Creation
Creating G2 surfaces requires more advanced tools than simple extrusions. The mainstays of advanced surface modeling are lofts and boundary surfaces.
Lofts create a surface by connecting two or more profile sketches. Think of it like stretching a fabric over a series of ribs. You can add 'guide rails'—additional curves that run perpendicular to the profiles—to control the shape of the surface between the ribs.
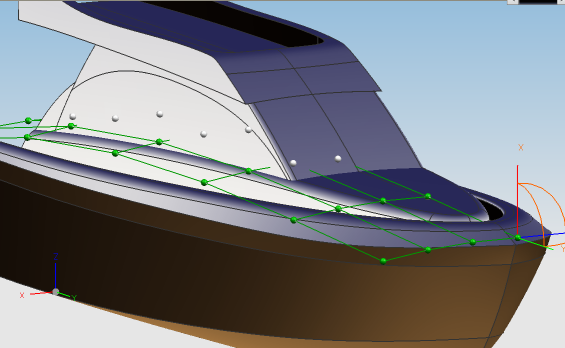
Boundary surfaces offer even more control. Instead of just profiles and optional guides, a boundary surface is defined by a complete network of curves in two directions. The key advantage is that for each curve in the boundary, you can often specify the desired continuity condition (G0, G1, or G2) relative to an adjacent surface, giving you precise control over the final shape and smoothness.
Often, a complex product isn't made from a single surface. It's an assembly of many surfaces that intersect and blend together. This is where trimming and knitting come in.
-
Trimming: You create overlapping surfaces and then use one surface as a cutting tool to trim away the unwanted portion of another.
-
Knitting (or Sewing): After trimming your surfaces to their final boundaries, you 'knit' them together. This process joins the individual surfaces into a single, continuous sheet. If the knitted surfaces form a fully enclosed volume, you can then convert it into a solid body, creating a ready for 3D printing or manufacturing analysis.
Checking Your Work
You can't rely on just your eyes to confirm G2 continuity. CAD software provides analysis tools to verify the quality of your surfaces. The most common tool is Zebra Stripes.
This mode projects a series of parallel black and white lines onto your model. How these stripes behave as they cross from one surface to another tells you everything about the continuity.
- Mismatch (G0): The stripes won't line up at all.
- Sharp Corner (G1): The stripes will meet at the boundary, but with a sharp, visible angle or kink.
- Smooth Flow (G2): The stripes will flow seamlessly from one surface to the next as if it were a single surface. This is your goal.
Another useful tool is a Deviation Analysis, which measures the distance between two curves or surfaces. This can help you ensure a new surface you've created stays within a specific tolerance of a target curve or another surface.
Mastering these advanced surfacing techniques allows you to design and build complex, organic shapes with the precision and quality demanded by modern product design. It's a skill that elevates your work from purely functional to truly artful.
When using the Zebra Stripes analysis tool, what visual cue indicates a G2 (Curvature) continuous connection between two surfaces?
A designer creates several overlapping surfaces to form the complex shape of a bicycle helmet. To create a single, solid part from these surfaces, what two processes must be performed in order?