Excel Fundamentals
Excel Interface
Getting Around in Excel
Opening a new Excel workbook for the first time can feel like looking at an airplane cockpit. There are buttons, menus, and grids everywhere. But once you know what the main parts do, it all starts to make sense.
Let's break down the five key areas of the Excel interface you'll use most often. Understanding these will be your foundation for everything else you do in the program.
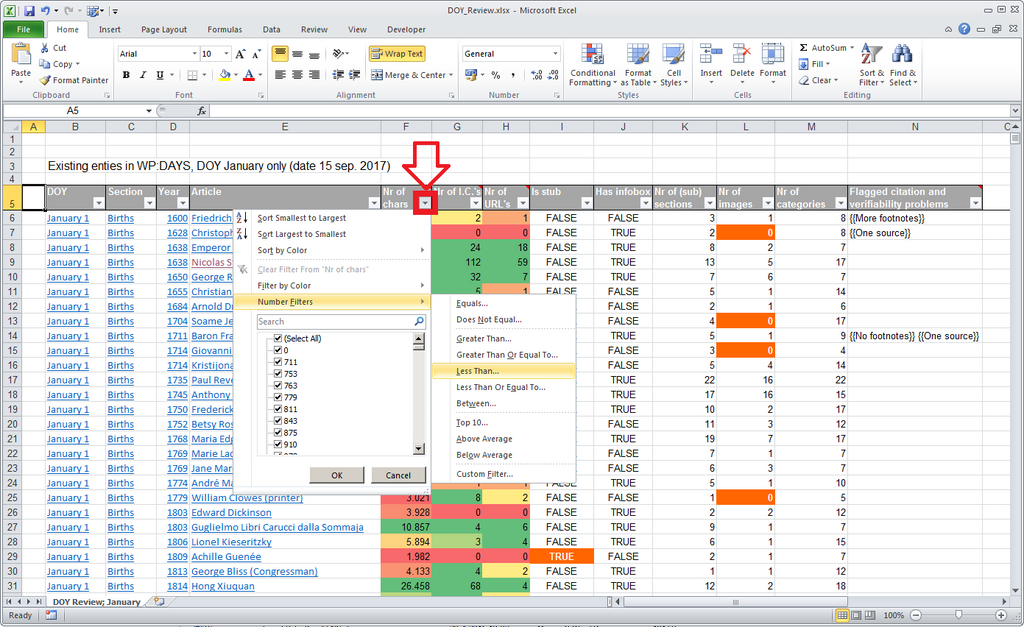
The Ribbon
At the top of the screen is the Ribbon, a wide band full of buttons and menus. This is your main command center. The Ribbon is organized into tabs, like Home, Insert, Page Layout, and Data. Each tab groups similar actions together.
The Home tab has your everyday tools: things like changing font styles, aligning text, and cutting or pasting data. If you want to add something new to your sheet, like a chart or a picture, you’ll click the Insert tab. Think of the Ribbon as a well-organized toolbox where every tool has its place.
Most of the commands you'll ever need are located somewhere on the Ribbon. Clicking through the tabs is a great way to discover what Excel can do.
Toolbar and Bars
While the Ribbon holds the bulk of the tools, a few other bars provide critical functions.
Quick Access Toolbar: Look at the very top-left corner of the window, above the Ribbon. This is the Quick Access Toolbar. By default, it holds just a few of the most common commands: Save, Undo, and Redo. It's designed to give you one-click access to essential functions, no matter which Ribbon tab you're on. You can even customize it to add your own favorite commands.
Formula Bar: Just below the Ribbon, you'll see a long white bar. This is the Formula Bar. It does two things. First, it shows you the actual contents of any cell you've selected. If a cell has the number 10, you'll see 10. If it has a formula like =B2+C2, you'll see the formula here, while the cell itself shows the result. Second, it's where you can type in or edit data and formulas for the selected cell.
Status Bar: At the very bottom of the Excel window is the Status Bar. It might seem quiet, but it’s incredibly useful. On the right side, you'll find the zoom slider and different page view options. On the left, it often says "Ready." But if you select a few cells containing numbers, the Status Bar automatically shows you their Average, Count, and Sum. It’s a great way to get quick insights without writing a formula.
The Worksheet
The main part of the screen is the worksheet itself, which looks like a big grid. This is where you'll do all your work.
The grid is made of columns, which are labeled with letters (A, B, C...), and rows, which are labeled with numbers (1, 2, 3...). The individual boxes where a row and column meet are called cells. Each cell has a unique address, or reference, based on its column and row. For example, the cell in the top-left corner is called A1.
The cell you've currently clicked on is the active cell. It has a dark border around it, and its address appears in the Name Box, just to the left of the Formula Bar.
At the bottom of the worksheet, you'll see tabs like Sheet1. An Excel file, called a workbook, can hold multiple worksheets. You can switch between them by clicking these tabs, which is like flipping through pages in a notebook.
Now that you're familiar with the layout, let's test your knowledge.
What is the main purpose of the Ribbon in Excel?
If cell C5 contains the formula =A5+B5 and displays the result 25, what will you see in the Formula Bar when you select cell C5?
That covers the basic tour of Excel's interface. Getting comfortable with these five areas will make your journey into spreadsheets much smoother.