Excel Data Management Essentials
Excel Interface
Getting Around Excel
When you open Microsoft Excel, you're looking at a workbook. Think of it as a digital notebook. Each workbook contains one or more worksheets, which you can switch between using the tabs at the bottom of the screen. A worksheet is a grid of columns (labeled A, B, C...) and rows (labeled 1, 2, 3...). The box where a column and row intersect is called a cell. Each cell has a unique address, like A1, B2, or C20. This grid is where you'll enter and organize your data.
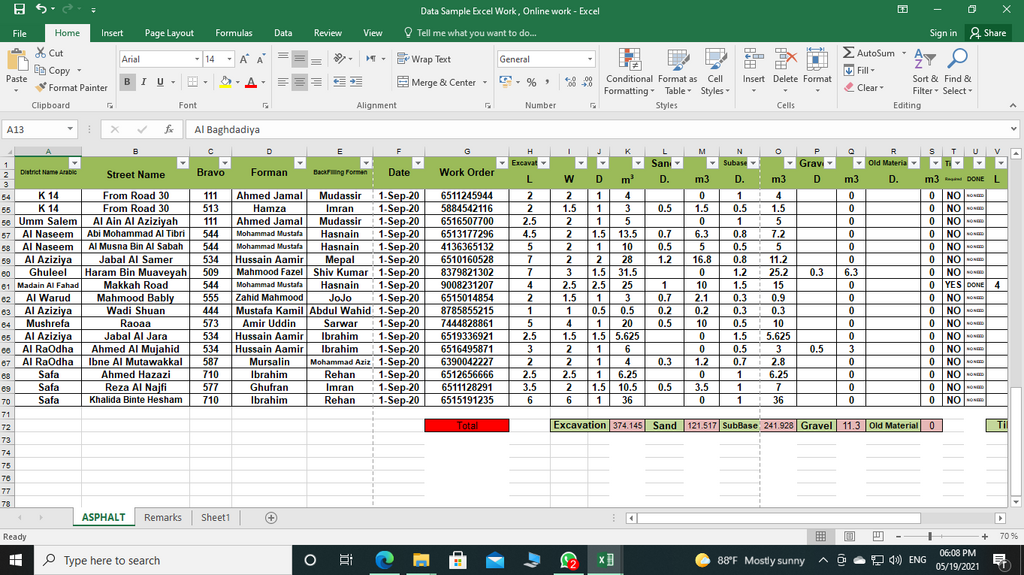
To get anything done, you'll use the tools located in the main control panels at the top and bottom of the window. Let's get to know them.
Your Command Center
At the top of the Excel window is the Ribbon. This is your primary toolkit, containing nearly all the commands you'll need. The Ribbon is organized into a series of tabs, like Home, Insert, Page Layout, and Data. Clicking a tab reveals a set of related commands, which are further organized into groups. For example, the Home tab has a Font group where you can make text bold, change its size, or add color.
The Ribbon is designed to show you the most relevant commands for the task at hand. You'll spend most of your time on the
Hometab for basic formatting and editing.
Just above the Ribbon is the Quick Access Toolbar. It's a small, customizable toolbar that stays visible no matter which tab you're on. By default, it holds shortcuts for Save, Undo, and Redo, but you can add any command you use frequently. This is great for keeping your favorite tools just a click away.
Below the Ribbon, you'll find the Formula Bar. This bar has two main parts. On the left, it shows the address of the active cell (like A1). On the right, it displays the actual contents of that cell. When you start working with formulas, this bar is essential for seeing and editing your calculations without cluttering the cell itself.
Finally, at the very bottom of the window is the Status Bar. On the left, it tells you the current status of your worksheet, often showing "Ready." On the right, it can display quick calculations for any cells you've selected. If you highlight a few cells with numbers, the Status Bar can automatically show their sum, average, and count without you having to write a formula. You can customize what it shows by right-clicking on it.
Working with Files and Data
To start a new project, you can open a blank workbook. To work on an existing file, go to File > Open. When you're ready to save your work, select File > Save. If it's the first time you're saving, you'll be prompted to give the file a name and choose a location. The standard Excel file format is .xlsx. Use Save As if you want to save a copy with a different name or in a different location.
Entering data is simple. Just click a cell to select it and start typing. The cell you've selected is called the active cell, and you'll see a dark border around it. What you type will appear in both the cell and the Formula Bar. When you're done, press Enter to move to the cell below or Tab to move to the cell to the right.
You can enter different types of information into cells:
- Text: Words and letters, like names or descriptions.
- Numbers: Digits for calculations or records.
- Dates and Times: Excel recognizes common formats like
10/15/2024or3:30 PM.
Need to fix a typo or change a value? You have a couple of options for editing data in a cell. You can double-click the cell directly to place your cursor inside it. Alternatively, you can select the cell with a single click and then edit its contents in the Formula Bar. This second method is often easier, especially when the cell contains a long piece of text or a complex formula.
What is the relationship between a workbook and a worksheet in Excel?
Which part of the Excel interface contains the primary collection of commands organized into tabs like 'Home', 'Insert', and 'Data'?
With these basics, you're ready to navigate Excel and start organizing your data.