Drumming Fundamentals
Drum Kit Setup
Building Your Command Center
Setting up your drum kit is more than just assembling parts. It's about creating an instrument that fits your body. A comfortable, ergonomic setup allows you to play for longer, develop better technique, and avoid injury. Think of it as tailoring a suit; it should be customized to your proportions for a perfect fit. Every piece should be exactly where you need it, without stretching or twisting.
Start with the Throne
Your drum throne is the most important piece of the puzzle. It's your foundation, and its position dictates where everything else will go. Don't skimp on a quality, stable throne; it’s crucial for good posture and balance.
Set your throne height so that your thighs are angled slightly downwards, with your feet flat on the floor. A common rule of thumb is to have your knees just below a 90-degree angle. This position gives you the power and balance you need to operate the pedals without straining your back or hips. Sit up straight but stay relaxed.
Once your throne is set, don’t move it. You will now build the entire kit around your seated position.
Positioning the Core
The core of your kit consists of the bass drum, snare, and hi-hat. They are the instruments you'll play the most.
First, position the bass drum. Place your dominant foot on the pedal in a natural resting position. Adjust the bass drum so the pedal is comfortable and the beater strikes the center of the drum head. Most drummers position it slightly to the right (for right-handed players).
Next, the snare drum. Place its stand directly in front of you, between your knees. You shouldn’t have to spread your legs uncomfortably wide to accommodate it. Adjust the height so the top rim is an inch or two above your thighs. This allows for powerful rimshots without hitting your legs. Angle the snare slightly towards you so your sticks land flat on the head, not at a sharp angle.
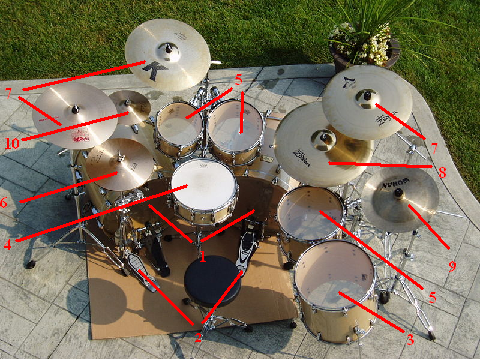
Finally, add the hi-hat stand. Your non-dominant foot will rest on its pedal. Position it next to your snare pedal so you can comfortably switch your foot between the floor and the pedal. The height is crucial. Set it so it's a few inches higher than your snare drum. You should be able to play the top cymbal with the tip of your stick and the edge with the stick's shoulder without reaching up awkwardly.
A good test: With your feet on the pedals, you should be able to lift your hands and feel completely balanced on the throne.
Placing Toms and Cymbals
With your core setup established, it’s time to add the toms and cymbals. The goal is to create a smooth, logical flow around the kit, minimizing unnecessary movement.
Start with the rack toms, which usually mount on the bass drum. Position them just above and slightly in front of your snare. They should be close together and angled gently towards you. You should be able to move from the snare to the toms with a simple, relaxed wrist and arm motion. Avoid placing them too high or at a steep angle, as this can lead to poor technique and dented drum heads.
The floor tom goes next to your dominant leg, just outside your hi-hat. Set its height to be roughly the same as your snare drum, or slightly lower. You should be able to reach it easily without twisting your torso.
Now, place your cymbals. The ride cymbal typically goes over or near your floor tom, low enough that you can comfortably play the bell and the bow (the main surface) without raising your shoulder. The crash cymbal usually sits on the other side, above the hi-hat and first rack tom. Place it within easy reach for accents.
Every drummer's body is different, so don't be afraid to experiment. Play a simple pattern moving around the kit. If you have to reach, stretch, or twist to hit something, adjust it. Your final setup should feel natural and effortless.
Now that your kit is set up for comfort and efficiency, you can start focusing on what really matters: playing.