Drum Beats for the Budding Beatmaker
Drum Kit Setup
Building Your Foundation
Setting up a drum kit is like building a house. You start with the foundation and build around it. For a drummer, that foundation is your seat, also known as the throne.
Adjust your throne so your thighs are angled slightly downward when your feet are flat on the floor. Your knees should be just below your hips. This position gives you balance and power without straining your back. Once you're comfortable, everything else falls into place around you.
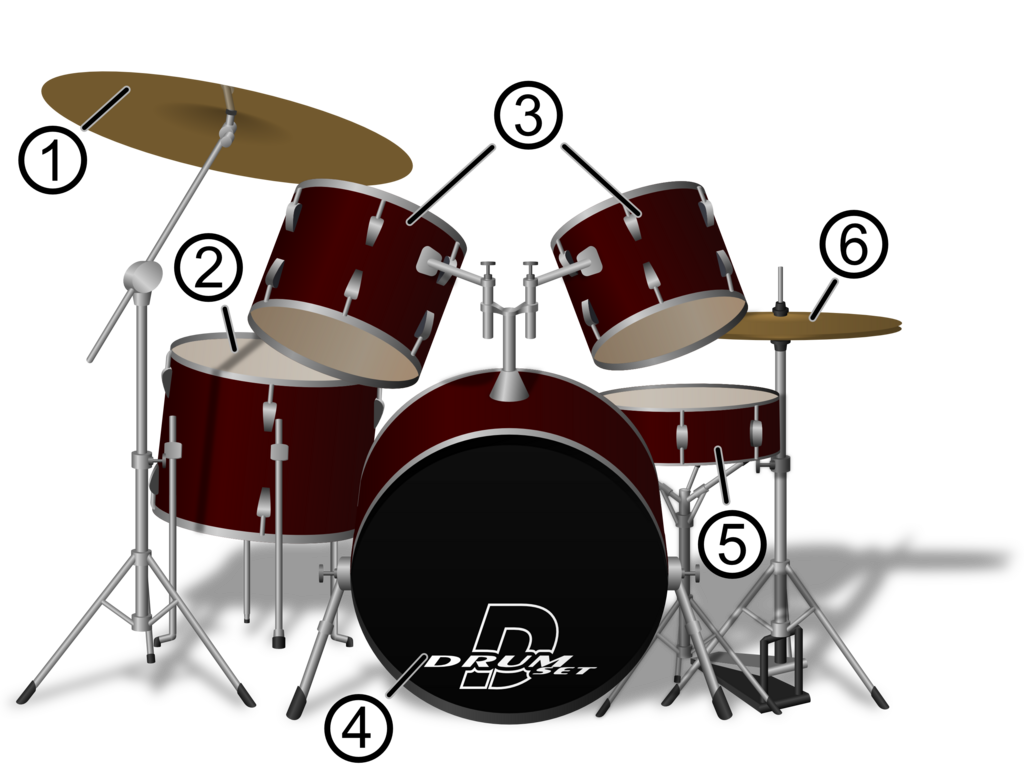
Next, bring in the bass drum. Place it so your dominant foot rests comfortably on the pedal. The beater should strike the center of the drumhead. After the bass drum comes the snare, the heart of the kit. Position the snare stand between your legs. Adjust the height so the rim is about two inches below your belt buckle. You should be able to strike the center of the snare without your stick hitting the rim or your leg.
With the core pieces in place, add the hi-hat stand next to your snare. Your non-dominant foot should rest comfortably on its pedal, just as your other foot rests on the bass drum pedal. Now, mount the rack toms on top of the bass drum and place the floor tom on the other side of your snare. Finally, position your cymbals. The ride cymbal usually goes over the floor tom, and the crash cymbal goes above the rack toms, but place them wherever they are easy and natural to reach.
Finding Your Voice
Drums are melodic instruments, and tuning is how you give them their voice. The goal is to create a clear, pleasing tone from each drum by applying even tension across the drumhead. All you need is a drum key.
Let's tune a snare drum. First, loosen all the tension rods around the rim until they're wobbly. Then, use your fingers to tighten each one until it just makes contact with the rim. This is your starting point, called "finger-tight."
Now, use the drum key. To ensure the head is tensioned evenly, tighten the rods in a star or criss-cross pattern. Pick a rod and give it a half-turn with the key. Then, move to the rod directly opposite it and do the same. Next, move to a rod two spots away and repeat, always tightening the one directly across from it.
As you tighten, gently tap the head about an inch from each tension rod. Listen to the pitch. The goal is to make the pitch the same at every rod. If one spot sounds lower, give that rod a tiny turn. If it sounds higher, loosen it slightly. Higher tension creates a higher-pitched sound, while lower tension produces a deeper tone. Don't be afraid to experiment to find the sound you like.
Setting Up for Comfort
Once your kit is assembled and tuned, the final step is to adjust everything to fit your body. This is called ergonomics, and it's crucial for playing comfortably and preventing injury. Think of the drum kit as an extension of yourself.
Your throne is already set, so now focus on reach. You shouldn't have to stretch or lean to hit anything. Adjust the height and angle of your snare so you can comfortably play a rimshot (hitting the head and rim at the same time) without changing your natural arm position. Angle your toms slightly toward you so your sticks strike them at a natural angle as you move around the kit. Avoid setting them completely flat or at a steep angle.
Your setup should feel effortless. If you feel any pinching, stretching, or tension while playing, something needs to be adjusted.
Your cymbals should be within easy reach. Position them at a height and angle where you can strike the edge with the shoulder of your stick and play on the top with the tip, all without raising your shoulder. A good setup feels natural and allows you to move freely, so take the time to get it right. Your body will thank you.
When setting up your drum throne, what is the ideal position for your legs to ensure balance and prevent strain?
After establishing your position on the throne, what are the next two core components you should place to build the foundation of your kit?
With your kit properly set up, you have a solid foundation to start playing.