Docker Essentials for Application Integration
Docker Images
The Blueprint for Your Application
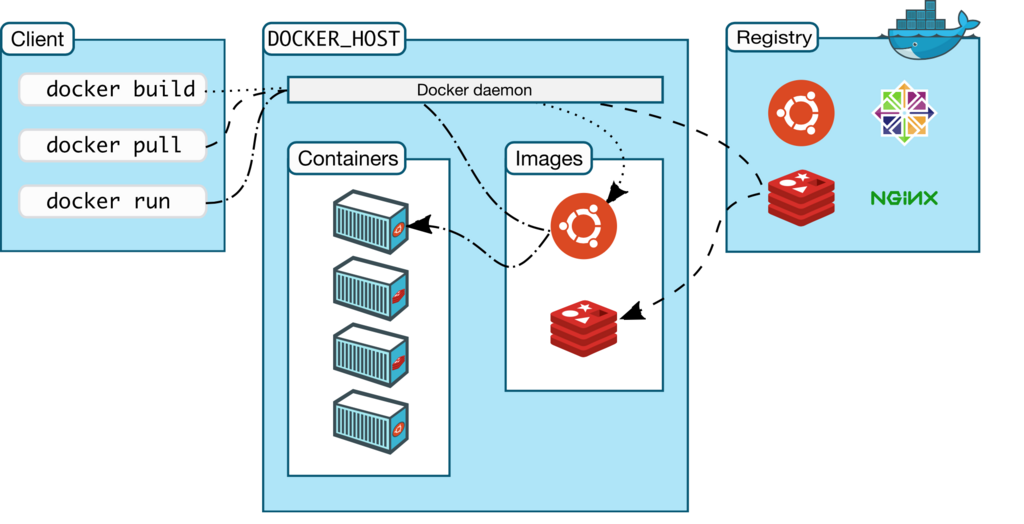
A Docker image is a read-only template that contains the instructions for creating a container. Think of it as a blueprint for a house. The blueprint itself isn't a house, but it holds all the specifications needed to build one consistently, time after time. Similarly, a Docker image contains your application code, a runtime environment, libraries, and any other dependencies needed to run your software.
Images are made up of a series of layers stacked on top of each other. Each layer represents a specific instruction from your image's configuration. This layered structure makes images efficient, as layers can be cached and reused across different images.
So, how do you create this blueprint? You write a set of instructions in a special text file called a Dockerfile. The Docker engine reads this file, executes the commands line by line, and builds a final, packaged image.
Crafting Images with a Dockerfile
A Dockerfile is your recipe for creating an image. It's a plain text file that automates the steps a person would take to set up an environment for an application. Each instruction in the Dockerfile creates a new layer in the image.
Let's look at a simple Dockerfile for a Node.js application.
# Use an official Node.js runtime as a parent image
FROM node:18-alpine

# Set the working directory in the container
WORKDIR /usr/src/app

# Copy package.json and package-lock.json
COPY package*.json ./

# Install app dependencies
RUN npm install

# Bundle app source
COPY . .

# Your app binds to port 8080
EXPOSE 8080

# Define the command to run your app
CMD [ "node", "server.js" ]
Here's a breakdown of the key instructions used in that file.
| Instruction | Purpose |
|---|---|
FROM | Specifies the base image to build upon. Every Dockerfile must start with this. |
WORKDIR | Sets the working directory for any subsequent RUN, CMD, COPY, and ADD instructions. |
COPY | Copies new files or directories from your host machine into the container's filesystem. |
RUN | Executes any commands in a new layer on top of the current image. Used for installing packages. |
CMD | Provides the default command to execute when a container is run from the image. |
To build an image from this Dockerfile, you navigate to the directory containing the file and run the docker build command. The -t flag lets you "tag" the image with a name.
docker build -t my-node-app .
Best Practices for Dockerfiles
Just because you can build an image doesn't mean it's a good one. Efficient, lean, and secure images are faster to build, push, and pull, and they reduce the attack surface of your application. Here are a few best practices to follow.
Use a
.dockerignorefile. This file works just like.gitignore. It lets you exclude files and directories that aren't needed in the final image, like.git, local log files, or dependency folders such asnode_modules. This prevents large, unnecessary files from being copied into your image and speeds up the build process.
Start with a minimal base image. Instead of using a full-fledged OS like ubuntu as your base, opt for smaller images like alpine. The node:18-alpine image is much smaller than node:18, which means your final image will also be smaller.
Combine RUN instructions. Each RUN instruction creates a new image layer. To reduce the number of layers and the final image size, you can chain commands together using the && operator. For example, instead of running apt-get update and apt-get install in separate RUN instructions, combine them.
# Less efficient
RUN apt-get update
RUN apt-get install -y curl

# More efficient
RUN apt-get update && apt-get install -y curl
Run as a non-root user. By default, containers run as the root user, which can be a security risk. It's better to create a dedicated user and group in your Dockerfile and then switch to that user with the USER instruction. This follows the principle of least privilege.
Managing and Sharing Images
Once you've built an image, you'll need to manage it. This involves listing, tagging, and removing images on your local machine. You can see all the images on your system with the docker images command.
Tagging is crucial for versioning. An image tag is a label that helps you identify different versions of an image, like my-app:1.0, my-app:1.1, or my-app:latest. You can add a new tag to an existing image using the docker tag command.
# Tag the my-node-app image with version 1.0
docker tag my-node-app my-node-app:1.0
When an image is no longer needed, you can remove it using docker rmi to free up disk space.
To share your images with others or deploy them to a server, you push them to a container registry. Docker Hub is the default public registry, hosting thousands of official and community-contributed images.
You can download any public image from Docker Hub with the docker pull command.
docker pull python:3.9-slim
To push your own custom image, you first need to tag it with your Docker Hub username: docker tag my-node-app:1.0 yourusername/my-node-app:1.0. After logging in via the command line with docker login, you can push it to the registry with the docker push command. From there, anyone can pull and use it.
What is the primary role of a Docker image?
What is the name of the special text file that contains the step-by-step instructions for creating a Docker image?
With these fundamentals, you can build, manage, and share Docker images for any application.