Comprehensive Guitar Mastery Journey
Guitar Fundamentals
Meet Your Guitar
Before you can play, it helps to know your way around the instrument. Guitars might look different, but they share the same basic parts. Let's walk through them.
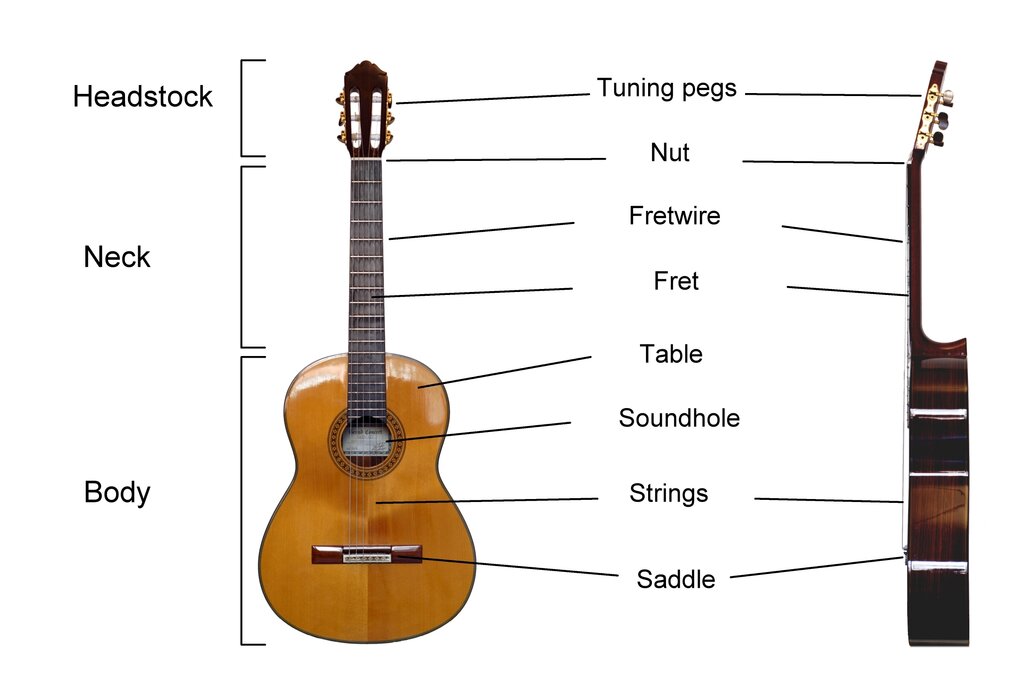
The large, hollow part is the body, which creates the sound. The long, thin part is the neck, and this is where you'll press down on the strings to make different notes. The headstock is at the very top, holding the tuning pegs that you'll turn to tune the strings.
The strings run from the bridge on the body, over the soundhole, and up the neck to the nut at the top. The metal strips on the neck are called frets. They act as markers for where to place your fingers.
Holding the Guitar
How you hold the guitar makes a big difference. It affects your comfort and your ability to play cleanly. Sit up straight in a chair without arms, and rest the curve of the guitar's body on your right thigh (if you're right-handed). The guitar should be angled slightly upward so you don't have to hunch over to see the fretboard.
Your fretting hand (usually your left) supports the neck. Keep your thumb on the back of the neck, roughly opposite your middle finger. This gives your fingers the leverage they need to press down on the strings. Your strumming hand should rest gently over the soundhole, ready to play.

Keep your hands and shoulders relaxed. Tension is the enemy of good guitar playing. If you feel yourself tensing up, take a short break.
Getting in Tune
A guitar that's out of tune will never sound right, no matter how well you play. Tuning should be the first thing you do every time you pick it up. The standard tuning for a six-string guitar, from the thickest string (closest to you) to the thinnest, is E-A-D-G-B-E.
A popular mnemonic to remember this is: Eddie Ate Dynamite, Good Bye Eddie.
| String Number | Note | Description |
|---|---|---|
| 6 | E | Thickest, lowest pitch |
| 5 | A | |
| 4 | D | |
| 3 | G | |
| 2 | B | |
| 1 | E | Thinnest, highest pitch |
The easiest way to tune is with a clip-on electronic tuner or a smartphone app. Pluck a string, and the tuner will tell you if the note is too low (flat) or too high (sharp). Turn the corresponding tuning peg on the headstock to adjust the pitch until the tuner shows the correct note.
Your First Chords
Chords are the building blocks of songs. They are groups of three or more notes played together. We'll start with five of the most common "open chords." They're called open because they use a mix of fretted notes and unfretted, or "open," strings.
Here are the diagrams for C, G, D, A, and E major. The vertical lines are the strings (thickest on the left), and the horizontal lines are the frets. The dots show where to place your fingers, and the numbers on the dots suggest which finger to use: 1 = Index 2 = Middle 3 = Ring 4 = Pinky
An 'O' above a string means to play it open. An 'X' means to mute or avoid playing that string.
Practice forming each chord. Place your fingers one at a time, then strum all the correct strings. Your goal is for every note to ring out clearly. If you hear a muted "thud," check your finger placement. You might be accidentally touching an adjacent string.
Basic Strumming
Strumming is how you create rhythm. You can use a pick or your thumb. For now, focus on simple, steady downstrokes. Try counting to four: "1, 2, 3, 4" and strumming down on each beat. This is called a quarter-note pattern.
Hold a G chord and try it. Strum, two, three, four. Strum, two, three, four. Keep it slow and even.
Once you're comfortable, try adding an upstroke between each beat. This creates an eighth-note pattern:
1 and 2 and 3 and 4 and ↓ ↑ ↓ ↑ ↓ ↑ ↓ ↑
Practice switching between your chords using these simple patterns. Moving smoothly from one chord to the next is a core skill, so be patient with yourself. It takes time to build muscle memory.
Playing a Simple Melody
Melodies are made of single notes played one after another. You can find the notes on the guitar by pressing down on one string at a time at different frets. Let's try playing the melody for "Twinkle, Twinkle, Little Star" using just the thinnest string (the high E string).
Here, the numbers represent which fret to play. "0" means playing the open string.
0 - 0 - 7 - 7 - 9 - 9 - 7 (Twinkle, twinkle, little star)
5 - 5 - 4 - 4 - 2 - 2 - 0 (How I wonder what you are)
Try playing it slowly. Use your index finger to press the frets. This exercise helps you get used to moving up and down the neck and coordinating your two hands.
Ready to check your understanding of these core concepts?
What is the primary function of the frets on a guitar neck?
What is the standard tuning for a six-string guitar, ordered from the thickest string to the thinnest?
These are the first steps on a long journey. Focus on getting these basics right, and you'll build a solid foundation for everything that comes next. Practice a little bit every day, and have fun.