Capturing Life in Motion Photography and Videography
Photography Basics
The Exposure Triangle
At its core, a photograph is just a recording of light. How bright or dark that recording is comes down to one thing: exposure. Getting the exposure right is the foundation of good photography. It’s a balancing act between three key settings that form what’s known as the exposure triangle.
Think of it like filling a bucket with water from a raincloud. You can use a wide-mouthed bucket (aperture), leave it out in the rain for a long time (shutter speed), or wait for a heavy downpour (ISO). You can change any of these factors, but to get the exact same amount of water, you’ll need to adjust the others. Let's break them down.
Aperture and Focus
Aperture is the opening in your camera's lens that lets light pass through to the sensor. It works just like the pupil of your eye, widening in the dark to let more light in and shrinking in bright conditions.
In photography, aperture is measured in f-stops. You'll see them written as , , or . Here’s the tricky part: a smaller f-number means a larger opening, and a larger f-number means a smaller opening. So, is a very wide aperture that lets in a lot of light, while is a tiny opening that lets in very little.
Small f-number () = Large aperture = More light Large f-number () = Small aperture = Less light
But aperture does more than just control brightness. It also determines your depth of field, which is how much of your photo is in sharp focus. A wide aperture (like ) creates a shallow depth of field. This means only a small slice of your image will be sharp, while the background and foreground blur away beautifully. It's perfect for portraits, making your subject pop.
On the other hand, a narrow aperture (like ) creates a deep depth of field. This keeps nearly everything in the frame sharp, from the flowers at your feet to the mountains in the distance. This is ideal for landscape photography where you want the entire scene to be in focus.
Shutter Speed and Motion
If aperture is how wide the opening is, shutter speed is how long that opening stays open. It’s the duration of time your camera's sensor is exposed to light. Shutter speed is measured in seconds or fractions of a second, like 1/1000s or 5s.
This setting has a dramatic effect on how motion is captured in your photos.
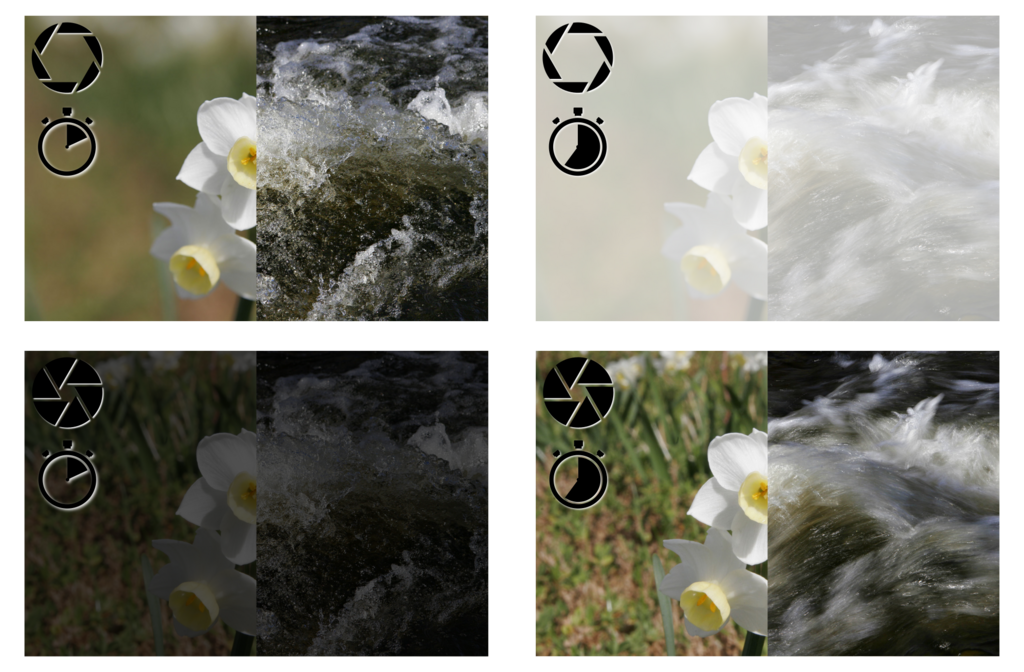
Fast Shutter Speed (e.g., 1/1000s): Freezes action. This is what you need to capture a speeding car, a bird in flight, or a laughing child without any blur. It lets in very little light, so it’s best for bright conditions.
Slow Shutter Speed (e.g., 1s): Creates motion blur. Anything that moves while the shutter is open will appear as a streak or blur. This can be used creatively to show the movement of water in a waterfall or the path of car headlights at night. Because the shutter is open for a long time, it lets in a lot of light, so you'll often need a tripod to keep the camera steady.
ISO and White Balance
The third part of the exposure triangle is ISO. It refers to your camera sensor's sensitivity to light. Think of it as artificially brightening your photo after the light has passed through the aperture and shutter. ISO is useful when you can't get enough light by adjusting the other two settings, like when shooting indoors without a flash.
ISO
noun
A camera setting that brightens a photo, similar to increasing the sensitivity of film. Common values include 100, 200, 400, and up.
A low ISO, like 100 or 200, produces the highest quality images with the least amount of graininess, or "noise." As you increase the ISO, the image gets brighter, but you also introduce more digital noise, which can make the photo look grainy. The goal is always to use the lowest ISO possible for the lighting conditions.
Related to light, but separate from exposure, is white balance. Our eyes automatically adjust to different light sources, but a camera needs to be told what is white. Different light sources have different color "temperatures." Daylight is cool and blue, while tungsten light bulbs are warm and orange. Setting the correct white balance ensures that the colors in your photo look natural. Most cameras have automatic white balance (AWB) which works well, but you can also set it manually to presets like "Daylight," "Cloudy," or "Tungsten" for more accurate colors.
Putting It All Together
So how do you use all this? Most cameras have modes to help you out.
- Auto: The camera controls everything.
- Aperture Priority (A or Av): You choose the aperture (for depth of field), and the camera sets the shutter speed for correct exposure.
- Shutter Priority (S or Tv): You choose the shutter speed (for motion), and the camera sets the aperture.
- Manual (M): You control everything: aperture, shutter speed, and ISO.
Aperture Priority is a great place to start. It gives you creative control over the most important artistic element—depth of field—while the camera handles the technical side of exposure.
By then end of this tutorial, you’ll have a firm idea of: 1) How to create motion blur or freeze motion using manual shutter speed 2) How aperture affects depth of field and which aperture to use for portraits or landscapes 3) Know the basic camera settings for setting exposure on manual mode, outdoors in bright sun or indoors on a dark night.
Understanding these fundamentals—aperture, shutter speed, and ISO—is the key to moving beyond automatic settings. It lets you take control of your camera and start making creative decisions to capture the world exactly as you see it.
Ready to test your knowledge? Let's see what you've learned about the basics of photography.
Which of the following aperture settings would let the most light into the camera, creating the shallowest depth of field?
You are trying to photograph a fast-moving bird in flight and want to freeze the motion completely. Which of these settings should be your priority?
Practice is the best way to master these concepts. Don't be afraid to switch your camera to a semi-automatic or manual mode and experiment. See how changing each setting affects your final image. Happy shooting!