Blender Fundamentals for 3D Creation
Blender Interface
Getting Around Blender
Opening Blender for the first time can feel like stepping into the cockpit of a spaceship. There are buttons, panels, and windows everywhere. But don't worry, it's all organized logically. Once you learn the layout, it becomes second nature.
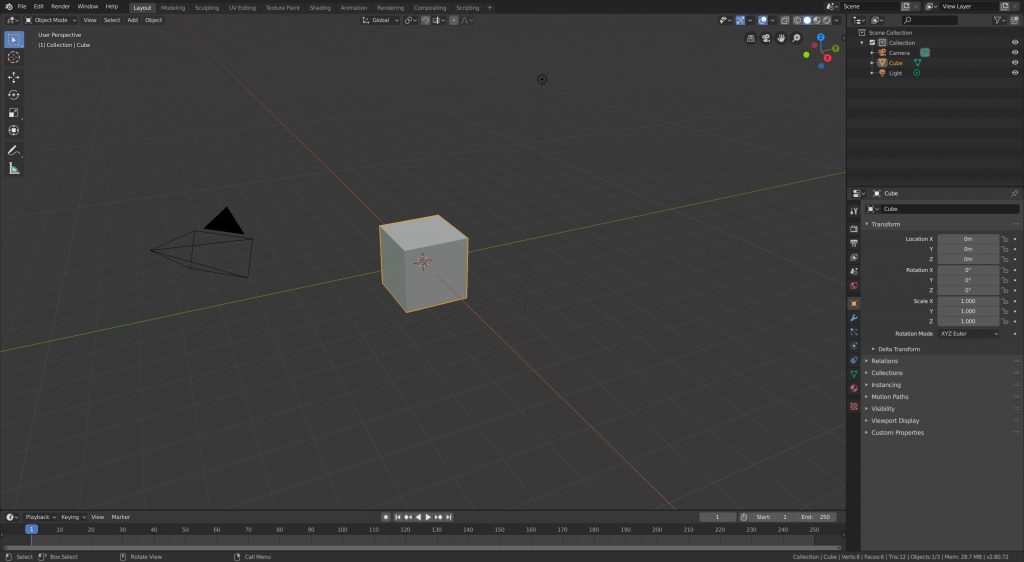
The interface is made up of several key areas:
- 3D Viewport: This is the largest window and your main workspace. It's where you'll see and interact with your 3D models.
- Outliner: Usually in the top-right, this panel lists every object in your scene, like cameras, lights, and models. It's like a table of contents for your project.
- Properties Editor: Below the Outliner, this is where you'll find all the settings and options for your selected object, the scene, rendering, and more.
- Timeline: At the bottom, this editor is for animation. We won't use it just yet, but it's good to know what it is.
Navigating the 3D Viewport
Moving around in your 3D scene is the most fundamental skill you'll learn. There are three main ways to change your view: orbiting, panning, and zooming.
Learning to navigate the Blender viewport will make your life much easier.
While you can use the navigation gizmo in the top-right of the viewport, using mouse and keyboard shortcuts is much faster. A three-button mouse with a scroll wheel is highly recommended for working in Blender.
| Action | Shortcut |
|---|---|
| Orbit (Rotate View) | Hold Middle Mouse Button + Drag |
| Pan (Move View) | Hold Shift + Middle Mouse Button + Drag |
| Zoom (In/Out) | Scroll Wheel Up / Down |
Practice these movements. Tumble around the default cube, pan side to side, and zoom in and out. Getting a feel for navigation is all about muscle memory.
Your First Tools
On the left side of the 3D Viewport, you'll see a vertical toolbar. This contains the most basic tools for manipulating objects: Move, Rotate, and Scale. While you can click these icons, the real power of Blender comes from using keyboard shortcuts.
| Tool | Shortcut Key |
|---|---|
| Move (or Grab) | G |
| Rotate | R |
| Scale | S |
Try it out. First, select the default cube by clicking on it. Then, press the G key. Your cube will stick to your mouse cursor. Move your mouse around, and then left-click to confirm the new position. If you change your mind mid-move, just right-click or press Esc to cancel the action. The same process works for Rotate (R) and Scale (S).
The workflow is typically: Select Object → Press Shortcut → Move Mouse → Left-Click to Confirm.
Another important concept is the 3D Cursor, that little red-and-white circle. Its main job is to determine where new objects are added to the scene. You can place it anywhere you like by holding Shift and right-clicking.
In the Blender interface, which area is the primary workspace where you see and interact with your 3D models?
What is the primary function of the Outliner panel?
That's the basic tour. You now know how the interface is laid out, how to navigate your scene, and how to use the most fundamental tools. In the next section, we'll start putting these skills to use by working with 3D objects.