Backend Web Development Architecture
Backend Architecture Fundamentals
The Heart of the Application
At its core, a backend has one primary job: to handle incoming requests and provide appropriate responses. This fundamental interaction is known as the request-response cycle. When you type a URL into your browser, click a button on a mobile app, or submit a form, you're creating a request. That request travels across the internet to a server, which processes it and sends back a response—be it a full webpage, raw data, or a simple confirmation.
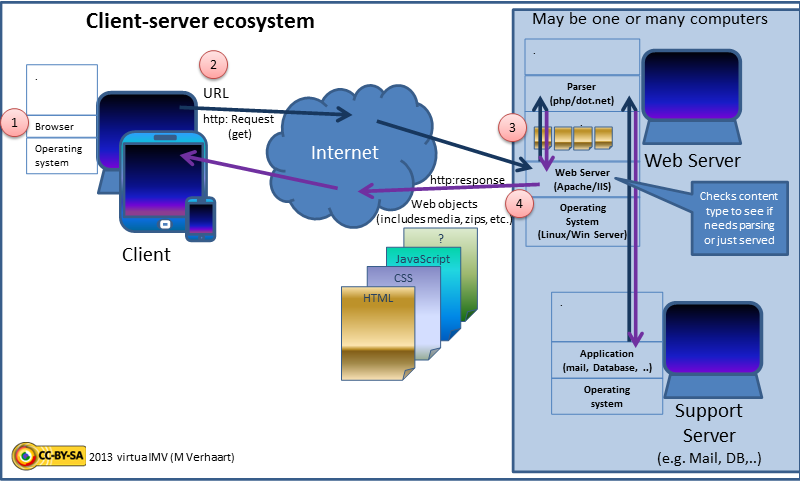
The server isn't just a passive file cabinet. It executes business logic—the unique rules and processes that define what your application does. This could involve calculating a shipping cost, verifying a user's password, or finding the fastest route between two points. The backend also manages data, interacting with databases to create, read, update, and delete information as needed.
Speaking HTTP
Clients and servers communicate using a set of rules called the Hypertext Transfer Protocol, or HTTP. Every HTTP request has a method that tells the server what kind of action the client wants to perform. These methods correspond directly to the CRUD (Create, Read, Update, Delete) operations you're likely familiar with from database management.
| HTTP Method | CRUD Operation | Description |
|---|---|---|
| GET | Read | Retrieves data from the server. |
| POST | Create | Submits new data to the server. |
| PUT | Update | Replaces an existing resource completely. |
| DELETE | Delete | Removes a specific resource from the server. |
After processing a request, the server sends back a response that includes an HTTP status code. This three-digit number quickly communicates the result. You've surely seen a 404 Not Found error, but there are many others.
- 2xx (Success): The request was successful.
200 OKis the standard success response, while201 Createdspecifically means a new resource was made. - 4xx (Client Error): The client made a mistake.
400 Bad Requestmeans the server couldn't understand the request, and401 Unauthorizedmeans the client isn't authenticated. - 5xx (Server Error): Something went wrong on the server's end.
500 Internal Server Erroris a generic catch-all for unexpected problems.
A Blueprint for Scale
For a tiny application, you could handle all logic in a single file. But as complexity grows, this becomes unmanageable. A solves this by separating the code into distinct layers, each with a single responsibility. This makes the codebase easier to understand, maintain, and scale.
Here’s a typical breakdown:
- Routes: This layer is the entry point. It defines the API's URL paths (like
/usersor/products/:id) and directs incoming requests to the correct controller. - Controllers: These act as traffic cops. They parse the incoming request (extracting parameters or body data), call the appropriate service function to handle the business logic, and then format the response to send back to the client.
- Services: This is where the core business logic lives. Service functions orchestrate tasks, like fetching data from multiple sources, performing calculations, or calling other services. They are kept clean of any HTTP-specific code.
- Repositories (or Data Access Layer): This layer's sole job is to communicate with the database. It contains all the logic for querying, creating, and updating data, abstracting it away from the rest of the application.
Getting Started with Node.js
Let's put this theory into practice by setting up a basic server using Node.js and the Express framework. Express provides a thin layer of fundamental web application features, without obscuring the Node.js features that you know and love.
# Create a new directory and navigate into it
mkdir my-backend
cd my-backend

# Initialise a new Node.js project
npm init -y

# Install Express
npm install express
Now, create a file named index.js. This simple snippet creates an Express application, defines a single route for the root URL (/), and starts a server listening on port 3000.
// Import the Express library
const express = require('express');

// Create an instance of an Express application
const app = express();
const port = 3000;

// Define a route for GET requests to the root URL ('/')
app.get('/', (req, res) => {
  res.send('Hello, World!');
});

// Start the server and listen for connections on the specified port
app.listen(port, () => {
  console.log(`Server listening at http://localhost:${port}`);
});
Finally, you need a way to manage sensitive information like database passwords or API keys without hard-coding them into your source code. This is crucial for security and for using different configurations across development, testing, and production environments.
The dotenv package lets you load these values from a .env file into your application's environment. First, install it:
npm install dotenv
Next, create a .env file in your project's root directory. Remember to add .env to your .gitignore file to prevent it from being committed to version control.
Inside .env:
PORT=3000
DATABASE_URL="your_database_connection_string"
To use these variables, require and configure dotenv at the very top of your index.js file. Now you can access them through process.env.
require('dotenv').config();
const express = require('express');

const app = express();
// Use the port from the .env file, or default to 3000
const port = process.env.PORT || 3000;

app.get('/', (req, res) => {
  res.send('Hello from a configured server!');
});

app.listen(port, () => {
  console.log(`Server listening at http://localhost:${port}`);
});
You now have a foundational understanding of a backend's responsibilities and a simple, configurable server to build upon. This layered approach and proper configuration management will set you up for success as you start building more complex applications.