Arduino Uno Essentials
Introduction to Arduino Uno
Meet the Arduino Uno
Think of the Arduino Uno as the brain for your electronics projects. It's a small, programmable board that can read information from the world around it and control physical objects. You can connect sensors, lights, motors, and more, and then tell the Arduino how to make them work together. It's the bridge between the digital world of code and the physical world you can touch.
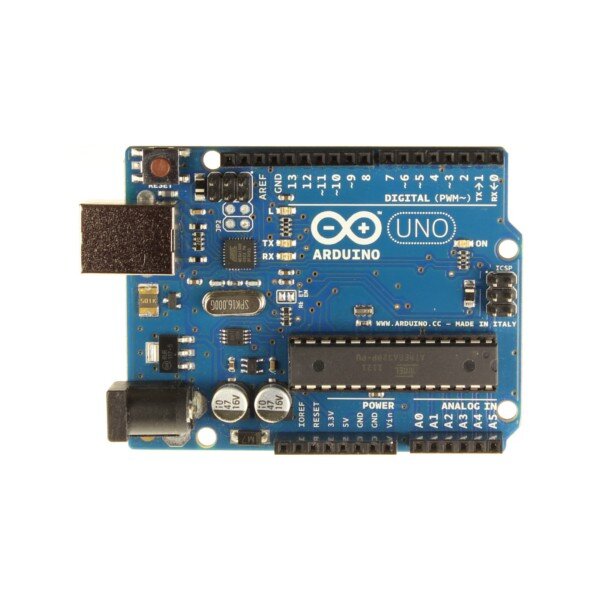
Arduino UNO is a low-cost, flexible, and easy-to-use programmable open-source microcontroller board that can be integrated into a variety of electronic projects.
At its heart is a microcontroller, the large black chip you see on the board. This is the ATmega328P, and it's the actual computer that runs your instructions. The rest of the board is designed to make it easy to connect things to this chip and give it power.
A Tour of the Board
Let's look at the key parts. You'll see rows of black sockets along the edges. These are the input/output (I/O) pins, and they are how you connect your components. They are divided into a few groups.
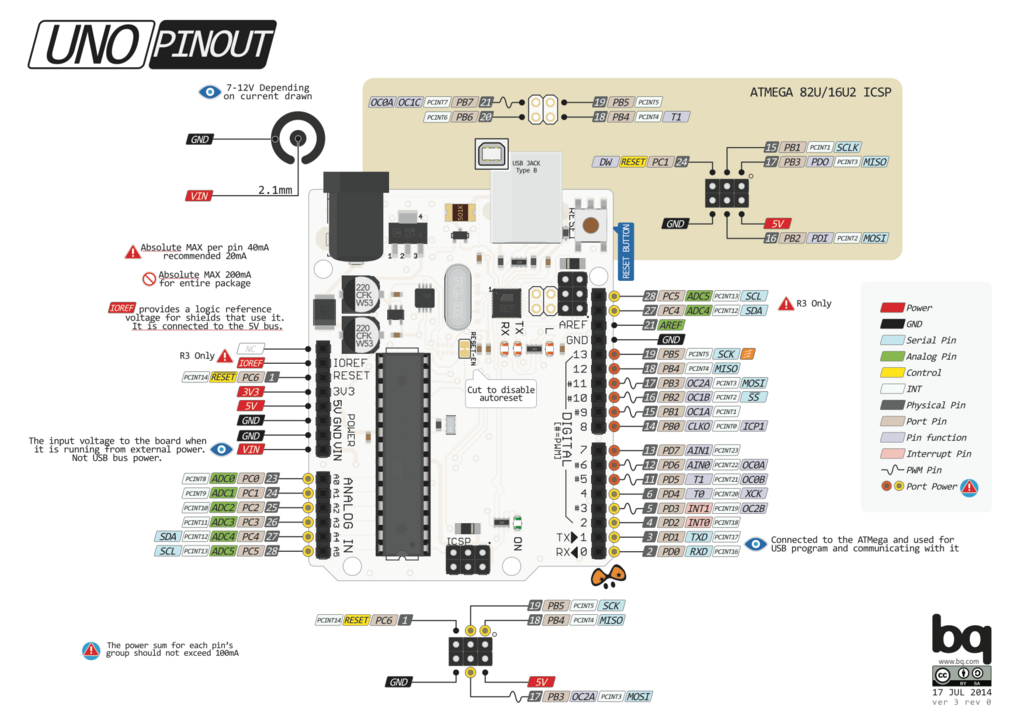
Digital Pins (0-13): These pins are like simple light switches. They can be set to either HIGH (on, 5 volts) or LOW (off, 0 volts). You'd use them to turn an LED on or off, for example. Some of these pins, marked with a tilde (~), have a special ability called Pulse Width Modulation (PWM), which lets them simulate an analog signal, like dimming an LED.
Analog In Pins (A0-A5): These pins are like dimmer switches. They read a range of voltages, not just on or off. This is useful for reading sensors that give variable data, like a temperature sensor or a knob you can turn.
Power Pins (5V, 3.3V, GND): These pins supply power to your circuit. The 5V and 3.3V pins provide a steady 5 volts or 3.3 volts, respectively. The Ground (GND) pins are for completing the circuit. Every circuit needs a path from the power source back to ground.
Power and Communication
To get your Arduino running, you need to give it power. You have two main options:
- USB Cable: The simplest way is to plug it into a computer or a USB wall adapter. This provides a steady 5V and is also how you'll upload instructions to the board.
- Barrel Jack: For projects that need to run untethered, you can use a wall adapter or a battery pack that plugs into this jack. The board can handle a recommended range of 7 to 12 volts here. It has a built-in voltage regulator that safely steps the voltage down to the 5V the board needs to operate.
Always check the voltage requirements of your power source. Using the barrel jack with less than 7V can make the board unstable, while more than 12V can damage it.
The Arduino Uno isn't just a solo act. It needs to talk to your computer and other electronic components. It does this using communication protocols, which are like languages for electronics. The Uno supports three main types:
- UART (Serial): This is the most common one. Digital pins 0 (RX) and 1 (TX) are used for serial communication. It's how the Arduino sends data back to your computer so you can see what it's doing.
- I2C: This protocol lets you connect many devices using just two wires: SDA and SCL. It's great for connecting multiple sensors without using up a lot of pins.
- SPI: This is a faster communication protocol, often used for things like SD card readers or certain types of displays.
| Specification | Value |
|---|---|
| Microcontroller | ATmega328P |
| Operating Voltage | 5V |
| Input Voltage (recommended) | 7-12V |
| Digital I/O Pins | 14 (6 provide PWM output) |
| Analog Input Pins | 6 |
| DC Current per I/O Pin | 20 mA |
| Flash Memory | 32 KB |
| SRAM | 2 KB |
| Clock Speed | 16 MHz |
These specifications tell you the limits and capabilities of the board. For instance, the 32 KB of Flash Memory is where your program is stored, and the 16 MHz clock speed tells you how fast it can execute instructions. This might not seem like much compared to a computer, but it's plenty of power for a huge range of electronics projects.