Arduino IR Sensor Buzzer Control
Arduino Basics
What is an Arduino?
An Arduino is a small computer that you can program to control things in the physical world. It's the brain behind countless DIY electronics projects, from blinking lights and robotic arms to weather stations and art installations. It reads inputs—like a sensor detecting light or a button being pressed—and turns them into outputs, like activating a motor or turning on an LED.
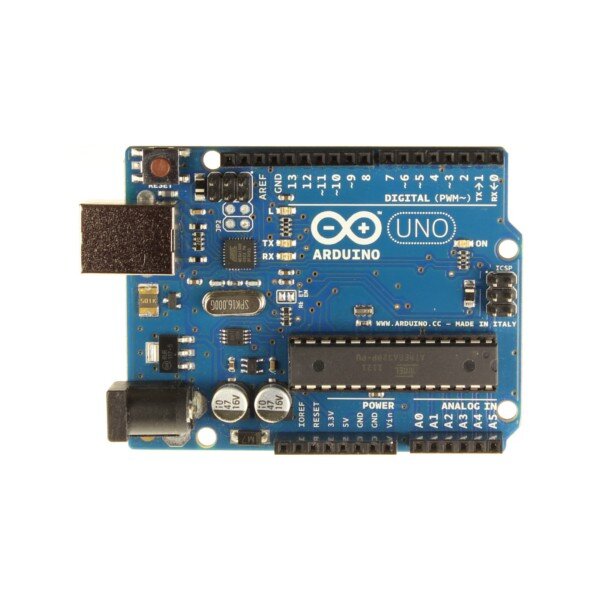
The most popular board for beginners is the Arduino Uno. It's versatile, easy to use, and has a huge community of users who share projects and solve problems together. Let's take a closer look at its parts.
A Tour of the Uno
At first glance, the board can look a little intimidating. But once you know what the main parts do, it's quite simple.
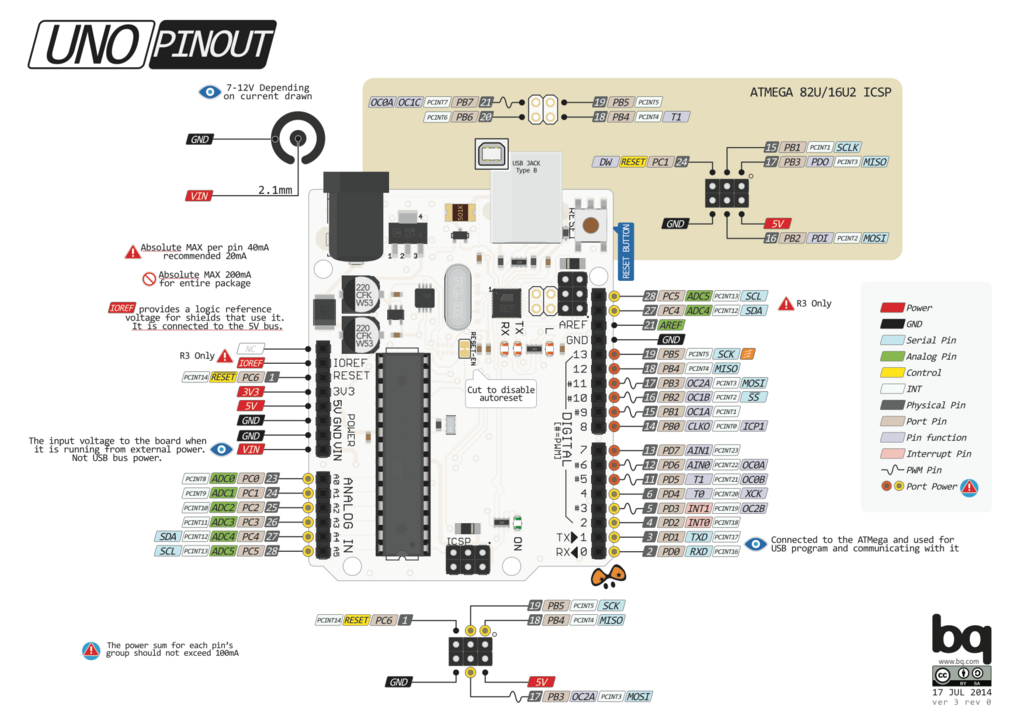
Here are the key players:
- Microcontroller: The large black chip in the middle is the ATmega328P. This is the brain of the board where your code runs.
- USB Port: This is how you connect the Arduino to your computer. It provides power and allows you to upload programs to the board.
- Power Jack: You can also power the Arduino with an external power supply or battery pack using this port.
- Reset Button: Pressing this will restart the program currently running on the microcontroller.
The most important parts for building circuits are the rows of black sockets along the edges, called pins.
Pins are how you connect wires to the Arduino, allowing it to interact with other electronic components like sensors, lights, and motors.
The pins are grouped by function:
- Power Pins: Look for pins labeled
5V,3.3V, andGND(Ground). These supply power to your electronic components.GNDis the negative terminal of the circuit. - Analog In Pins: Labeled
A0toA5, these pins can read a range of voltage levels. This is useful for reading sensors that give variable data, like a light sensor measuring brightness or a potentiometer (knob) being turned. - Digital Pins: Labeled
0to13, these are the most versatile pins. They can be configured as either inputs or outputs. As outputs, they can be either on (HIGH) or off (LOW), perfect for controlling things like LEDs. As inputs, they can detect if something is on or off, like a button press.
Some digital pins, marked with a tilde (~), have an extra ability called Pulse Width Modulation (PWM). This allows them to simulate an analog output, like dimming an LED.
The Arduino IDE
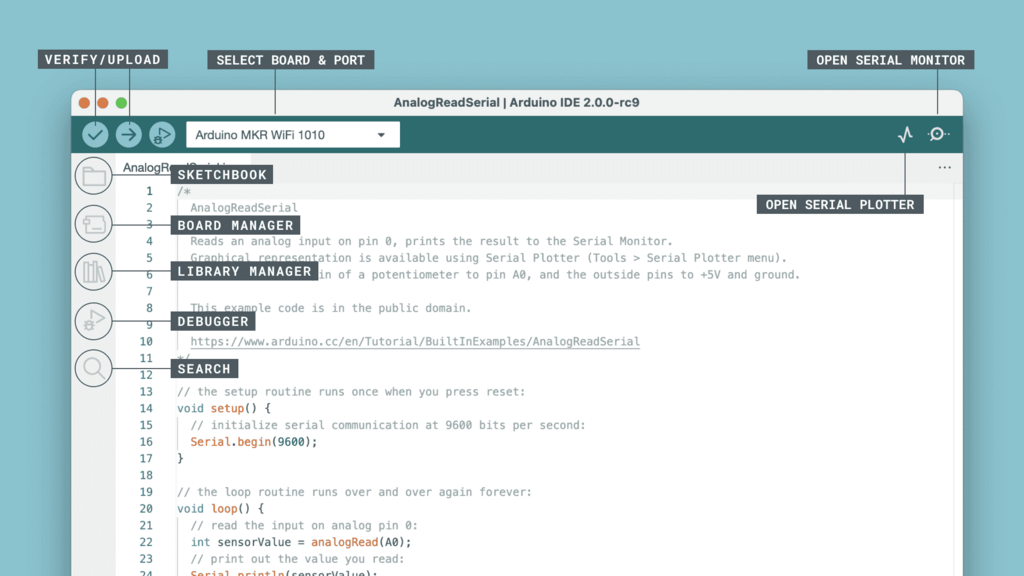
To tell the Arduino what to do, you write a program, also called a sketch. You'll do this in a special application called the Arduino Integrated Development Environment, or IDE. It's a simple text editor with a few buttons to verify your code and upload it to the board.
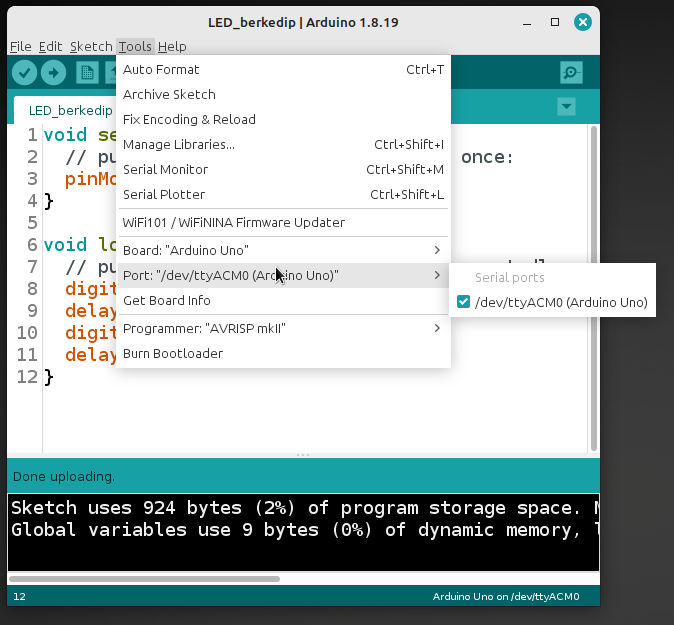
Before you can upload your first sketch, you need to tell the IDE what kind of board you're using and how it's connected to your computer.
- Download and install the Arduino IDE from the official Arduino website.
- Connect your Arduino Uno to your computer with a USB cable.
- Open the IDE. Go to the
Tools > Boardmenu and selectArduino Uno. - Go to the
Tools > Portmenu and select the port your Arduino is connected to. It will usually have the board name next to it.
With the IDE configured, you're ready to look at the basic structure of an Arduino sketch.
Structure of a Sketch
Every Arduino sketch has two main functions: setup() and loop(). A function is just a named block of code that performs a specific task.
void setup() {
  // put your setup code here, to run once:

}

void loop() {
  // put your main code here, to run repeatedly:

}
The setup() function runs exactly once, right after you power on or reset the Arduino. It's where you put code for one-time initialization tasks, like telling the board which pins will be inputs and which will be outputs.
Think of
setup()as the preparation step. You do it once at the beginning to get everything ready.
The loop() function is where the magic happens. After setup() finishes, the code inside loop() runs over and over again, forever (or until you turn the board off). This is the core of your program, where you'll constantly check sensor readings, control motors, and blink lights.
Think of
loop()as the main action. It's a continuous cycle that keeps your project running.
You're now familiar with the board, the software, and the basic structure of a program. Let's test what you've learned.
What is the primary role of the large black ATmega328P chip on an Arduino Uno board?
Which function in an Arduino sketch is designed to run over and over again, forming the main part of the program?
With these fundamentals in place, you're ready to start building your first circuit.