Arduino IoT for Environmental Monitoring
Arduino Basics
Meet the Arduino
Arduino is an open-source electronics platform that makes it easy to create interactive projects. It consists of two main parts: a physical circuit board (the hardware) and a piece of software (the IDE) that runs on your computer. You use the software to write code and upload it to the board, which can then interact with the physical world.
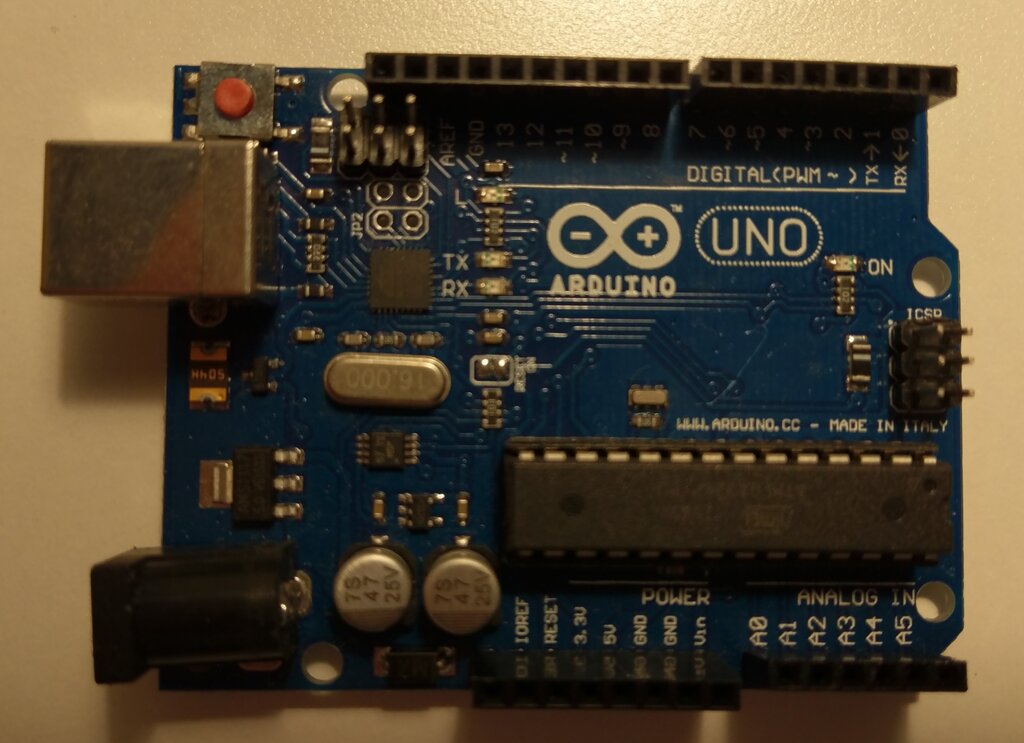
Let's look at the key parts of the board. The large black chip is the microcontroller, which acts as the brain. The USB port connects the board to your computer for power and programming. The rows of black sockets along the edges are the input/output (I/O) pins. These pins are how the Arduino connects to sensors, lights, motors, and other electronic components.
The Programming Environment
To program your Arduino, you'll use the Arduino IDE (Integrated Development Environment). This is a simple application where you write your code, check it for errors, and send it to the board. The code you write is called a "sketch."
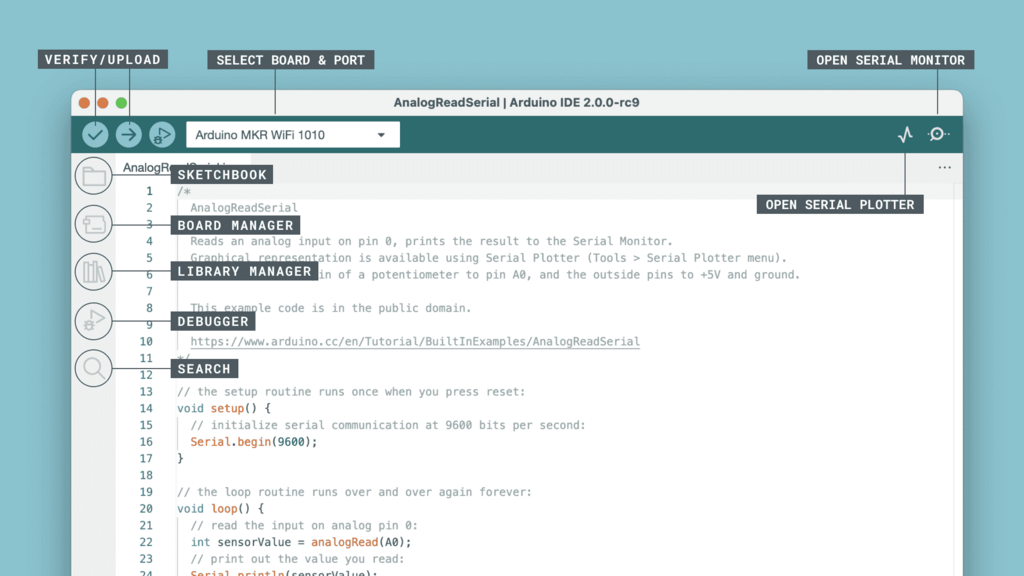
Setting it up is straightforward. First, download the free IDE from the official Arduino website. Once installed, connect your Arduino board to your computer with a USB cable. In the IDE, you'll need to select two things from the 'Tools' menu:
- Board: Tell the IDE which Arduino board you're using (e.g., 'Arduino Uno').
- Port: Select the communication port your board is connected to. It will usually be labeled with the board's name.
Your First Sketch
Every Arduino sketch has two essential functions: setup() and loop(). The Arduino runs these automatically.
setup()runs only once, right after the board powers on or is reset. It's used for initialization, like setting up pins or starting a communication link.
loop()runs continuously aftersetup()finishes. It repeats the code inside it over and over, which is where the main action of your project happens.
The classic first sketch is called "Blink." It simply turns the board's built-in LED on and off. Most Arduino boards have a small LED connected to digital pin 13, which you can control without wiring anything.
void setup() {
  // Initialize digital pin LED_BUILTIN as an output.
  pinMode(LED_BUILTIN, OUTPUT);
}

void loop() {
  digitalWrite(LED_BUILTIN, HIGH);  // Turn the LED on
  delay(1000);                      // Wait for a second
  digitalWrite(LED_BUILTIN, LOW);   // Turn the LED off
  delay(1000);                      // Wait for another second
}
Let’s break down the commands:
pinMode(pin, mode): Configures a specific pin to behave as either an input or an output.LED_BUILTINis a constant that refers to the pin number of the onboard LED (usually 13).digitalWrite(pin, value): Writes aHIGH(on) orLOW(off) value to a digital pin.delay(ms): Pauses the program for a specified number of milliseconds.delay(1000)creates a one-second pause.
To run this sketch, type it into the IDE, click the 'Verify' button (a checkmark) to check for errors, and then click 'Upload' (an arrow) to send it to your board. If all goes well, the tiny LED on your Arduino will start blinking.
What are the two essential functions that every Arduino sketch must contain?
What is the primary function of the pinMode(pin, mode) command?
That's the core process. By changing the values in digitalWrite() and delay(), you can control how the Arduino interacts with its most basic output, a simple light.