Advanced WSL Techniques
WSL Performance Optimization
Tuning WSL Performance
By default, the Windows Subsystem for Linux (WSL) is designed to use as much of your system's resources as it needs, up to a certain limit. For most tasks, this works perfectly. But when you're running demanding applications like compiling large codebases, running databases, or training machine learning models, you might want more direct control over how much CPU and memory WSL can access.
This is where the .wslconfig file comes in. It's a configuration file you can create in your Windows user profile folder (usually C:\Users\<YourUsername>) to set global limits for all your WSL 2 distributions. If the file doesn't exist, you just need to create it.
Adjusting CPU and Memory
The two most common resources to tweak are the number of processors (CPU cores) and the amount of memory available to the WSL virtual machine. You can specify these directly in your .wslconfig file.
[wsl2]
# Limit the number of CPU cores to 4
processors=4

# Limit memory to 8GB
memory=8GB

# Turn off memory reclaim to keep performance consistent
# This stops WSL from shrinking its memory usage
autoMemoryReclaim=disabled
After creating or editing this file, you need to restart WSL for the changes to take effect. You can do this by opening PowerShell or Command Prompt and running wsl --shutdown. The next time you start a WSL distribution, it will use your new settings.
Managing Disk Space
WSL distributions are stored in a virtual hard disk file (.vhdx). This file automatically grows in size as you add files, but it doesn't automatically shrink when you delete them. Over time, this can lead to a lot of wasted space.
To reclaim this space, you need to manually compact the .vhdx file. This is a multi-step process involving Windows tools.
First, find your
.vhdxfile path by runningwsl -l -vto get the distribution name, then look it up in your system settings. Once you have the path, shut down WSL withwsl --shutdown.
Next, open the Windows diskpart utility to perform the compaction. You'll need to run these commands in a Command Prompt or PowerShell with administrator privileges.
# Start the diskpart utility
diskpart

# Select the WSL virtual disk file
# Replace the path with the actual path to your VHDX file
DISKPART> Select vdisk file="C:\path\to\your\ext4.vhdx"

# Compact the disk to reclaim free space
DISKPART> compact vdisk

# Detach the disk
DISKPART> detach vdisk
Monitoring Performance
To know if your optimizations are working, you need to monitor WSL's resource usage. You can use standard Linux tools from within your WSL terminal.
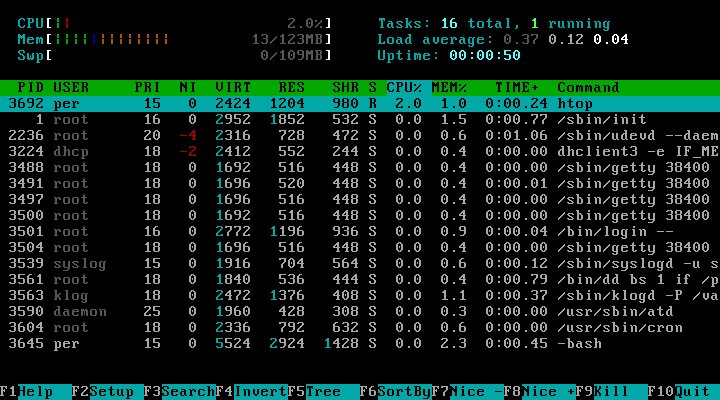
Tools like top and its more user-friendly cousin, htop, give you a detailed, real-time look at CPU and memory usage by different processes running inside WSL. If you don't have htop installed, you can usually get it with sudo apt update && sudo apt install htop on Debian-based distributions.
You can also monitor WSL from the Windows side. The Windows Task Manager will show a vmmem process, which represents the resource usage of the WSL virtual machine.
Best Practices for Resource Management:
- Set Realistic Limits: Don't allocate all your CPU cores or memory to WSL, as this can slow down Windows itself. A good starting point is half of your system's resources.
- Close Unused Terminals: Each open WSL session consumes some resources. Close them when you're done.
- Manage Background Processes: Be mindful of any services or applications you leave running in the background within WSL.
- Compact Disks Periodically: If you frequently create and delete large files, make a habit of compacting your
.vhdxfile every few months to reclaim space.
Now, let's test your knowledge on optimizing WSL.
Where should you create the .wslconfig file to apply global settings to all WSL 2 distributions?
After modifying the .wslconfig file to limit memory or CPU cores, what is the necessary command to run in PowerShell or Command Prompt for the changes to take effect?
By actively managing WSL's resources, you can ensure it runs smoothly without slowing down your host machine, creating a more efficient development environment.