Advanced Mac Terminal Workflows
Navigation Mastery
Navigate Like a Pro
You know how to get around the Terminal with cd and see what's there with ls. Now it's time to move faster. The key is understanding how the file system is structured and using shortcuts to jump around it with precision.
Every file and folder on your Mac has an address, called a path. There are two ways to write this address: absolute and relative.
An absolute path starts from the very top of your file system, the root directory, which is represented by a single /. It's a complete, unambiguous address. For example: /Users/your_username/Documents.
A relative path starts from your current location. If you are in /Users/your_username, the relative path to your Documents folder is just Documents. It's shorter, but it only works from that specific starting point.
Use absolute paths when you need to be certain about a location, no matter where you are. Use relative paths for quick moves to nearby files and folders.
Smarter Directory Hopping
Jumping between two directories deep in your file system can be tedious. Constantly typing long cd commands is slow. A more efficient method is to use pushd and popd.
Think of pushd as creating a bookmark for your current directory before jumping to a new one. It pushes your current location onto a list, like putting a plate on a stack. popd takes the top plate off the stack and sends you back there.
# You are in your Documents folder
~ $ pwd
/Users/your_username/Documents

# Push this location onto the stack and go to Downloads
~ $ pushd ~/Downloads
~/Downloads ~/Documents

# Do some work in Downloads...

# Pop the last location off the stack and return to Documents
~ $ popd
~/Documents
Another essential shortcut is the tilde ~. It always expands to the path of your home directory. So instead of typing /Users/your_username every time, you can just type ~. cd ~/Desktop is a lot faster than cd /Users/your_username/Desktop.
Uncovering File Details
The ls command is more powerful than it looks. By adding flags, you can change its behavior to reveal more information. Flags are options that follow a command, usually preceded by a hyphen.
| Flag | Action |
|---|---|
-l | Long format. Shows detailed information. |
-a | All files. Includes hidden files. |
-h | Human-readable. Displays file sizes in KB, MB, GB. |
-t | Time sort. Lists files by modification time, newest first. |
-S | Size sort. Lists files by size, largest first. |
You can combine flags. ls -la is a common combination that shows all files in long format. Adding h (ls -lah) makes the file sizes easier to read. ls -lSt will show you the largest files first, with ties broken by modification time.
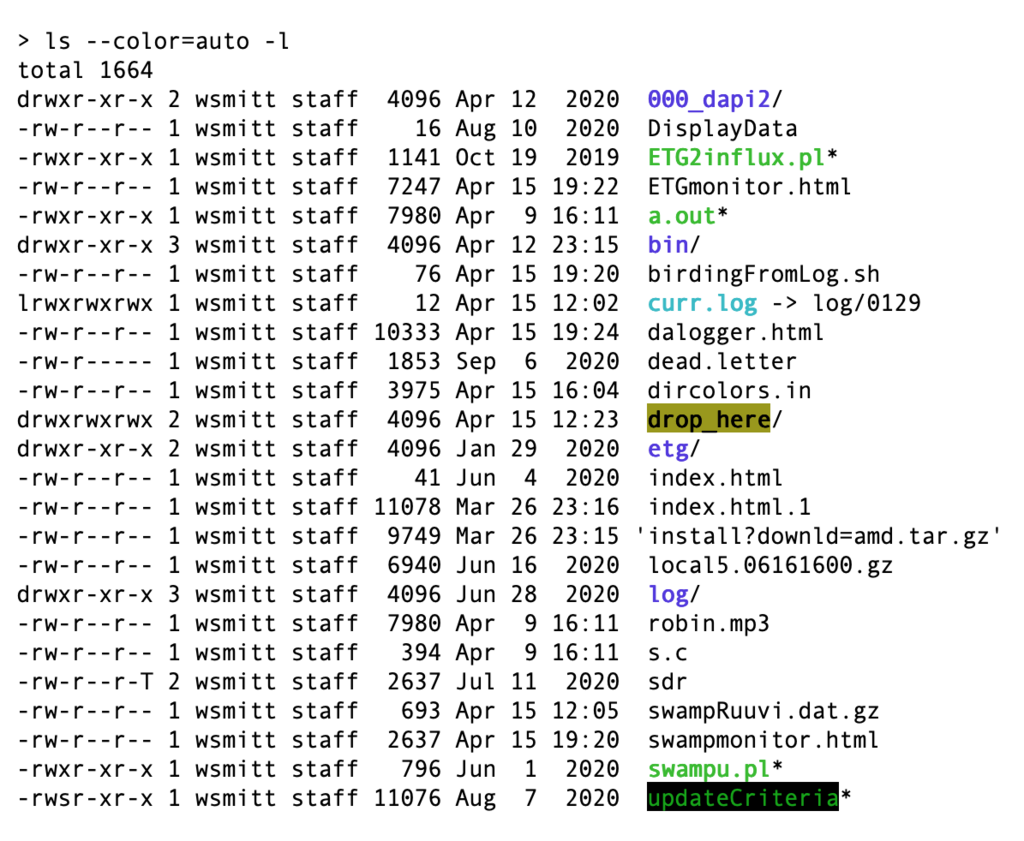
The ls -l command reveals a lot, including file permissions, owner, size, and modification date. The string of characters at the beginning, like -rwxr-xr--, describes who can read, write, and execute the file.
Using ls -a is how you see dotfiles. These are configuration files, often hidden by default, that control how applications behave. They're critical for customizing your development environment.
Let's break down the from ls -l. It's a ten-character code.
The first character indicates the file type (- for a file, d for a directory). The next nine characters are three sets of three. They represent the permissions for the user (owner), the group, and others (everyone else). Each set specifies r (read), w (write), and x (execute) permissions.
Mastering these navigation techniques will dramatically speed up your workflow in the Terminal. You'll spend less time typing and more time getting things done.
Time for a quick check-in on what you've learned.
Which of the following is an example of an absolute path?
The tilde character ~ is a shortcut for what directory?
With these commands, you're well on your way to moving through your Mac's file system with ease and confidence.