Ableton Live for Live Performance Mastery
Session View Mastery
The Grid of Possibilities
Ableton Live's Session View is where musical ideas come to life. Unlike a traditional timeline that moves from left to right, Session View is a grid. Think of it as a musical sketchpad, perfect for brainstorming, jamming, and performing live. It’s built for improvisation and flexible arrangement.
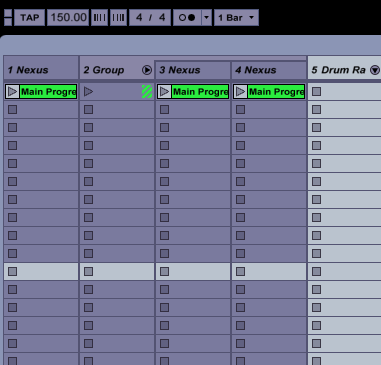
The layout is simple but powerful. Each vertical column represents a track, which can hold an instrument or audio. Each empty rectangle in a track is a clip slot, waiting for a musical idea. The horizontal rows are called scenes. This grid structure is the key to its non-linear workflow, freeing you from a fixed song structure.
In Session View, time is flexible. You decide when and what to play next, making it an incredibly creative tool for live performance.
Working with Clips and Scenes
A clip is the basic building block in Session View. It's a short piece of music, either audio (like a drum loop or a vocal sample) or MIDI (a sequence of notes). Each clip has its own play button, allowing you to trigger it independently. You can mix and match clips on the fly to see what works.
To stay in time, Live uses a feature called quantization. When you launch a clip, it waits until the next beat or bar to start playing, ensuring everything stays locked to the grid. You can adjust this setting in the control bar at the top of the screen.
While launching individual clips is great for experimenting, scenes are what you'll use to build a performance. A scene is a horizontal row of clips. When you launch a scene using the master play button on the right, all the clips in that row start playing simultaneously.
This lets you organize your song into sections. For example, Scene 1 could be your intro with a simple beat. Scene 2 could add a bassline, and Scene 3 could bring in the main melody. You can trigger these scenes in any order you want, rearranging your song in real time.
Managing scenes is straightforward. You can rename them to reflect parts of your song, like "Verse" or "Chorus." You can also click and drag scenes up or down to reorder them, helping you structure your live set in a way that makes sense for you.
Performing in Real Time
The true power of Session View comes out during a live performance. Instead of being locked into a pre-made arrangement, you can react to the energy of the moment. You can loop a section longer if it's working well, or transition to the next part whenever you feel it's right.
Here’s a common strategy: start by triggering your first scene. Let it play, then launch the next scene to build energy. While a scene is playing, you can still trigger individual clips from other rows. For example, you could be in your "Chorus" scene but decide to launch a percussion clip from your "Intro" scene for a quick variation. The newly launched clip will override whatever was playing in that track, giving you precise control.
Ableton Live's Session View is a non-linear interface that lets musicians arrange clips, loops, and sounds to explore and inspire creativity.
Stopping clips is just as important as starting them. Each playing clip has a stop button, and each track has a global stop button to silence it. You can also create empty scenes that act as a "master stop," allowing you to create dramatic breaks or smooth transitions between songs by silencing all clips at once.
Ready to test your knowledge? This quiz will cover the key concepts of working in Session View.
What is the primary characteristic of Ableton Live's Session View workflow?
In Session View's grid, vertical columns are called ______ and horizontal rows are called ______.
By mastering these techniques, you can turn Ableton Live from a simple production tool into a dynamic instrument for performance.