STATA Essentials for Data Analysis
Introduction to Stata
Getting Started with Stata
Stata is a powerful tool for data analysis and statistical software. Before you can analyze data, you need to get comfortable with its environment. The very first step is installing it. You will need a license, which you can typically get through a university or by purchasing one directly from StataCorp.
You will need a license to Stata and to have it installed before you begin.
Once installed, opening Stata for the first time reveals an interface that might look busy, but its components are logically organized to streamline your workflow.
Navigating the Interface
When you launch Stata, you'll see several windows. Each one serves a distinct purpose. Understanding them is key to using the software effectively. The default layout places the most important windows front and center.
Here’s a breakdown of the main windows:
-
Results Window: This is the largest window and the main screen. It displays the output from any commands you run. When you perform an analysis, the tables, statistics, and summaries will appear here.
-
Command Window: Located at the bottom, this is where you type commands directly into Stata. After typing a command, you press Enter to execute it.
-
Review Window: On the left, this window keeps a running history of all the commands you've executed in your session. You can click a previous command to put it back in the Command window for reuse or editing.
-
Variables Window: Also on the left, this window lists all the variables in the dataset you currently have open. It displays variable names and their labels, giving you a quick overview of your data.
Setting Up Your Workspace
Before you start working with data, it's good practice to tell Stata where your files are located. You do this by setting a working directory. This is the default folder Stata will use to look for datasets and save any files you create, like graphs or new datasets.
Think of the working directory as setting a home base for your project. All your project files should live in this one folder to keep things organized.
You can manage your working directory with simple commands. To see your current working directory, you use pwd (print working directory). To change it, you use cd (change directory), followed by the file path to your desired folder.
# Check the current working directory
pwd

# Change the working directory to a specific folder
# Replace the path with the actual path on your computer
cd "C:/Users/YourName/Documents/StataProject"
Notice that the file path is enclosed in double quotes. This is necessary if the path contains spaces. It's a good habit to always use them.
Once your working directory is set, you can easily open files within that folder. The primary command for opening a Stata dataset (which has a .dta extension) is use.
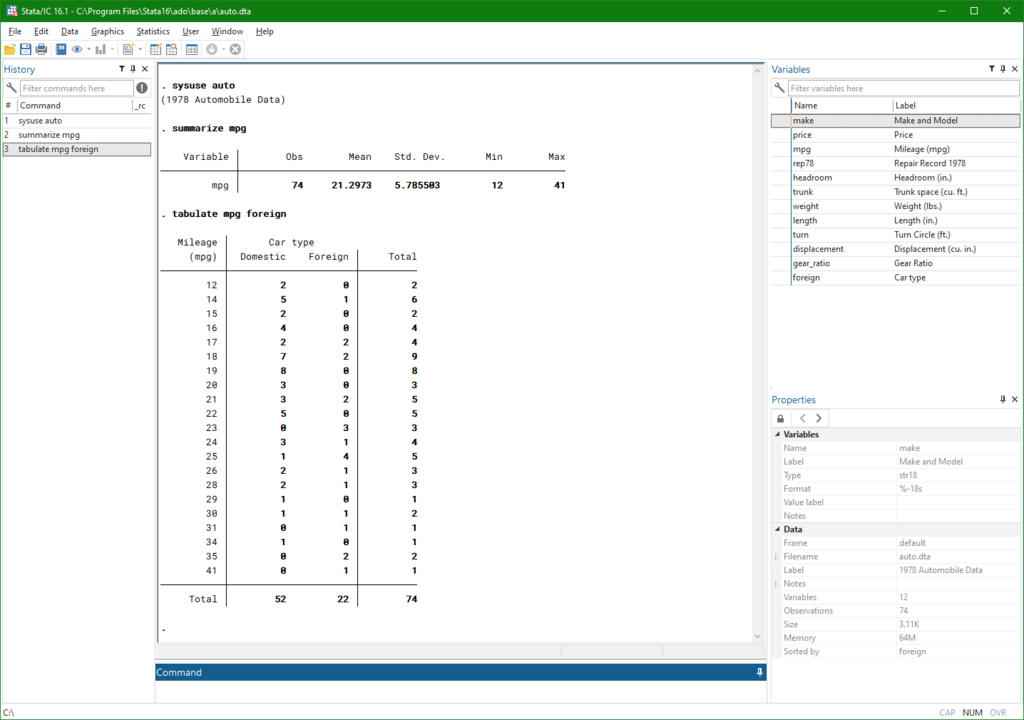
For example, Stata comes with some sample datasets. One of them is called auto.dta. To open it, you would first need to find where Stata stores it or, more simply, load it directly from the web using the sysuse command, which is a special command for system datasets.
# Load a sample dataset that comes with Stata
sysuse auto.dta, clear
The clear option tells Stata it's okay to replace any data currently in memory. If you wanted to load your own dataset from your working directory, the command would be use "mydata.dta", clear. Mastering these basic file and directory commands is the first step toward efficient data analysis in Stata.
Which Stata window is the main screen where the output and results from executed commands are displayed?
What is the purpose of the clear option when used with the use command (e.g., use "mydata.dta", clear)?