PHP MySQL Topic Directory
Introduction to PHP and MySQL
The Chef and the Pantry
Imagine a restaurant. The menu you see is like a static website, built with HTML and CSS. It looks good, but it doesn't change unless someone manually reprints it.
Now, imagine a special of the day, or a menu that updates based on what ingredients are fresh. To do that, the restaurant needs a chef in the kitchen who checks the pantry and creates the dishes. In the world of websites, PHP is that chef, and MySQL is the pantry.
PHP is a server-side scripting language. This means it works its magic on the web server, not in your browser. It can talk to databases, handle logic, and build a custom HTML page just for you before sending it over. The browser just sees the final result, a standard HTML page.
MySQL is a relational database management system. Think of it as a highly organized digital pantry. It stores information in tables, like spreadsheets, with rows and columns. This makes it easy to find, add, update, and manage vast amounts of data, like user profiles, blog posts, or product inventories.
Setting Up Your Kitchen
Before you can start coding, you need a local development environment. This is a setup on your own computer that mimics a live web server. It lets you build and test your website privately.
For beginners, the easiest way to do this is with a software package that bundles everything you need. The most popular ones are XAMPP and WAMP.
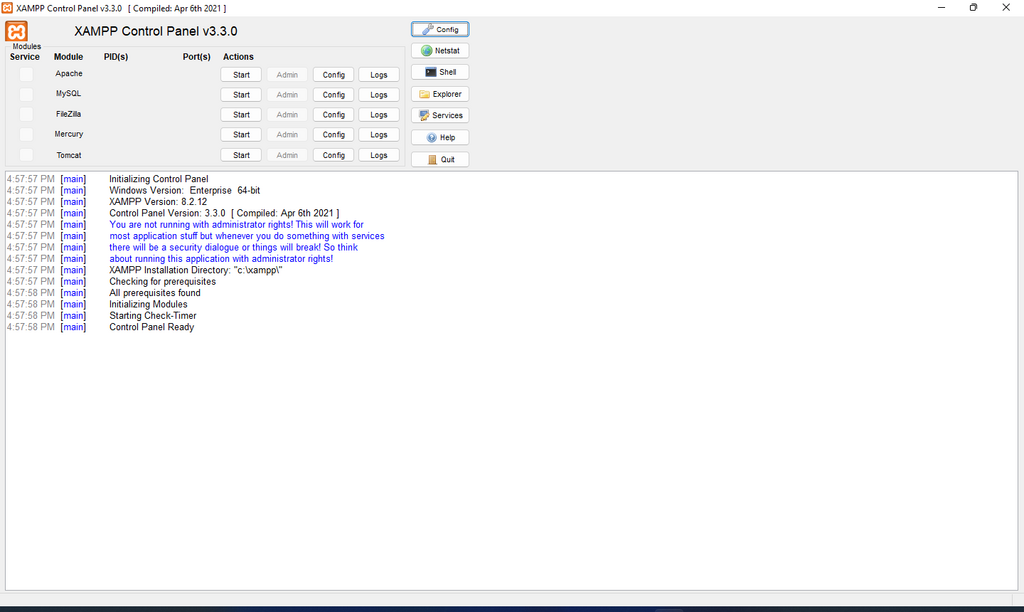
For beginners, tools like XAMPP bundle the PHP interpreter, Apache, and MariaDB (a database server that’s compatible with MySQL) together for easy setup.
XAMPP is cross-platform (it works on Windows, macOS, and Linux) and includes:
- Apache: The web server software.
- MariaDB: A replacement for MySQL that works the same way.
- PHP: The scripting language.
- Perl: Another scripting language.
Once you install XAMPP, you can start the Apache and MySQL services from its control panel. This turns your computer into a server, ready for development.
Writing Your First Scripts
Let's write some code. PHP code is written in files that end with a .php extension. You can mix it right in with your HTML.
PHP code lives between special tags: <?php and ?>. The server knows to execute anything between these tags.
A classic first step is to print a message to the screen. In PHP, we use the echo command for this. Create a file named hello.php in your server's web directory (for XAMPP, this is usually a folder called htdocs).
<!DOCTYPE html>
<html>
<head>
    <title>My First PHP Page</title>
</head>
<body>
    <h1>Welcome!</h1>
    <p><?php echo "Hello, world!"; ?></p>
</body>
</html>
Save this file and open your web browser. Navigate to http://localhost/hello.php. You'll see a webpage that says "Hello, world!" The browser never sees the PHP code, only the HTML output it generated.
Now, let's talk to the database. We use a language called SQL (Structured Query Language) to communicate with MySQL. You can run SQL commands directly using a tool like phpMyAdmin, which comes with XAMPP.
Let's create a simple table to store a list of users. The SQL for that looks like this:
CREATE TABLE users (
    id INT AUTO_INCREMENT PRIMARY KEY,
    username VARCHAR(50) NOT NULL,
    email VARCHAR(100) NOT NULL
);
This command creates a table named users with three columns: id, username, and email. Now, let's add a user to it.
INSERT INTO users (username, email)
VALUES ('alice', 'alice@example.com');
We've now stored data in our pantry. The final step is to use our chef, PHP, to fetch that data and display it on a webpage.
Connecting PHP and MySQL
This is where the real power comes from. PHP can connect to a MySQL database, run a query, and then use the results to build a dynamic HTML page.
Here's a simple script that connects to our database, retrieves the user we just added, and displays their username.
<?php
// Database connection details
$servername = "localhost";
$username = "root"; // Default for XAMPP
$password = ""; // Default for XAMPP
$dbname = "test"; // The default database

// Create connection
$conn = new mysqli($servername, $username, $password, $dbname);

// Check connection
if ($conn->connect_error) {
  die("Connection failed: " . $conn->connect_error);
}

// SQL to get data
$sql = "SELECT username FROM users WHERE id = 1";
$result = $conn->query($sql);

if ($result->num_rows > 0) {
  // output data of the first row
  $row = $result->fetch_assoc();
  echo "Hello, " . $row["username"] . "!";
} else {
  echo "No user found.";
}

$conn->close();
?>
This script follows a clear pattern:
- Connect: Establish a connection to the database server.
- Query: Send an SQL command to select the data you want.
- Process: Loop through the results and do something with them (like
echothem). - Close: Close the connection when you're done.
This is the fundamental loop for creating almost any data-driven website, from a simple blog to a massive e-commerce platform.
Time to check what you've learned.
In the provided restaurant analogy, what does the MySQL database represent?
What does it mean for PHP to be a "server-side" language?
You now have the basic building blocks for creating dynamic websites. You've set up a server, written a simple script, and learned how to make PHP and MySQL work together.