Elementor Website Design Mastery
WordPress Installation
Your Website's Home and Address
Every website needs two things to exist online: a home and an address. In website terms, the home is called a hosting provider, and the address is its domain name.
Think of it like building a house. The hosting provider sells you a plot of land where your house (your website) will be built. The domain name is the street address people use to find it, like www.example.com.
When choosing a hosting provider, you don't need the fanciest plot of land, just a reliable one. Look for providers that specialize in WordPress. They often include features that make your life much easier.
Key features to look for in a host are good customer support, reliable uptime (so your site is always online), and, most importantly, a 'one-click' WordPress installation option.
Registering a domain name usually happens at the same time you sign up for hosting. Many providers offer a free domain for the first year. When picking a name, aim for something short, memorable, and easy to spell. The .com extension is the most common, but .org, .net, or country-specific ones work just as well.
The One-Click Install
Years ago, installing website software was a complicated, manual process. Today, it’s incredibly simple.
Most hosting providers offer a one-click WordPress installation.
This tool, found in your hosting account's control panel, automates the entire setup. You'll typically follow a few simple steps:
- Locate the Installer: Find the WordPress installer in your hosting dashboard. It might be called 'WordPress Installer,' 'Softaculous,' or something similar.
- Choose Your Domain: Select the domain name you just registered.
- Enter Site Details: Provide a title for your site (you can change this later), and create a username and a strong password for your administrator account.
- Click Install: That's it. The installer will handle the rest, setting up the files and database for you. The whole process usually takes less than a minute.
A Tour of the Dashboard
With WordPress installed, it’s time to log in and look around. You can access your login screen by adding /wp-admin to the end of your domain name (e.g., www.yourdomain.com/wp-admin). Use the administrator username and password you created during installation.
Once you have installed WordPress, the next step is to familiarize yourself with the WordPress Dashboard—the central hub where you manage and control your website.
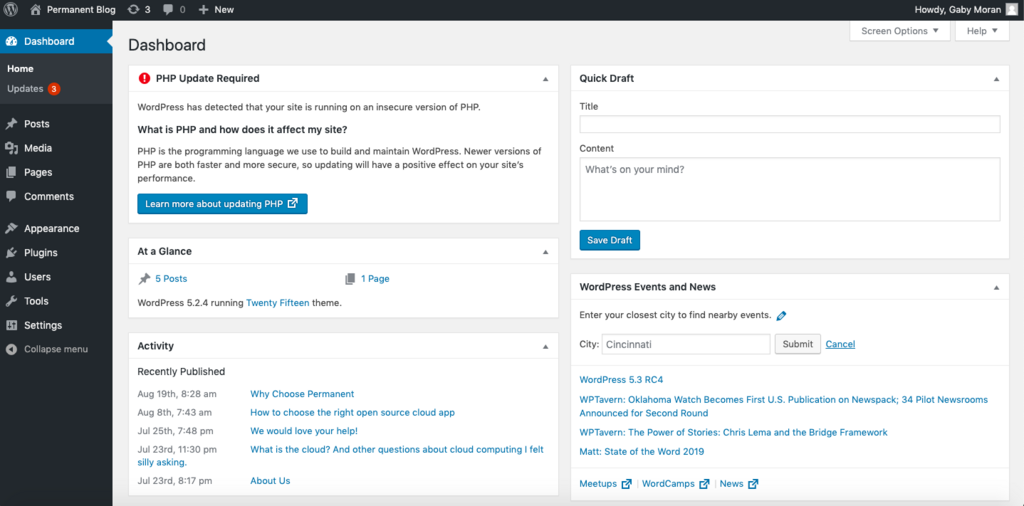
The dashboard can look a bit overwhelming at first, but you only need to know a few key areas to get started. On the left side, you’ll find the main navigation menu.
- Posts: This is where you’ll write blog posts.
- Media: The library for all images, videos, and files you upload.
- Pages: For creating static pages like 'About Us' or 'Contact'.
- Appearance: This is where you’ll manage your site’s design by choosing themes and customizing them.
- Plugins: Here you can add new features to your site with 'apps' called plugins.
- Settings: Contains general configuration for your site, like its title and tagline.
Don't worry about mastering everything at once. We'll explore these sections in more detail as we build out the site.
In the analogy of building a house for your website, what does the 'hosting provider' represent?
To log into your WordPress dashboard, you should navigate to www.yourdomain.com/______.
Now that you have a live WordPress site and know your way around the dashboard, you're ready to start shaping it into something of your own.