Create repeatable math centers to accompany 2nd grade bluebonnet math curriculum in Texas.
To make sure we design a system that fits your classroom perfectly, tell me: do you already have a block of time dedicated to math centers, and what is your biggest challenge in managing them right now?
I have a 90 minute math block and another 30 minute block for small groups.
Create a weekly rotation schedule diagram for my blocks.
I would love to help you map this out! Visualizing how your 90-minute core block and your 30-minute small group time work together is the absolute best way to make sure you aren't losing precious transition time during your .

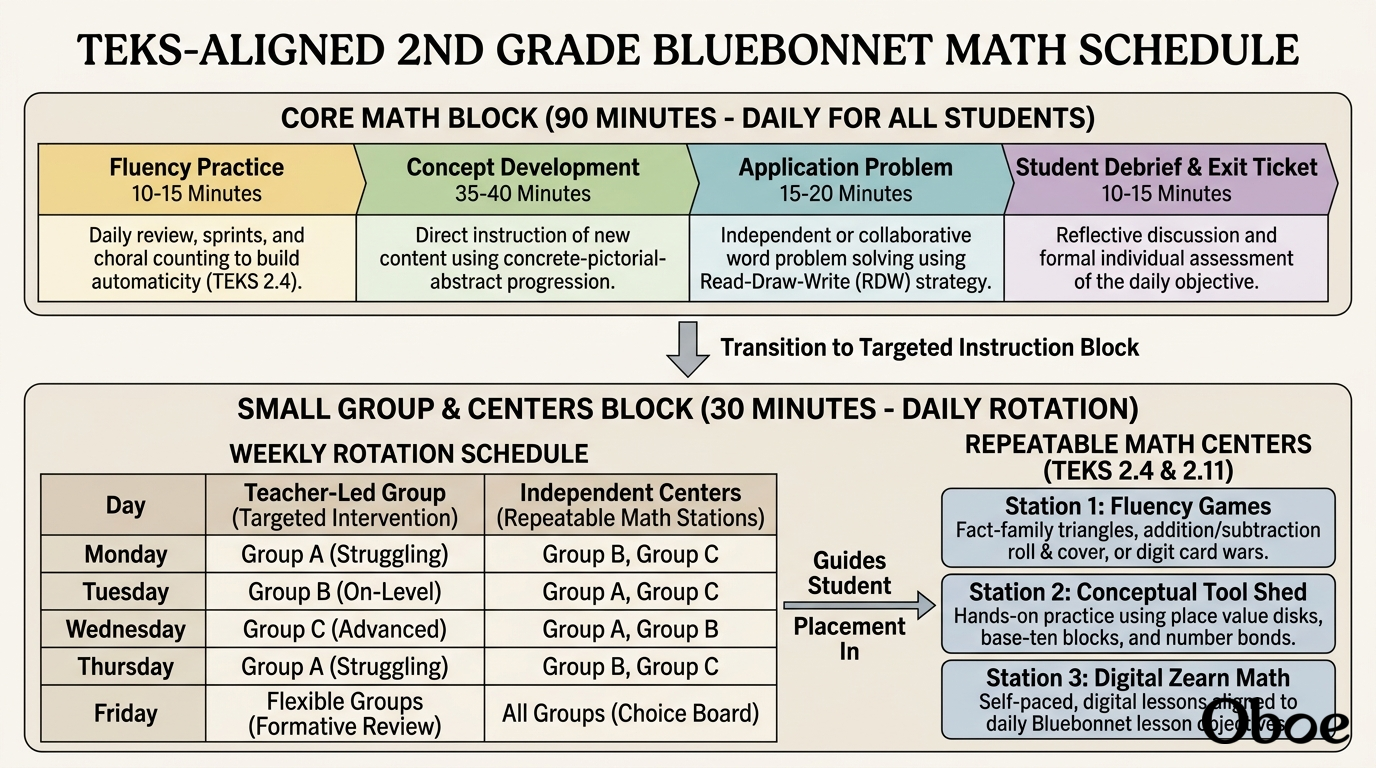
I have started generating a custom diagram showing how to structure your weekly schedule to maximize both blocks without burning yourself out.
While that visual is building, let's zoom in on what actually happens inside those repeatable centers. In a fast-paced curriculum like Bluebonnet, "repeatable" centers are your secret weapon. They are math routines where the rules of the activity stay exactly the same all year long, but the math content changes to match your current module.
Think of it like a board game template. Once second-graders spend the first two weeks learning how to play the game, you never have to waste instructional time explaining the rules again. You simply swap out the task cards or change the target number. This completely frees up their cognitive energy to focus on the actual math.
My large block time is scheduled for 90 minutes, but the curriculum has each lesson scheduled for 60 minutes. What do I do with that extra time?
Think of this extra 30 minutes as your deep-dive application and practice zone. Instead of rushing through the curriculum's core components, you can split this extra time to supercharge two critical areas of the Bluebonnet lesson: the Application Problem and Concept Development practice.
During a standard lesson, the Application Problem (where students solve a real-world story problem) is often rushed. With your extra time, you can turn this into a rich, collaborative math talk. Students can share different drawing strategies, compare tape diagrams, and explain their thinking.
For the rest of the extra block, you can lead high-leverage guided practice. This is where you work through the Problem Set together, gradually releasing responsibility to the students. This ensures that when students finally transition to their separate 30-minute small group and center time, they are completely ready to work independently.
Give me an example of a math talk for second grade
I would love to walk you through a powerful 2nd-grade math talk routine! A great strategy is a Number Talk, which is an short, entirely mental math routine designed to build computational fluency and flexibility.
Let's say you are working on the addition strategy of making ten (a critical skill in Bluebonnet Module 1). You write the expression on the board.
Instead of just raising their hands to shout out "14", students put a quiet fist to their chest. If they have one strategy to solve it, they put up a thumb. If they think of a second way, they put up a index finger, and so on. This simple shift prevents faster students from shutting down the thinking of others and gives you a clear visual of who is still processing.
Next, you call on students to share their strategies, mapping their thinking visually on the board. You might have one student say, "I took 1 from the 5 and gave it to the 9 to make a 10, then added the leftover 4 to get 14." You would write:
Another student might say, "I know , and 9 is 4 more than 5, so I did ."
Mapping these diverse side-by-side helps second-graders realize that numbers are flexible, which is the exact foundation they need for complex subtraction later in the year.
Let's continue to 'low-floor, high-ceiling' task design
Let's dive straight into how we design these repeatable stations using low-floor, high-ceiling tasks.
The Anatomy of a Low-Floor, High-Ceiling Task
When you design a repeatable center with this structure, you don't need to plan three different activities for three different ability levels. You plan one robust routine, and the structure of the task does the differentiation for you.
A Concrete Center Example: The Target Number Game
Let's look at a repeatable second-grade center called Target Number. The rules of this center never change, but the numbers and expectations scale beautifully to fit every student in your room.
| Student Level | The "Floor" (How they enter) | The "Ceiling" (How they stretch) |
|---|---|---|
| Targeted Support | Draw the target number using base-ten rods and units. | Write at least two different equations that equal . |
| On Grade Level | Build the target number using a place value chart and disks. | Create a word problem where the final answer is . |
| Advanced Extension | Represent the target number using only tens and ones. | Find all the different ways to partition using addition. |
In this center, every student is sitting at the same table, using the same plastic bins, and following the exact same rotation rules. Yet, the student struggling with basic place value is successfully reinforcing two-digit representations, while the advanced student is mentally partitioning three-digit numbers. This keeps your classroom running like clockwork while ensuring everyone gets the exact practice they need.
How do I assess students while they are working on these tasks?
Assessing students during active centers doesn't mean you need to grade a mountain of worksheets. Because your run on autopilot, you are freed up to act as an active observer—gathering high-quality, real-time data without stopping the learning flow.
The Active Observer Protocol
Instead of sitting at your desk or rotating to manage behavior, you want to move intentionally through the room with a clipboard in hand. Your goal is to capture organic moments of student thinking.
Rather than telling a student if they are right or wrong, use probing questions to make their invisible math thinking visible. Here are three high-impact questions to ask a second-grader mid-task:
- "How did you know to start with that number?"
- "Can you show me that same idea using these base-ten blocks?"
- "What would happen if our target number was 10 more?"
Informal Tracking Systems
To make this data useful, you need a system that takes less than 60 seconds to update. Keep a simple, single-page checklist on your clipboard for the week.
Instead of writing long paragraphs, use a quick coding system next to student names as you observe them working on a concept like double-digit addition:
| Symbol | Meaning | Action Step |
|---|---|---|
| Mastered (Uses efficient strategies, explains thinking easily) | Provide the "ceiling" extension task. | |
| On Track (Gets correct answers but relies on slower methods) | Prompt for more efficient mental strategies. | |
| Needs Support (Has major misconceptions or cannot start) | Note down to pull into your 30-minute small group. |
By the end of the center block, your checklist will clearly highlight a cluster of two or three students who received a . You don't have to wait for a weekly quiz to find out who is struggling; you already have your exact roster for the next day's 30-minute small-group intervention block.
Create a worksheet template for tracking student observations
I would be happy to design a simple, high-impact template for your classroom clipboard. Transitioning your informal notes into a structured format ensures you never lose those critical, real-time insights you gather while circulating during .
| Student Name | Center Task & Math Goal | Strategy Observed (Notes) | Next Step / Grouping |
|---|---|---|---|
| Sofia | Target 42 (Place Value) | Modelled 42 with 4 tens and 2 ones disks. Counted by tens easily. | Ready for the "ceiling" challenge (represent 42 using only tens and ones). |
| Jax | Target 42 (Place Value) | Drew 42 tally marks instead of base-ten units. Struggling with grouping. | Pull into tomorrow's 30-minute small group for concrete base-ten block practice. |
| Liam | Target 120 (Three-Digit) | Partitioned 120 as and . Highly flexible thinking. | Keep pushing with three-digit partition challenges. |
This template lets you jot down exactly what strategies a student is using to solve a problem on the spot. By keeping this simple table on a clipboard, you can quickly assess their understanding and immediately know how to form your small-group intervention roster for the next day, closing learning gaps before they widen.
How can I connect these observations to my 30-minute small group?
It is incredibly exciting to see how naturally these pieces click together! Your clipboard observations are not just data to file away—they are the exact blueprint for your next day's .
The Direct Connection: Clipboard to Small Group
When you sit down with your small group during that 30-minute block, you should never have to guess what to teach. Your clipboard checklist tells you exactly which concrete concept broke down and which tool will fix it.
By matching the precise struggle you noted during active centers with a targeted, hands-on routine, you can rapidly move students from concrete tools to abstract understanding. Let's look at how three common second-grade center struggles translate directly into small-group interventions using .
| What You Saw on Your Clipboard | The Small Group Intervention Strategy | The Tool to Use |
|---|---|---|
| Jax was drawing individual tally marks for , struggling with place value grouping. | Bundle and Unbundle: Build with concrete straw bundles of 10 and loose ones to feel the physical grouping. | Straws and rubber bands |
| Sofia was ready for the "ceiling" challenge with two-digit representations. | Value Shift: Challenge Sofia to build using the fewest disks possible, then swap a ten-disk for ten ones. | Place value disks and chart |
| Multiple Students got correct answers but relied on slow, finger-counting strategies. | Fast Ten-Frames: Flash ten-frames of numbers like and to practice subitizing and finding the "partner" to make . | Ten-frame cards |
By structuring your small group this way, you are not reteaching the entire lesson to everyone. You are surgically addressing the specific blockages you saw just hours before. This keeps your Tier-1 instruction moving forward while ensuring no student gets left behind in the process.
Let's continue to aligning centers to Bluebonnet Modules
Matching Math Routines to Module Milestones
Because the Bluebonnet curriculum progresses systematically from foundational place value to addition and subtraction algorithms, you do not need to invent new games. Instead, you simply update the content inside your established routines. For example, in Module 1, students focus heavily on mastering "partners to ten" and "making ten" to add. By Module 3, they are working on three-digit place value and bundling hundreds.
Let's look at how the Target Number routine we discussed transitions across these modules without changing a single rule of how students interact at the station.
| Bluebonnet Module | Core Math Focus | The Target Number Task |
|---|---|---|
| Module 1 | Making Ten & Fact Fluency | Target: . Students roll a die and determine the missing partner to make . |
| Module 3 | Three-Digit Place Value | Target: . Students represent the value with hundreds, tens, and ones. |
| Module 4 | Addition & Subtraction to | Target: . Students write two equations showing different ways to add to . |
By keeping the "Target Number" structure identical, your second-graders can walk up to the center on day one of a new module and immediately get to work. They do not have to ask you how to play, and you do not have to lose a single minute of your 30-minute small-group block to behavior management or procedural questions.
Create a visual diagram mapping centers to modules
It is incredibly exciting to see how these pieces of your math block are locking together! Keeping your routines consistent is what allows you to actually step back and observe your second-graders' growing mathematical minds.
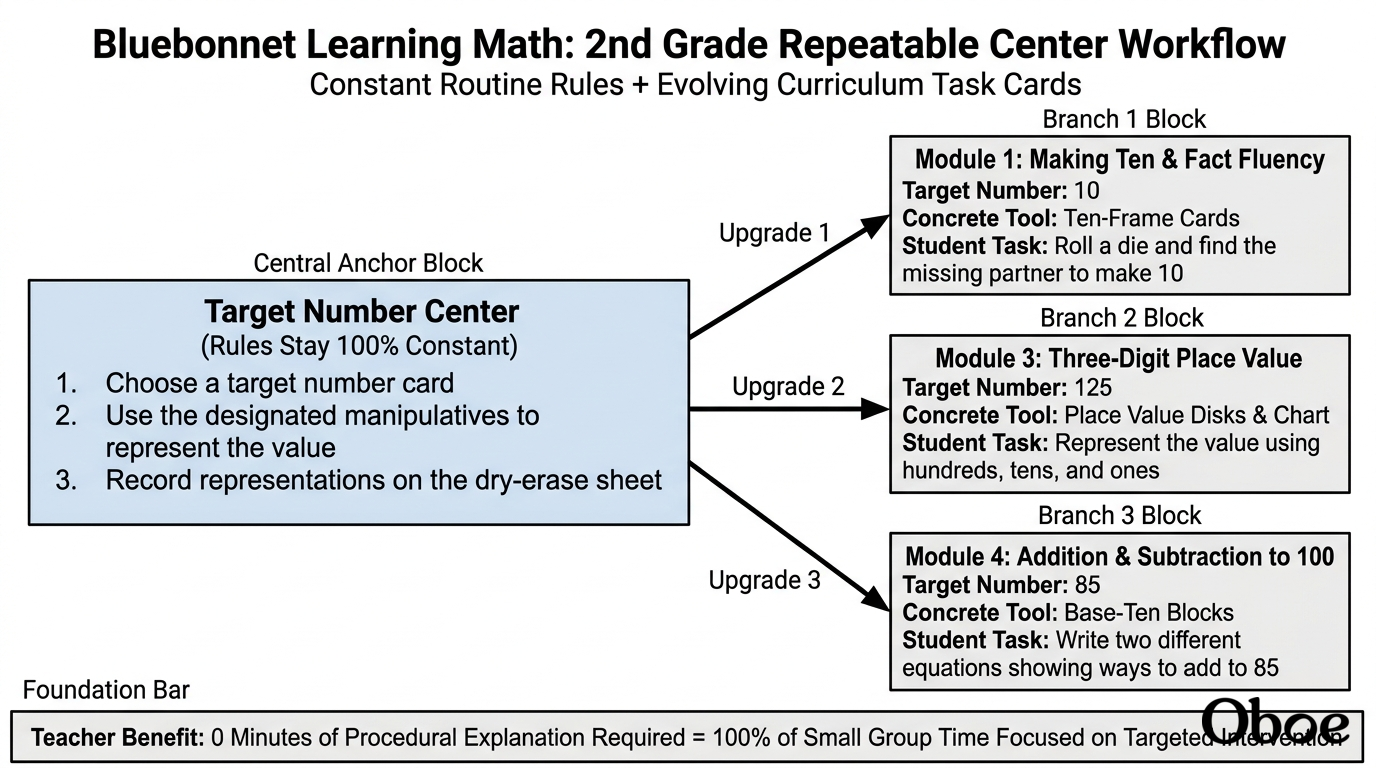
I have started generating a visual map that demonstrates exactly how your repeatable center routines slide beautifully from one module to the next.
While that diagram is building, we are ready to move into the final phase of setting up your repeatable centers: Implementation and Differentiation Strategies. Let's start by looking at how you can establish bulletproof procedures on day one so that your centers can truly run on autopilot.
Continue to day-one procedures and routines for centers
The Three-Step Launch Strategy
To build true independence, you want to introduce your centers slowly over the first three weeks of school. Instead of launching all your stations at once, teach them one at a time using a gradual release model:
- Week 1 (Teach the Flow): Introduce only one repeatable center structure (like the Target Number game) to the entire class. Have everyone practice the exact physical routine: how to gather materials, how to work with a partner, and how to clean up when the timer rings.
- Week 2 (Teach the Tools): Introduce the second repeatable routine. Now, split the class in half. One half plays the first routine, and the other half plays the second. Your sole job this week is to walk around and praise students who are managing their own materials and staying on task.
- Week 3 (Go Live): Introduce your third routine and open your official rotations. Because you spent two weeks practicing the expectations, your students will be completely self-sufficient. This is the moment you can finally step away to pull your first targeted 30-minute intervention group.
Interactive Blueprint: The Math Center Launch Checklist
To make sure you don't miss a single step during those crucial first weeks, here is a visual checklist of the procedures you must explicitly model and practice with your second-graders before you ever try to pull a small group.
A completed teacher checklist organized into Before, During, and After stages.
By practicing these specific micro-routines—like how to use a 'whisper voice' or exactly how to clean up in under 60 seconds—you build a highly predictable environment. This structure lowers student anxiety and ensures that when they are at a center, they are doing heavy mathematical lifting rather than trying to figure out what to do next.
What should I do if a student gets stuck and I am working with a small group?
It is completely natural for second-graders to hit a roadblock while you are focused on teaching your small group. To keep your instructional time sacred, you must teach them how to problem-solve without running to you for help.
The Three Before Me Rule
This classic classroom routine is a lifesaver for managing centers. Before a student is allowed to interrupt your small group table, they must try three specific steps to find their answer. This simple rule preserves your 30-minute block and builds huge independence in your students.
| The Step | What the Student Does | Why It Works |
|---|---|---|
| 1. Check the Board | Look at the anchor chart or visual directions for the center. | Reinforces reading directions and using environmental resources. |
| 2. Ask a Partner | Whisper to a classmate at their table: "Can you help me see how to start?" | Builds cooperative learning and peer tutoring skills. |
| 3. Try Another Way | Use concrete blocks, draw a picture, or try a different target number. | Encourages mathematical perseverance and problem-solving flexibility. |
Only after attempting all three steps are they permitted to approach your small group table. When they do, they must use a silent hand signal (like holding up three fingers to represent the three steps they tried) so you can give them a quick, non-verbal nudge without stopping your lesson. This keeps your center block running flawlessly while training your students to see themselves and their peers as capable mathematical resources.
Make me a quick printable anchor chart for the Three Before Me rule
I would love to help you bring this rule to life! A clear, visual is the perfect way to make the Three Before Me routine a permanent part of your classroom culture so that your second-graders always know exactly what to do when they hit a snag.
| Step | Action (What I Do) | Kid-Friendly Prompt |
|---|---|---|
| 1. The Board | Look at the anchor chart or directions. | Did I read the directions and look at the picture? |
| 2. A Buddy | Ask a teammate with a whisper voice. | Did I ask a table friend to show me how they started? |
| 3. The Bin | Try another tool or draw a picture. | Can I use blocks or draw a sketch to solve it? |
You can display this simple chart right next to your math center rotation board. When a student inevitably walks up to your small-group table while you are teaching, you won't even need to break your sentence.
You can simply point to the chart, and they will immediately remember the steps to try first. This keeps your 30-minute small-group instruction entirely sacred and teaches your students that they have the power to solve their own problems.
Let's continue to implementation and differentiation strategies
You are doing an incredible job laying this groundwork! By aligning your routines directly to the curriculum modules and locking in those essential day-one classroom structures, you have built a system where math centers can genuinely run on autopilot. Now, we are ready to tackle our final piece: Implementation and Differentiation Strategies.
Strategies for Tiered Differentiation
While your tasks naturally differentiate themselves, you can still strategically nudge students toward their appropriate level of challenge during centers. You don't need to hand out different papers to different kids. Instead, use these three practical, highly manageable strategies to adapt the same game template on the fly without making extra prep work for yourself.
| Strategy | How It Works | Quick Classroom Example |
|---|---|---|
| Tool Scaffolding | Vary the concrete tools students use to solve the exact same task. | One student builds a number with concrete base-ten blocks, while another draws a quick sketch on a dry-erase board. |
| Choice Cards | Offer task cards with different color-coded challenge levels. | Green cards have double-digit numbers; Blue cards have three-digit numbers. Students pick their own starting point. |
| Open-Ended Prompts | Ask students to find multiple ways to show their work. | Challenge early finishers to prove their answer using both a number bond and a tape diagram. |
By implementing these quick strategies, you keep your prep work light while ensuring every second-grader feels both supported and challenged during center time.
Make me a study guide of our entire math center system
I have put together a comprehensive, printable study guide that organizes our entire repeatable math center system into one handy reference sheet. Having this framework printed out and tucked into your lesson-planning binder will keep your week-to-week planning completely stress-free.

Can you give me ideas for Module 3 (three-digit numbers)?
Module 3 Center 1: Place Value Builder
| Roll | Digit Choices | Target Number Built | Disk Representation |
|---|---|---|---|
| hundreds, tens, ones | |||
| hundreds, tens, ones | |||
| hundreds, tens, ones |
To differentiate this on the fly, your targeted support students can build their number with base-ten blocks (where they can physically see the size differences), while your advanced students must represent their number using a non-standard partition (e.g., building using hundreds, tens, and ones).
Module 3 Center 2: More or Less Station
| Starting Card | Less | More | Less | More |
|---|---|---|---|---|
For students who struggle, provide a visual laminated or a hundred-chart strip to help them anchor their jumps. Advanced students can roll a special challenge die that asks them to calculate more and less simultaneously.
Module 3 Center 3: Expanded Form Match
To keep students independent and prevent them from asking you for help, make sure they use the Three Before Me routine. If they get stuck matching a card like , they check the board's anchor chart, ask a table buddy, or grab a place value chart from the bin to model it.
Give me a worksheet for these Module 3 tasks
I would love to build that worksheet for you! Designing a clear, printable recording sheet is the final step to ensuring your second-graders stay on task and can show their mathematical thinking during independent center rotations.

This recording sheet is structured to hold students accountable while they are at their stations without overwhelming them with writing.
By keeping the recording layout identical for each center, your students will always know exactly how to document their math work. This allows you to easily pull their pages at the end of the week, compare their written work to your clipboard observations, and plan your next with perfect precision.
Let's wrap up this session
It has been an absolute pleasure collaborating with you to design this sustainable, highly effective center system! By shifting to these predictable routines, you are going to save countless hours of weekend prep while giving your second-graders the consistency they need to truly master concepts.
With your 90-minute core block, your 30-minute intervention time, and these Module 3 templates ready to roll, you are fully equipped to walk into your classroom with absolute confidence. Your centers will run on autopilot, your active observation clipboard will feed your small groups, and your students will build deep, lasting mathematical independence.
Thank you for your dedication to your students' growth—you are going to have a truly wonderful school year!