
Oboe
No history yet

g major chord on guitar

Welcome! I am so excited to help you learn the guitar. It is one of the most rewarding instruments to pick up, and the G major chord is the perfect place to start. Before we dive into the fretboard, could you tell me a little bit about your guitar experience—are you a total beginner, or have you played other chords before?

I have played a few basic chords before.

That is awesome. Having even a little experience with chords is going to make learning the G major chord a lot smoother for you. To start off, let's take a look at the blueprint of this chord. In music theory, a major chord is a "", which means it is built from three unique notes. For a G major chord, those three notes are G (the root), B (the third), and D (the fifth). No matter where or how you play it on the neck, as long as you are ringing out some combination of those three notes, you are playing a G major chord.
Your path
Context and Application

Continue to step-by-step finger positioning

Let's build this G major chord on your step by step. We will use a popular three-finger version in the open, or first, position.

A standard G major chord shape on a guitar fretboard diagram showing finger positions.

Take it one finger at a time and press firmly right behind the metal frets:
  1. Place your index finger on the second fret of the A string (the fifth string).
  2. Place your middle finger on the third fret of the low E string (the thickest, sixth string).
  3. Place your ring finger on the third fret of the high E string (the thinnest, first string).
Let the D, G, and B strings ring out completely open without your fingers brushing against them. When you are ready, give all six strings a steady, slow strum starting from the thickest string.

Give me a diagram of the string names

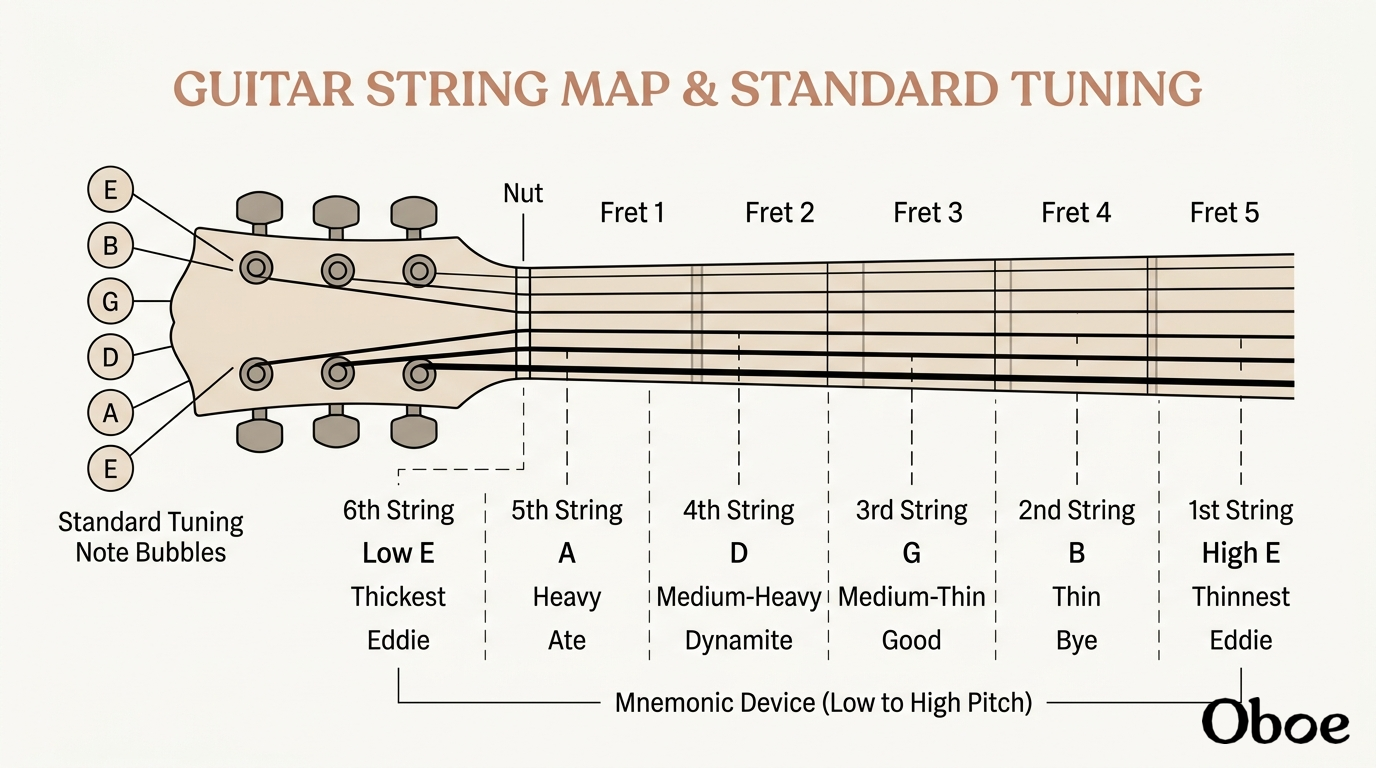
Here is a clear map of the six guitar strings to help you get oriented. On a standard guitar, the strings are numbered 1 through 6, starting from the thinnest string (highest pitch) up to the thickest string (lowest pitch).

DIAG
Diagram
Generated diagram
To help remember this layout from the thickest string (6th) to the thinnest string (1st), many guitarists use the classic mnemonic: Eddie Ate Dynamite, Good Bye Eddie. Now that you can see where each string is located, we can talk about a few important habits to build when fretting the G major chord. It is completely normal if some strings sound muffled or buzzy at first! Usually, this is because a finger is accidentally leaning over and touching an adjacent string that is supposed to ring open. To prevent this, try to arch your fingers high so that only your very are pressing down on the wood.

Give me a practice exercise to make it ring clearly

A fantastic way to train your fingers for clean articulation is a structured cycle we call the Strum-Pick-Adjust drill.

The Strum-Pick-Adjust Drill

This simple exercise prevents you from rushing and helps your brain isolate which specific finger needs to adjust when a string sounds muffled. Here is how you do it, step-by-step:
  1. Strum: Form the G major shape with your fingers and give all six strings a single, slow strum. Let it ring.
  2. Pick: Individually pluck each of the six strings, one by one, from the thickest string down to the thinnest. Listen closely to the tone of each string.
  3. Adjust: If a string sounds dull, buzzy, or dead, stop. Don't take your hand off the neck. Instead, look closely to see which finger is causing the problem. Is your index finger leaning on the open D string? Curl that knuckle and lift. Press a tiny bit harder right behind the fret if it's buzzing.
  4. Repeat: Once you make the adjustment, strum all six strings together again to hear the clean, beautiful chord.
Running through this drill just five times before your practice sessions will completely transform how clean your chords sound.