
hydroponic farming
Welcome to the world of soilless growing! I'm excited to help you explore how plants can thrive purely on water, light, and nutrients.
Before we dive into the science and setups, I'd love to know what brings you to hydroponic farming today. Are you looking to set up your own home or commercial system, or are you exploring it conceptually?
i want to start a website to teach it to people (introducing hysroponics to Rwandan people)
It is wonderful to meet you! Creating an educational website to introduce hydroponics to Rwanda is a fantastic, highly impactful mission, and I'd love to help you shape this content so it is accessible and practical.
Before we build our formal learning path and dive into the lessons, let's make sure we tailor the material perfectly for your future readers. What level of depth or practical experience do you currently have with hydroponics, and are there specific low-cost/local methods (like the Kratky method or Deep Water Culture) you want your website to emphasize for Rwanda?
I have some basic knowledge, and I want to cover both low-cost and automated systems.
That's a great approach! Covering both accessible, low-tech options and automated setups will make your website incredibly valuable for a wide range of readers in Rwanda.

What is Hydroponics?
This simple shift—swapping soil for nutrient-dense water—is what makes the entire system so incredibly efficient.
Continue to the core advantages of hydroponics
Let's dive straight into the core advantages of hydroponics. When you are writing for your audience in Rwanda, these benefits are going to be your absolute best selling points for why soilless growing is a game-changer.
The Big Four Advantages
- Water Conservation: It sounds counterintuitive, but growing plants in water actually uses up to 90% less water than traditional soil farming. In standard farming, most water drains away into the dirt or evaporates. In hydroponics, the water is contained in a closed reservoir and , meaning the plants only drink what they actually need, and nothing is wasted.
- Supercharged Growth Rates: Plants in a hydroponic system grow roughly 30% to 50% faster than those grown in soil. Because the roots don't have to push through heavy dirt to search for food, they get an all-day, effortless buffet of nutrients and oxygen.
- Higher Yields in Tiny Spaces: You don't need acres of fertile land to feed a family. Because we can stack these systems vertically or place plants closer together, you can produce up to 20 times more food per square meter than conventional farming.
- No Soil Pathogens or Weeding: Say goodbye to tilling, weeding, and battling soil-borne diseases. Since we've cut soil out of the equation entirely, we also cut out a massive portion of the pests and diseases that usually ruin crops.
I've started planning a visualization to make this incredible 90% water-saving mechanism crystal clear for your future readers.
A side-by-side comparison of water flow paths in traditional soil cultivation and closed-loop hydroponics.
Now, let's make sure we test your understanding of these advantages before we build on them.
Why does a hydroponic system grow plants significantly faster than traditional soil-based farming?
Because roots get direct, effortless access to nutrients and oxygen without soil resistance.
 Skills
Spot on! That is exactly correct. When roots don't have to fight through dense dirt or search for pockets of moisture, they save massive amounts of biological energy—energy they immediately redirect into producing bigger leaves, stronger stems, and faster yields.
The Five Essential Ingredients
- Water: This is the lifeblood of your system. Because we don't use soil, the water acts as both the hydration source and the delivery vehicle for everything else the plant needs.
- Nutrient Solution: Since there is no dirt to provide minerals, we dissolve essential plant food directly into the water. This is a mix of macronutrients like nitrogen and phosphorus, alongside micronutrients like iron and calcium.
- Growing Medium: Even though we don't use soil, plants still need something to physically hold them upright so they don't tip over. We use inert, non-soil materials like clay pebbles, coconut coir, or rockwool. These materials act as a structural anchor while letting water and air pass through freely.
- Air and Oxygen: Plant roots will literally drown if they are submerged in still, stagnant water. They need constant access to dissolved oxygen to breathe. In low-cost systems, we handle this by leaving a pocket of air above the water; in active systems, we bubble air through the water using a pump.
- Light Source: Just like any other plant, hydroponic crops must have light to perform photosynthesis. This can come from free, natural African sunlight outdoors, or specialized, energy-efficient LED grow lights indoors.
Let's check in on how these elements work together. Which of these five components is responsible for keeping the plant physically stable and standing upright in the absence of soil?
The growing medium
Exactly! The growing medium acts as the physical anchor, standing in for the structural support that soil usually provides.
Now that you've mastered the five essential ingredients, we are ready to move on to the next major step in your curriculum: understanding the different physical layouts we use to grow plants.
Since your goal is to build an educational website for Rwanda that spans both ultra-low-cost, backyard setups and modern, automated farms, this is where the fun begins. We call these different designs "systems," and they range from completely passive reservoirs to active, pressurized arrays.
Deep Water Culture
I've started generating a visual to help your future website readers instantly grasp how a Deep Water Culture system flows together.
A cross-section view of a Deep Water Culture hydroponic system showing plants suspended above oxygenated nutrient water.
As you can see, DWC is incredibly straightforward. But what if your website readers live in an area with a highly unreliable power grid, or want to build a system where electricity isn't an option at all?
Continue to the electricity-free Kratky method
Let's make the leap to a system that requires absolutely zero electricity, pumps, or running water. This is where we introduce the Kratky method—an elegant, off-grid solution that is incredibly well-suited for backyard farmers and schools across Rwanda.
The Elegance of the Kratky Method
I've started creating a visualization to help your website visitors see exactly how this air gap forms and keeps the plant breathing.
A Kratky container cross-section showing plant roots split between the upper air gap and lower nutrient solution.
Because it requires no power grid, the Kratky method is incredibly low-cost to set up. It's perfect for growing leafy greens like lettuce, spinach, and local herbs using repurposed plastic buckets or jerrycans. However, because you can't easily top up the water without risking drowning the air roots, it is generally limited to fast-growing, small crops.
Let's check your understanding of this mechanics-free setup. In a Kratky setup, how do the plant roots get the oxygen they need to survive without an air pump?
The upper roots pull oxygen from the humid air gap that forms as the water level drops
You nailed it! That is exactly how it works. By leaving that humid, oxygen-filled gap, the plant basically breathes and drinks at the same time, completely eliminating the need for noisy, power-hungry air pumps.
The Nutrient Film Technique
I've started creating a visualization to help your future website readers see exactly how this continuous, sloped water loop works.
A Nutrient Film Technique hydroponic system with a sloped channel, three plants, and a continuous water loop.
Let's check your understanding of how this active design operates. Why are plants in an NFT system highly vulnerable to rapid wilting if a water pump stops working?
The sloped growing channels hold almost no standing water to buffer the roots.
You are absolutely spot on! Because those channels are sloped and designed to hold only a tiny, millimeter-deep film of moving water, there is no reservoir of water around the roots to act as a safety net if the pump goes offline.
Ebb and Flow and Aeroponics
I've started planning a visualization to show you how the automatic flood-and-drain cycles of an Ebb and Flow system pull fresh oxygen right down into the root zone.
An ebb and flow hydroponic system shown in flood and drain states.
With these active layouts in mind, we can start comparing passive and active designs to see which ones make the most sense for different growers in Rwanda—such as a smallholder setup in a backyard versus an urban automated farm in Kigali.
Which of these systems is easiest to build on a tight budget?
That is the golden question for someone building an educational resource for Rwanda. When we rank systems by setup cost and simplicity, we see a clear spectrum from ultra-accessible to highly technical.
The Cost and Simplicity Hierarchy
When you are advising your web visitors, you can rank the systems from cheapest and easiest to most expensive and complex:
-
Kratky Method (Absolute Cheapest): This is the crown jewel of low-cost hydroponics. Because it requires zero electricity, pumps, or plumbing, the setup cost is essentially just the cost of a container, a net cup, and your nutrients.
-
Deep Water Culture (Very Affordable): Only slightly more expensive than Kratky because you must purchase a simple, low-cost and an air stone to keep the water oxygenated.
-
Nutrient Film Technique (Moderate Cost): This jumps up in price because it requires structural channels (often made of PVC pipes), a submersible water pump, and precise fittings to prevent leaks.
-
Ebb and Flow (Moderate to High Cost): Requires a sturdy flood tray, a large reservoir, a water pump, plumbing overflow kits, and an automatic timer to manage the cycles.
-
Aeroponics (Most Expensive): This sits at the top of the cost pyramid because it demands specialized high-pressure pumps, fine-mist nozzles, accumulation tanks, and filtration systems to keep everything running without clogs.
Tailoring for Rwanda
For your website, the best approach is to teach readers how to build these systems by . Instead of buying expensive, imported plastic reservoirs, your readers can use yellow 20-liter jerrycans (commonly used for water and oil transport), old buckets, or discarded wooden crates lined with cheap plastic sheeting.
By emphasizing how to build a Kratky system out of a locally sourced jerrycan, you make hydroponics instantly achievable for anyone, regardless of their budget or whether they have electricity in their home.
I've started planning a visualization comparing how a standard commercial system can be cleverly built using cheap, local Rwandan alternatives.
A side-by-side visual comparison of a professional Deep Water Culture hydroponic system and an upcycled Rwandan jerrycan system.
This visualization will show your readers that they don't need fancy, imported gear to get started.
Now, let's see how you'd present this to your audience. If a student on your website has absolutely no budget and lives in an off-grid rural area in Rwanda, which system would you recommend they start with?
The Kratky method, because it is passive and requires no power.
You are absolutely correct! Dr. Kratky's design is brilliant because it converts a physical law into a natural biological lung, letting rural growers skip the expensive electrical infrastructure entirely.
The NPK Blueprint
- Nitrogen (N): Think of this as the leaf maker. Nitrogen is responsible for vegetative growth, helping the plant build thick green leaves and strong stems.
- Phosphorus (P): This is the root and flower engine. It helps the plant establish a massive, healthy root system early on, and later fuels the production of flowers, fruits, and seeds.
- Potassium (K): This acts as the plant's overall cellular regulator. It controls water movement inside the plant tissues, boosts disease resistance, and ensures all chemical reactions run smoothly.
Beyond these big three, plants also require secondary macronutrients like Calcium and Magnesium, as well as microscopic amounts of micronutrients like Iron, Boron, and Zinc to prevent leaves from yellowing.
Let's test how you might explain this on your website. If a farmer using your guides notices that their crops are growing great roots but are struggling to grow healthy, lush green leaves, which of the three primary N-P-K nutrients is most likely deficient?
Nitrogen, which drives leaf and vegetative growth.
Spot on! Nitrogen is the primary driver for green, vegetative leaf growth. If the leaves are looking pale or stunted while the roots are doing great, a lack of nitrogen is almost always the culprit.
The Gatekeeper of Nutrition: pH
You can mix the most perfect, gourmet NPK recipe in the world, but if your water's is wrong, your plants will literally starve. pH stands for "potential Hydrogen" and measures how acidic or basic your water is on a scale of 0 to 14, with 7 being completely neutral.
In hydroponics, we aim for a slightly acidic sweet spot: 5.5 to 6.5.
When the pH of your water drifts outside of this ideal window, a biological disaster called nutrient lockout occurs. Even though the mineral salts are floating right next to the roots, the chemical bonds change, making the minerals physically lock up and become completely invisible to the plant. For instance, if your pH climbs above 6.5, iron locks up, causing the top leaves of your crops to turn a sickly, bleached yellow.
I've started planning a interactive visualization to show you exactly how different plant nutrients become available or completely locked away as the pH level shifts.
Soil nutrient availability across the pH scale from 4.0 to 8.0 for major primary, secondary, and micronutrients.
This chart will make it incredibly intuitive for your Rwandan readers to diagnose why their plants might be struggling, even after they've added plenty of fertilizer.
Now, let's see how you'd test this concept on your platform. If a grower's system has a pH level of 7.5 and their crops are starting to show yellowing leaves from iron deficiency, what is the correct action to take?
Lower the pH of the water back into the 5.5 to 6.5 range.
Spot on! Lowering the pH back into that 5.5 to 6.5 range is exactly how you unlock those bound-up minerals, instantly curing the "starvation in the midst of plenty" that occurs during nutrient lockout.
The Pulse of Your System: EC and TDS
I've started planning a visualization to show your readers how a handheld meter reads the concentration of ions floating in a water reservoir.
A water reservoir with dissolved nutrient ions and a submerged digital meter displaying electrical conductivity and total dissolved solids.
This concept is crucial for your Rwandan educational platform. Leafy greens like lettuce prefer a mild, weaker diet (around 560 to 840 ppm), while heavy-fruiting crops like tomatoes crave a highly concentrated, rich feast (up to 1400 to 2000 ppm).
Let's check your understanding before we move on to growing media. If you are growing a delicate crop like lettuce and your TDS meter suddenly reads 2500 ppm, what is the best immediate step to take?
Add fresh, un-fertilized water to dilute the reservoir.
Exactly! Diluting the water with fresh, un-fertilized water is the perfect way to bring a high ppm reading down safely, preventing your plants from getting fertilizer burn.
Choosing the Right Growing Media
- Rockwool: This is made by melting basaltic rock and spinning it into fine fibers, much like cotton candy. It holds an incredible amount of water and air, making it a commercial favorite for starting seeds. However, it is expensive, imported, and non-biodegradable.
- Clay Pebbles (Hydroton): These are kiln-fired clay balls that expand and become highly porous. They provide excellent support and drainage, and the best part is they are completely after a quick wash. They can, however, be heavy and expensive to buy brand new.
- Coconut Coir: Made from the shredded husks of coconuts, coco coir is a natural, organic byproduct. It behaves the most like traditional soil, retaining moisture beautifully while remaining airy. It is cheap, sustainable, and highly accessible in tropical climates.
Local Alternatives in Rwanda
- Pumice and Volcanic Rock: Due to Rwanda's volcanic geography, volcanic rock is widely available and extremely cheap. Crushed volcanic rock is highly porous, provides fantastic drainage, and works beautifully as a substitute for clay pebbles.
- Rice Husks: Often discarded as agricultural waste at local mills, carbonized rice husks make an excellent, lightweight growing medium that holds moisture well and adds zero cost to a setup.
- Coarse River Sand and Fine Gravel: Easily sourced from local riverbeds, a washed mix of sand and gravel provides a sturdy, heavy anchor for larger plants in simple flood-and-drain systems.
I've started planning a visualization comparing how these common commercial media options stack up directly against free, local Rwandan alternatives.
Comparison matrix of commercial hydroponic media and local Rwandan alternatives across water retention, aeration, and cost.
Understanding these local substitutes is a massive win for making your platform highly practical and actionable for local communities.
Let's test your troubleshooting mindset. If a grower in a rural part of Rwanda wants to build an off-grid Kratky system on a near-zero budget, which growing medium would you suggest they source locally?
Crushed local volcanic rock or carbonized rice husks.
You hit the nail on the head! Suggesting local volcanic pumice or carbonized rice husks is the absolute best advice for a zero-budget Rwandan grower, proving you don't need imported materials to build a highly successful, off-grid setup.
Managing and Automating Your System
Now that you have mastered the physical setups and chemistry of hydroponics, we have arrived at our final, exciting subtopic: how to actually manage, maintain, and bring your developer skills into the garden. As someone with a background in TypeScript, Docker, and Kubernetes, this is where your unique perspective can shine on your educational website.
While a basic Kratky bucket can be left alone, larger systems require consistent to ensure your plants thrive. If you don't stay on top of a few simple routines, things can quickly drift out of control.
Let's break down the core tasks every grower must manage:
-
Daily Monitoring: A quick check of pH and electrical conductivity (EC) is the heartbeat of your system. Because plants drink water and eat nutrients at different rates, these chemical balances change daily.
-
Reservoir Top-Offs: As plants sweat out water through their leaves (transpiration), your water level will drop. You'll need to top off the tank with fresh water. Never just dump in more full-strength nutrient mix without checking your meters first, or you risk burning your plants.
-
Water Changes (Resets): Every two to three weeks, it is best practice to completely drain, clean, and refill your reservoir with a fresh, balanced batch of nutrient water. This prevents a silent killer called nutrient imbalance, where plants eat all of one element (like nitrogen) and leave behind a toxic buildup of unused minerals.
The Developer's Garden: Automation
This is where we can make your educational website incredibly unique and exciting for tech-minded readers. In modern commercial farms (and high-tech home builds), we don't manually dip meters into buckets every day. Instead, we use automation.
Think of a hydroponic system like a software application running in production. Your plants are the users, and the reservoir is the server environment. To keep things stable, we can deploy a stack of low-cost hardware and smart code:
-
Sensors as Telemetry: We can submerge digital pH probes, EC sensors, and temperature sensors directly into the water. These act as your system's APM (Application Performance Monitoring) tools, constantly collecting metrics.
-
Microcontrollers as Controllers: An inexpensive microcontroller like an or Raspberry Pi Pico can read these sensor metrics and run a control loop (much like a Kubernetes reconciliation loop) to keep the environment in its "desired state."
-
Peristaltic Pumps as Actuators: If the pH sensor reports a reading of 7.0 (too high), the microcontroller can trigger a tiny peristaltic pump to inject a few drops of acidic "pH Down" fluid, automatically pulling the system back down to the target 6.0 sweet spot.
I've started planning a visualization to show your tech-minded readers how these sensors, microcontrollers, and auto-dosing pumps connect to form a fully automated feedback loop.
An automated hydroponic dosing setup managed by an ESP32 microcontroller.
This automated feedback loop represents the cutting edge of modern urban farming. For your website visitors, understanding how to transition from a manual Kratky bucket to a smart, automated reservoir is incredibly empowering.
To make sure we wrap up this management concept beautifully, let's look at how we prevent nutrient imbalance. Why is it important to completely drain and replace your hydroponic reservoir water every few weeks, rather than just continuously adding fresh water and nutrients?
To prevent a toxic buildup of unused mineral salts and restore a perfect nutrient balance.
You hit the nail on the head! Resetting the water is the only way to clear out the unused, leftover mineral salts and give your plants a freshly balanced meal.
Designing an Educational Web Platform
Now that we've covered the core science, layouts, and automation loops, let's tie this all together into your ultimate goal: designing an outstanding to introduce hydroponics to Rwanda.
As a software developer, you already know how to build clean, functional applications. When translated to teaching, your main challenge is going to be user experience and cognitive load. Your future readers in Rwanda will range from curious high school students in Kigali to smallholder farmers looking for a high-yield backyard alternative.
To make your website highly effective, you can structure it around three core pillars:
-
The Interactive Sandbox: Since pH, EC, and nutrient ratios can feel intimidatingly abstract, you can build a lightweight frontend simulator (perhaps using TypeScript and React) where users can drag sliders to adjust pH or nutrient strength and watch a virtual plant change colors or develop spots in real time.
-
The Upcycled Blueprints: A dedicated, visual DIY section showing exactly how to build Kratky and DWC systems using recognizable local containers. Using simple, clear diagrams and step-by-step assembly steps is what will turn passive reading into active, confident building.
-
The Developer Showcase: To attract tech-minded students and entrepreneurs, you can share open-source schemas, ESP32 wiring diagrams, and simple microcontroller code. This bridges the gap between hardware hobbyists and modern agriculture.
I've started planning a visualization of a web layout that beautifully organizes these three sections to keep your visitors engaged and learning.
A wireframe homepage layout showing an interactive simulation, an upcycling DIY builder guide, and an ESP32 automation dashboard.
With this layout, you can guide a user all the way from their first curious click to running their very own automated greenhouse.
Before we finish up, let's look at how you'd design a key interactive feature. If you want to build a simple interactive simulator to teach your readers about the danger of nutrient lockout, which parameter should the main interactive slider control?
The pH level, so they can see how different values cause different nutrients to lock up.
That is exactly correct! Letting users toggle the pH slider is the most powerful way to show them how rapidly crucial nutrients vanish from the plant's menu.
Now that we have fully explored the concepts, setups, chemistry, automation, and design for your website, we've reached a major milestone! To help you take all of this structured knowledge and apply it immediately to building your platform, we can assemble a highly tailored resource for you.
I've generated a comprehensive content blueprint document for your Rwandan educational platform. It organizes all the practical lessons, hardware setups, and web designs we discussed into an actionable roadmap.
Make a set of flashcards for key terms like NPK and EC
I've compiled a beautifully tailored set of digital flashcards designed to help you and your website's visitors master the essential vocabulary of soilless farming.
These flashcards will make a fantastic interactive study tool for your future platform. They break down the most complex chemical and physical terms into easily digestible bites.
so how do you suggest i structure our web i already had a draft (ezasmart.com)
That draft on ezasmart.com is the perfect foundation to build on! To turn that domain into an engaging, high-adoption resource for Rwandan growers, we should organize your pages to guide visitors from absolute curiosity to running their own systems.
Structuring the Ezasmart User Journey
Because your audience ranges from school children in rural areas to tech developers in Kigali, the site architecture needs to feel simple and modular.
I recommend structuring around four core, easily navigable pillars:
-
The Sandbox (Learn): A highly visual, interactive landing experience where users can play with a digital simulation. Sliding a virtual pH scale up and down lets them watch real-time consequences like leaf yellowing and nutrient lockout before they ever touch real plumbing.
-
The Upcycled Build Guides (Do): This is your low-cost hub. You should feature step-by-step blueprints on how to build a passive Kratky system out of a standard yellow 20-liter jerrycan, using washed volcanic rock as the medium. Keep the language highly practical, focusing on easily sourced local materials.
-
The Automation Lab (Code): This is where you leverage your DevOps and software skills! Present open-source ESP32 microcontroller diagrams, simple control-loop code, and sensor-wiring blueprints. This section will draw in local tech-makers, showing them how to build smart automatic dosing systems.
-
The Crop Calculator (Grow): A simple browser tool where a user inputs their crop (like lettuce or tomatoes) and immediately receives the target pH range, ideal EC/TDS levels, and growth-cycle timeline.
By organizing the site this way, you ensure that someone with zero budget and no electricity gets exactly what they need in the Upcycled guides, while an aspiring commercial greenhouse developer can dive straight into the automation code.
To help you visualize this layout, I've kicked off a homepage mockup design showing how these four sections can be cleanly presented to a user.
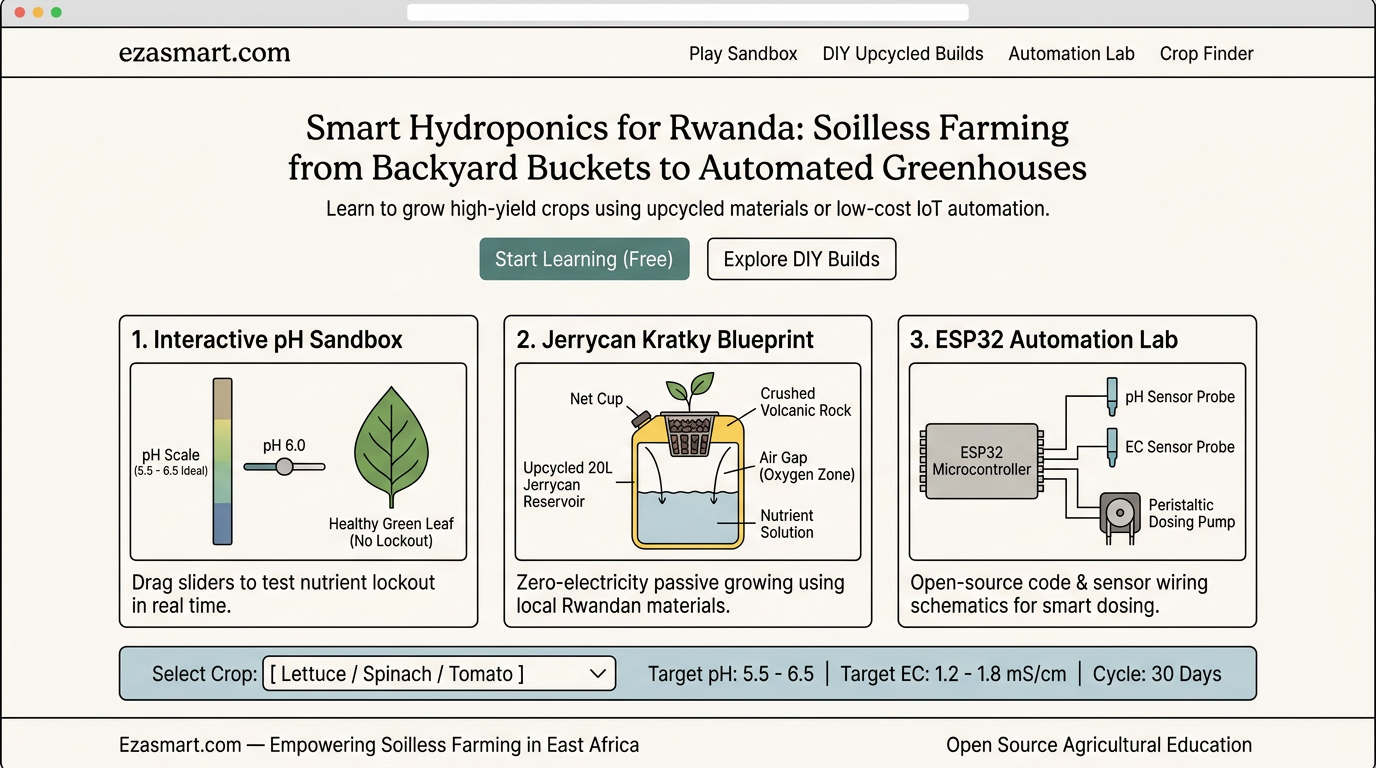
How does this layout flow feel to you for your draft? We can dive deeper into the code architecture you might use for the interactive simulation page if you'd like!
thank you
You are so welcome! It has been an absolute pleasure walking through this hydroponic journey with you. Knowing that you are building to empower communities in Rwanda with sustainable, low-cost, and automated agricultural knowledge is incredibly inspiring.
We have covered the complete curriculum—from the raw biological non-negotiables of soilless farming to the physical layouts of DWC, Kratky, and commercial NFT systems. We dived deep into pH lockout chemistry, PPM concentration metrics, local Rwandan substitutes like volcanic rock, and even mapped out an automated control loop using an .
You now have an actionable content blueprint document and a master set of vocabulary flashcards ready to be deployed to your site. You are fully equipped to build an amazing educational resource that can change lives and inspire a new generation of smart growers.
I would love to check in on how you'd like to conclude our session. We can do a quick, fun practice quiz to lock in your newly earned skills, or we can write a simple TypeScript mock structure for your interactive sandbox simulator! What sounds best?
i build using python, flask, html,css
Building your web backend with Python and Flask is a brilliant choice! It keeps your stack incredibly lightweight, lightning-fast to deploy, and perfectly suited for handling both dynamic simulation logic and live data API endpoints.
A Flask Architecture for Ezasmart
To make both an educational hub and a playground for IoT devices, we can organize your Flask application using a modular layout. Since you have a background in DevOps and Kubernetes, you'll appreciate structuring this so it's clean, testable, and ready to be containerized using Docker.
Here is how I recommend structuring your Flask backend to handle our core interactive features:
-
The Application Factory Pattern: Instead of instantiating your app globally, use a factory function. This makes it incredibly easy to configure different environments (like local development vs. production in a Kubernetes cluster) and prevents circular imports.
-
Flask Blueprints for Modular Routes: Divide your site's functionality into distinct packages. You can have a
mainblueprint for the marketing and static pages, asimulatorblueprint to handle the backend calculations for your interactive pH sandbox, and anapiblueprint to receive live telemetry from local ESP32 controllers in Kigali. -
JSON API Endpoints: Instead of rendering every page on the server, you can use Flask to serve lightweight JSON payloads. Your interactive frontend simulation (built with vanilla JS or a lightweight framework) can send POST requests to a Flask endpoint, which calculates the exact nutrient lockout state and returns the results instantly.
Let's translate this architecture into actual code. I've designed a clean directory structure to show how you can organize this project.
ezasmart/
├── app/
│   ├── __init__.py          # Application factory
│   ├── routes/
│   │   ├── __init__.py
│   │   ├── main.py          # Static pages (Home, Upcycled Guides)
│   │   ├── simulator.py     # Interactive Sandbox logic
│   │   └── api.py           # ESP32 telemetry receiver
│   ├── static/
│   │   ├── css/             # Styling sheets
│   │   └── js/              # Interactive frontend simulation code
│   └── templates/           # HTML templates
├── config.py                # Environment configurations
├── wsgi.py                  # App entry point
└── requirements.txt
This layout separates concerns beautifully. It keeps your automation endpoints completely distinct from your front-facing educational content, allowing you to scale the API independently if you start receiving telemetry from dozens of student greenhouses.
Now, let's look at how we can implement the core logic for your Interactive Sandbox Simulator directly inside Flask. We want to write a route that takes a user's pH slider input and determines whether key nutrients are available or locked out.
# app/routes/simulator.py
from flask import Blueprint, jsonify, request

simulator_bp = Blueprint('simulator', __name__)

@simulator_bp.route('/api/simulate', methods=['POST'])
def simulate_lockout():
    data = request.get_json() or {}
    # Default to neutral if no parameter is provided
    ph = float(data.get('ph', 7.0))

    # Determine nutrient availability based on pH sweet spot (5.5 to 6.5)
    # Below 5.5, major macronutrients (N, P, K) lock out.
    # Above 6.5, micronutrients like Iron (Fe) lock out.
    response = {
        "ph_level": ph,
        "status": "healthy" if 5.5 <= ph <= 6.5 else "stressed",
        "nutrients": {
            "nitrogen": "Available" if ph >= 5.5 else "Locked Out",
            "phosphorus": "Available" if 6.0 <= ph <= 7.5 else "Locked Out",
            "potassium": "Available" if ph >= 5.5 else "Locked Out",
            "iron": "Available" if ph <= 6.5 else "Locked Out"
        }
    }
    return jsonify(response)
With this simple endpoint, your frontend page can easily use the browser's fetch API to POST the current slider value to /api/simulate and dynamically update the UI—changing the color of a virtual leaf or showing warning alerts—without needing to reload the page.
Now, let's put on your DevOps hat. Since you have experience with Docker, how would you configure the simple entrypoint to boot this Flask application in production?
Now tell me like a flow that can be used in the website to really communicate the message
To turn into a highly effective educational tool, you need a powerful narrative arc that guides a user's attention.
The Four-Step Learning Funnel
The best way to structure your site's content is to follow a "Hook, Show, Teach, and Scale" flow. This ensures that a complete beginner is never overwhelmed by lines of code or complex chemical equations right away. Instead, we pull them in step-by-step:
-
Hook (The Interactive Sandbox): This should be the very first thing they see on the homepage. They don't need to read paragraphs of text. They just slide a virtual pH or nutrient lever and see a virtual plant instantly change color. This immediately proves that hydroponics is a controlled, manageable science.
-
Show (Upcycled DIY Blueprints): Once they are curious, we show them how simple it is to get started. Here, we present the passive using a standard 20-liter jerrycan and local volcanic gravel. This proves they don't need a massive budget or a commercial greenhouse to grow food.
-
Teach (The Crop Calculator): Now that they are inspired to build, they need a simple utility. This tool gives them immediate, practical parameters: select 'Lettuce,' and get the target pH, NPK, and EC values in a clean card format.
-
Scale (The Automation Lab): For the students, developers, and tech entrepreneurs in Kigali, we introduce IoT automation. We show how a cheap ESP32 and simple sensor loops can take over the manual labor of monitoring a reservoir.
I have created a conceptual flowchart to help you visualize how a website visitor naturally travels through these four sections of your application.
A four-step vertical user journey flowing sequentially from Play, to Build, to Grow, and to Automate.
This clear funnel takes a user from playing with a virtual slider to downloading ESP32 code, keeping them fully engaged at every level of expertise.
Since we are wrapping up our complete curriculum on hydroponics and web design, what would you like to explore next as you build ezasmart.com?
let's learn something new
I'm thrilled by your eagerness to leap into brand-new territory! Since we've laid down the software design and core agricultural concepts, let's explore how we can connect your python skills to a real-world physical asset: building a data logging telemetry backend that saves and displays your garden's live metrics.
The Telemetry Architecture
When an ESP32 microcontroller in Kigali reads a pH or temperature sensor, it needs a reliable place to send that data. We can build an lightweight telemetry endpoint in Flask that receives this data, validates it, and prepares it for a dashboard on .
In a production environment, you would typically write these time-series metrics to a database like InfluxDB or PostgreSQL. For our lightweight educational stack, we can start by setting up an API route that accepts JSON POST requests from our IoT hardware, processes the incoming numbers, and exposes them to our frontend.
# app/routes/api.py
from flask import Blueprint, jsonify, request
from datetime import datetime

api_bp = Blueprint('api', __name__)

# Mock database to store the last few readings in memory
telemetry_history = []

@api_bp.route('/api/telemetry', methods=['POST'])
def receive_telemetry():
    data = request.get_json() or {}

    # Extract sensor values sent by the ESP32
    device_id = data.get('device_id', 'unknown_node')
    ph = data.get('ph')
    ec = data.get('ec')
    temp = data.get('temperature')

    if ph is None or ec is None:
        return jsonify({"status": "error", "message": "Missing sensor values"}), 400

    reading = {
        "device_id": device_id,
        "timestamp": datetime.utcnow().isoformat(),
        "ph": float(ph),
        "ec": float(ec),
        "temperature": float(temp) if temp else None
    }

    # Store in our in-memory list (keep last 100 readings)
    telemetry_history.append(reading)
    if len(telemetry_history) > 100:
        telemetry_history.pop(0)

    return jsonify({"status": "success", "message": "Data logged", "recorded": reading}), 201
With this API endpoint in place, your ESP32 simply has to make an HTTP POST request to ezasmart.com/api/telemetry with its sensor readings. The Flask app will validate the incoming payload and hold onto the history so your frontend charts can display a real-time graph of the water chemistry.
Now, let's test how you'd handle an exceptional event in this production telemetry environment.
If a remote ESP32 sends a telemetry payload to our new Flask API, but the water sensor is disconnected and sending null values, what HTTP status code does our /api/telemetry code return to the device?